Custom develop Apps/Instances
We call custom develop apps those applications that a user develops to meet their needs; these can be developed in C, Python, Javascript... among others.
How to build an application
In this section we'll look at how to create an application in the first place.
An overview of what we're going to do:
- Create a sample application locally on our computer
- Compress the application
- Install the application using the Syrus 4 Management Tool Apps Manager
- Create an instance of the application and run it on the Syrus 4
- View the logs in the Syrus 4
To get started you'll need to create a package.json file, similar to how you would for a JS/Node project, as well as an init.sh file.
package.json
Assuming we create an application called MyApp from scratch locally on our computer.
$ mkdir MyApp
$ cd MyApp/
We can use npm init to create the package.json file with the default values.
$ npm init

package name: (myapp)
version: (1.0.0)
description: My first app
entry point: (index.js)
test command:
git repository:
keywords: syrus4
author: DCT
license: (ISC)
About to write to /Projects/dct/apps/MyApp/package.json:

{
  "name": "myapp",
  "version": "1.0.0",
  "description": "My first app",
  "main": "index.js",
  "scripts": {
	"test": "echo \"Error: no test specified\" && exit 1"
  },
  "keywords": [
	"syrus4"
  ],
  "author": "[email protected]",
  "license": "ISC"
}

Is this OK? (yes) yes
A valid package.json for Syrus 4 must contain the "name", "version", "description", "main", and "minApexVersion" fields.
| required | field | Description | |
|---|---|---|---|
| ✅ | name | Application name, cannot be more than 50 characters | |
| ✅ | version | Application version | |
| No | description | Description that appears when you install the application on Syrus 4 UI | |
| ✅ | main | Application's main script | |
| No | icon | Path to an image used as the main icon for the application | https://images.site.com/icon.png |
| ✅ | minApexVersion | Minimum version of Apex OS that's required to run the app | 20.25.00 |
| No | repository | Path to app repo | https://www.github.com/path/to/app/ |
Example package.json file:
{
	"name": "myapp",
	"version": "1.0.0",
	"description": "My first app",
	"main": "index.js",
	"icon": "https://image.flaticon.com/icons/svg/2948/2948003.svg",
	"minApexVersion": "20.25.00",
	"repository": "https://www.github.com/path/to/app/",
	"scripts": {
		"test": "echo \"Error: no test specified\" && exit 1"
	},
	"keywords": [
		"syrus4"
	],
	"author": "[email protected]",
	"license": "ISC",
	"dependencies": {}
}
Please note that thename of the application cannot be longer than 50 characters
index.js
Once you have your package.json specified, you can create your main file index.js and start adding packages and consuming the API.
An example using request
$ npm install requestCreate a new file index.js and use this sample code
const request = require("request");
var options = {
	'method': 'GET',
	'url': 'http://localhost:8080/gps/position'
};
request(options, function (error, response) {
	if (error) throw new Error(error);
	payload = JSON.parse(response.body);
	console.log(payload)
});
init.sh
The init.sh file is a script which indicates the starting point for your application. It's executed anytime that syrus-apps-manager starts your application. Make sure this file is executable (chmod +x init.sh):
Example init.sh file:
node index.jsZipping
At this point in your directory you should have
MyApp/
├── index.js
├── init.sh
├── node_modules/
├── package-lock.json
└── package.json
You can now zip your files into a folder and add it using the Syrus 4 Application Manager.
Zipping ContentsMake sure that you zip the files into a folder instead of zipping the folder
$ zipinfo MyBrokenApp.zip| grep -v "/." Archive: MyBrokenApp.zip Zip file size: 1568567 bytes, number of entries: 1408 drwx------ 2.0 unx 0 bx stor 23-Nov-08 23:42 MyBrokenApp/ 1408 files, 4106784 bytes uncompressed, 1218827 bytes compressed: 70.3%$ zipinfo MyApp | grep -v "/." Archive: MyApp.zip Zip file size: 1308204 bytes, number of entries: 705 -rw-r--r-- 2.0 unx 11916 bX defN 21-Apr-21 09:50 package-lock.json -rw-r--r-- 2.0 unx 444 bX defN 21-Apr-21 09:50 package.json -rw-r--r-- 2.0 unx 265 bX defN 21-Apr-21 09:25 index.js -rwxr-xr-x 2.0 unx 14 bX defN 21-Apr-21 09:26 init.sh drwxr-xr-x 2.0 unx 0 bx stor 21-Apr-21 09:50 node_modules/ 705 files, 3983889 bytes uncompressed, 1150036 bytes compressed: 71.1%
Zip tool in MacIf you are using Mac you may want to use the
ziptool to manually remove unnecessary files from the zipped results# view zip info zipinfo MyApp.zip # delete a single file from zip zip -d MyApp.zip file_to_delete.txt # remove all files under __MACOSX* directory zip -d MyApp.zip '__MACOSX*'
How to install an Application
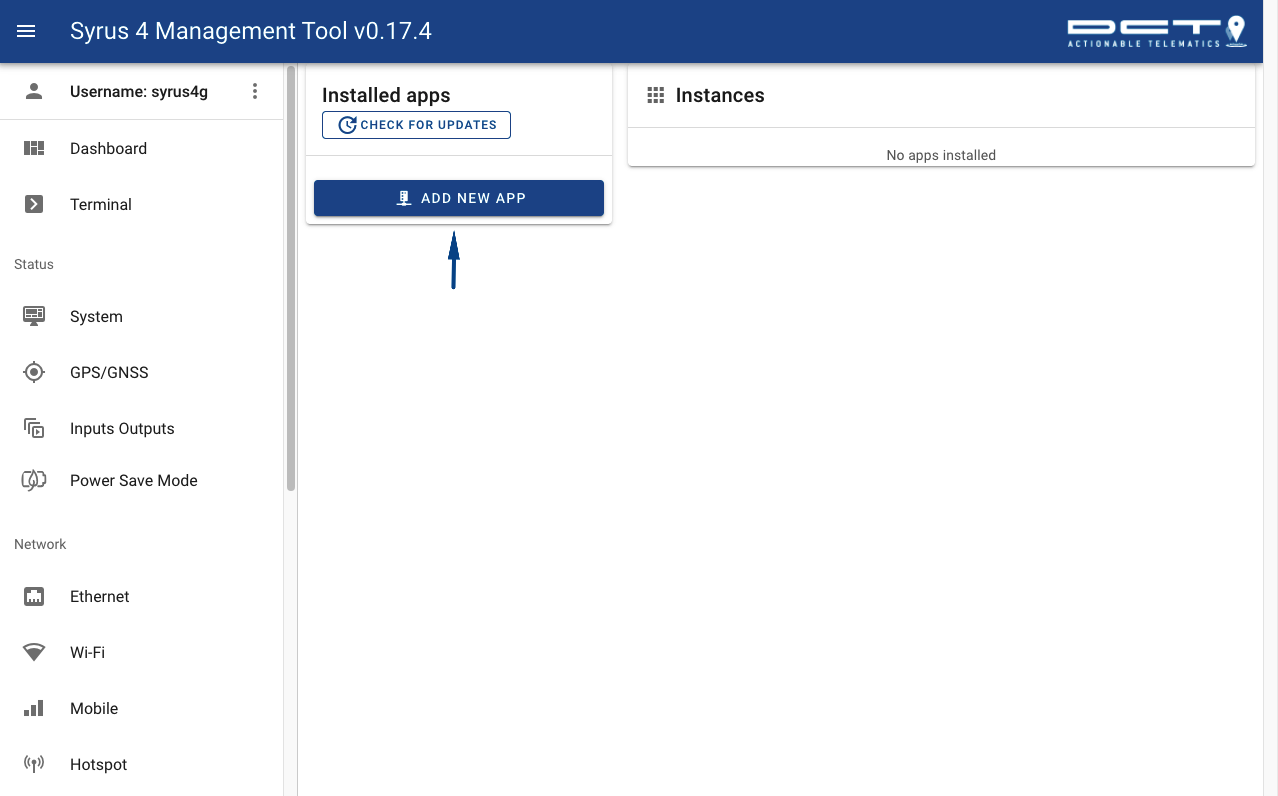
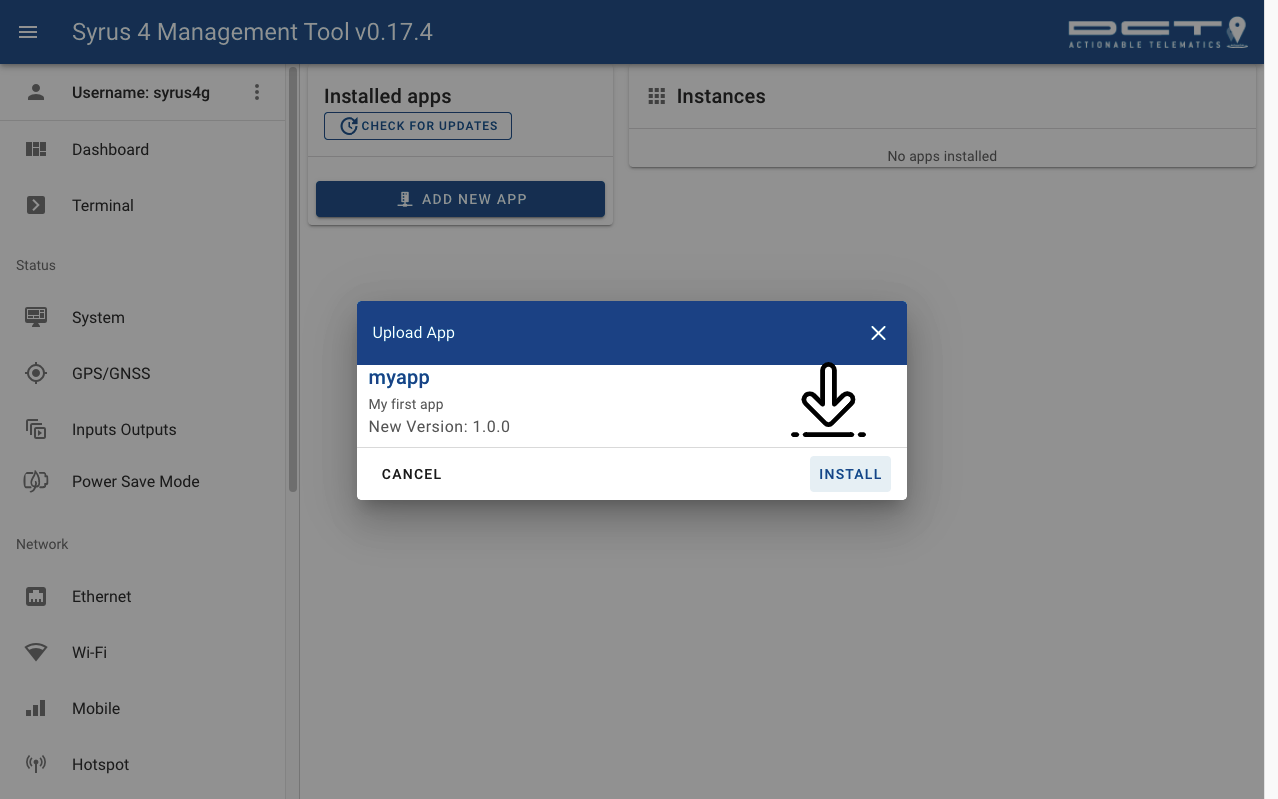
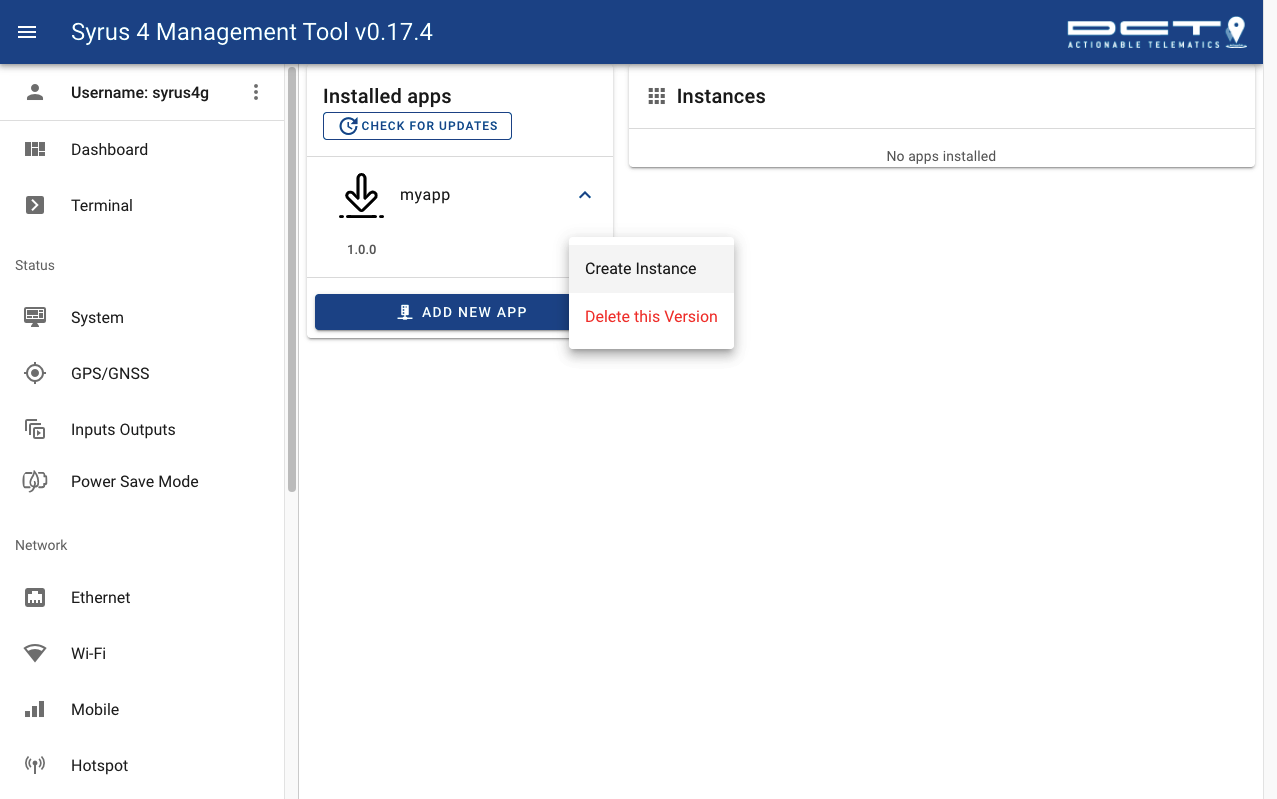
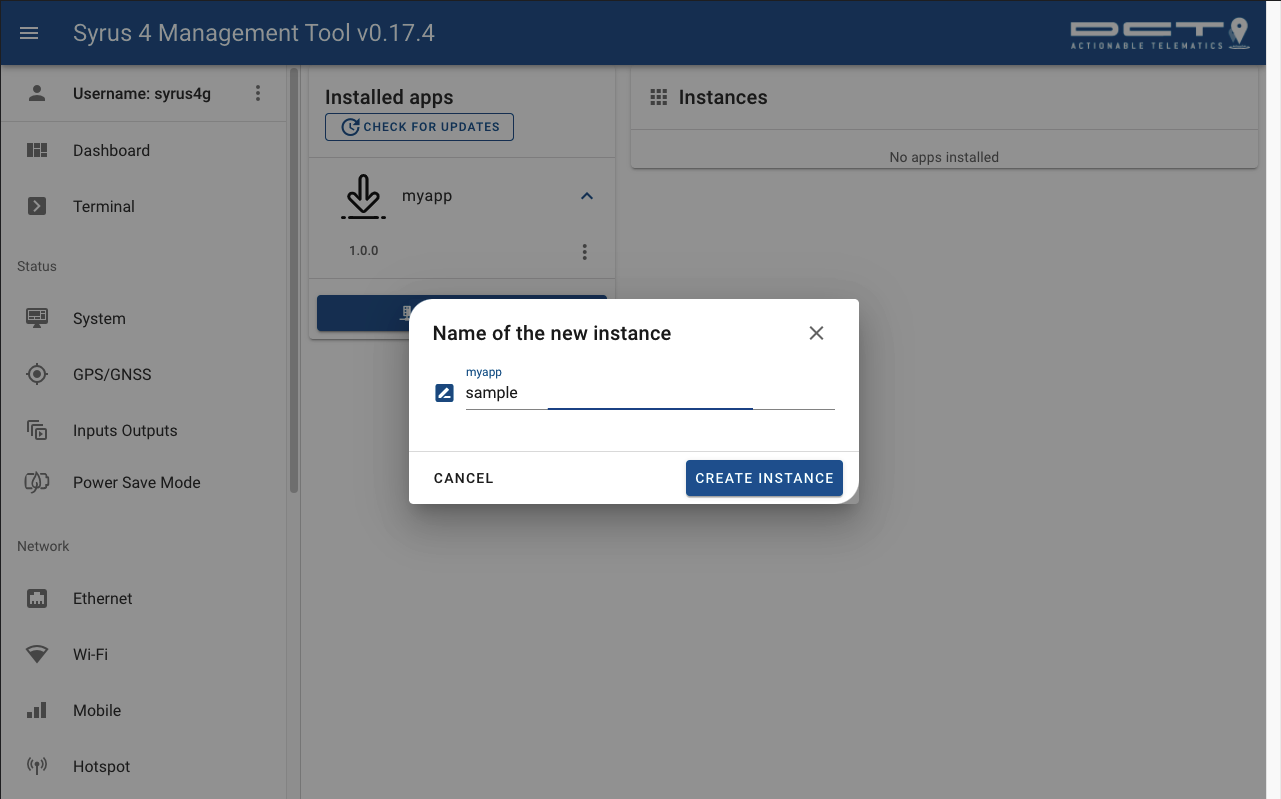
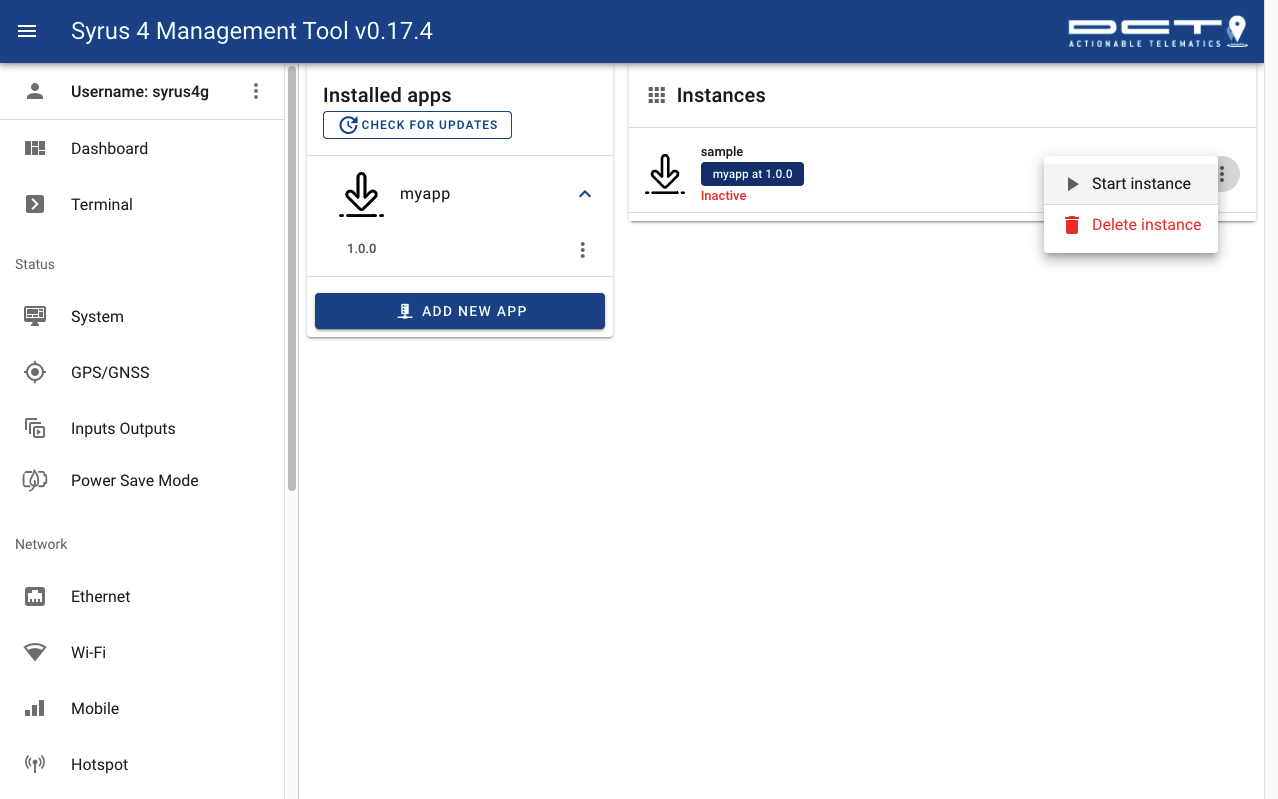
Once you have a .zip file with your application, you can install it via Management Tool like this:
-
Go to application section and upload your application.
-
Install your application.
-
Click on your app and create an instance.
-
Start your instance.
-
Once you click start you can check the logs:
syrus4g@syrus-867698040012345:$ cat /data/logs/myapplication-out.log{
coords: {
latitude: 25.783675,
longitude: -80.293561,
speed: 0.046388926000000004,
accuracy: 2.9499999999999997,
altitude: 12.207,
bearing: 346.74,
altitudeAccuracy: 4.95
},
timestamp: 1619013443,
extras: {
hdop: 0.59,
vdop: 0.99,
pdop: 1.16,
fix: 3,
satsActive: 18,
criteria: 'signal'
}
}Click here to view the project on Github and download the example.
Versioning
You can have different versions of your application which allow users to view Your application can manage different
Automatic versioning can be achieved in two steps.
- specify in the package.json a key called
repositorywith a link to your application's repo.
"repository": "https://www.github.com/path/to/app/",- In the repository create a file with the name:
version.json, with the contents being a key calledstableand the version is stable.
From there on, the Syrus 4 UI App Manager will display a button for users to click to update to that version, if it detects a newer version than the current one installed on the Syrus, then it will show button with an available upgrade.
{
	"stable": "1.22.0"
}
User Input / JSON Schema
The schema is an optional object that you can include in the package.json file which will produce forms for your application, allowing you to automatically expose input fields and information via a graphical UI for users to input rather than having them edit any json configuration file.
An example schema is:
{
	...
	"schema": {
		"type": "object",
		"required": [
			"api_token"
		],
		"properties": {
			"account": {
				"label": "User Account Name",
				"description": "Name for the account used in application",
				"type": "string",
				"minLength": 3,
				"maxLength": 50
			},
			"api_token": {
				"label": "Token",
				"description": "Application token",
				"type": "string",
				"fullWidth": true
			}
		}
	}
}
For more information visit JSON Schema Format
Updated 3 months ago
