Syrus Cloud
Remote management for Syrus devices in online portal
Syrus Cloud is a remote management software that allows you to perform remote actions to the device as well as check its diagnostics. Login
Download the Syrus Cloud Marketing Brochure here.
If it's your first time accessing Syrus Cloud you can click on SIGN UP button and follow the steps to access it.
Once logged into Syrus Cloud you'll see on the left-hand side the navigation into the different sections, depending on the level of access you have you may see the management section.
All Syrus 4G devices are set up to report to Syrus Cloud periodically, as a sort of 'health-check' to make sure the units are reporting properly. The default time is every 8 hours but that can be changed via the apx-watcher tool.
Under normal circumstances, the device will connect periodically at the time indicated by the apx-watcher tool, however, in the event of something more critical or generally important the device will connect immediately.
Some important events include:
- Critical battery level
- Network change (change from WiFi to LTE for example)
- Power save mode activated
- Device out of memory
Users and Permissions
There are 2 primary users of Syrus Cloud:
- Admins: also known as an organization's owner or manager
- Users: which are users within an organization that belong to one or many groups
Admins:
- All the devices within their organization
- Create and edit applications, profiles, groups, users, and devices
- Install applications, upgrade firmwares, send advanced commands
- Manage billing and unlocking devices
Users:
- Are limited to what devices they have access to see, assigned by the group the user belongs to
- Can see a summary of the diagnostic messages, commands sent, dashboard, and videos
- Can send basic commands
The menu comparison between both users are broken down as follow:

Dashboard
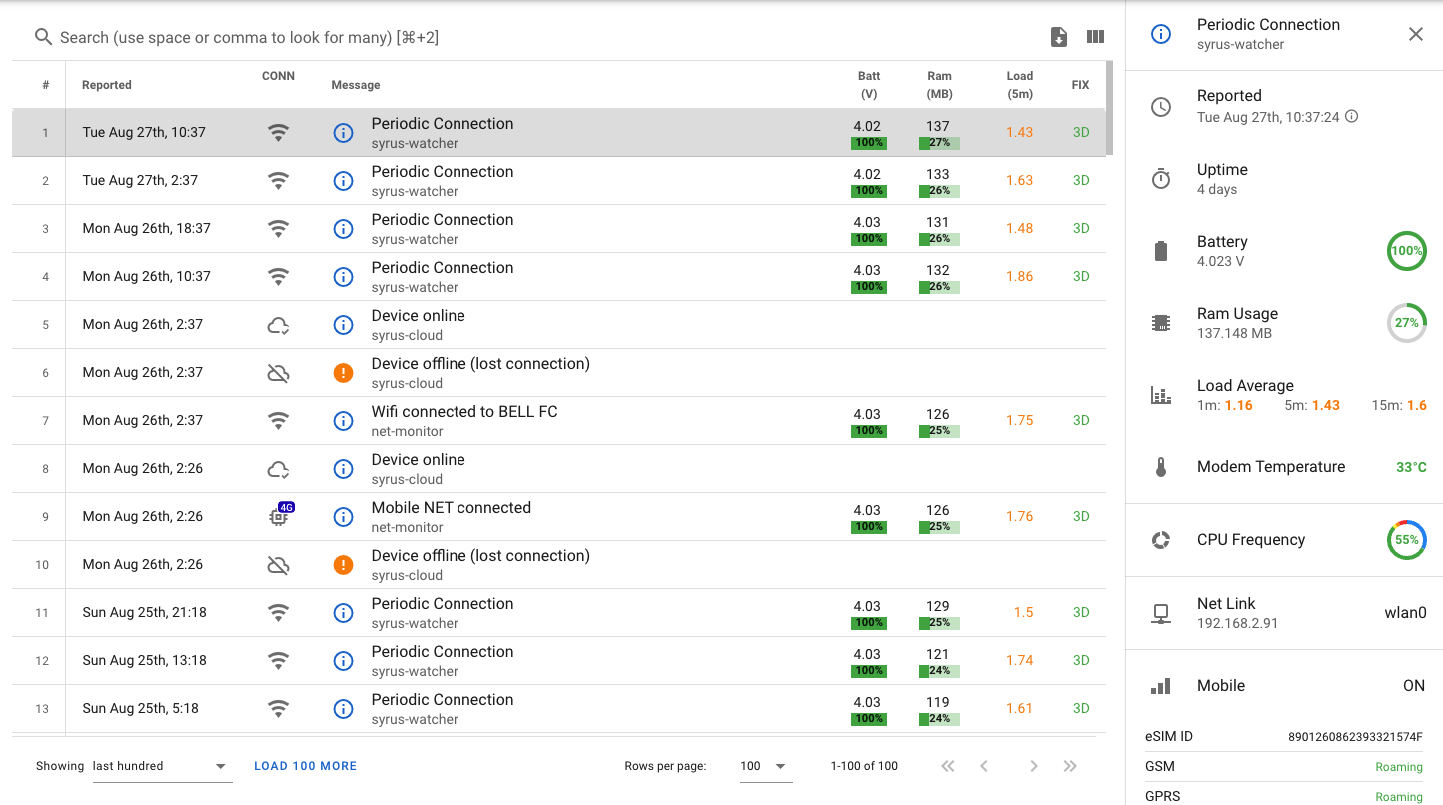
Summary
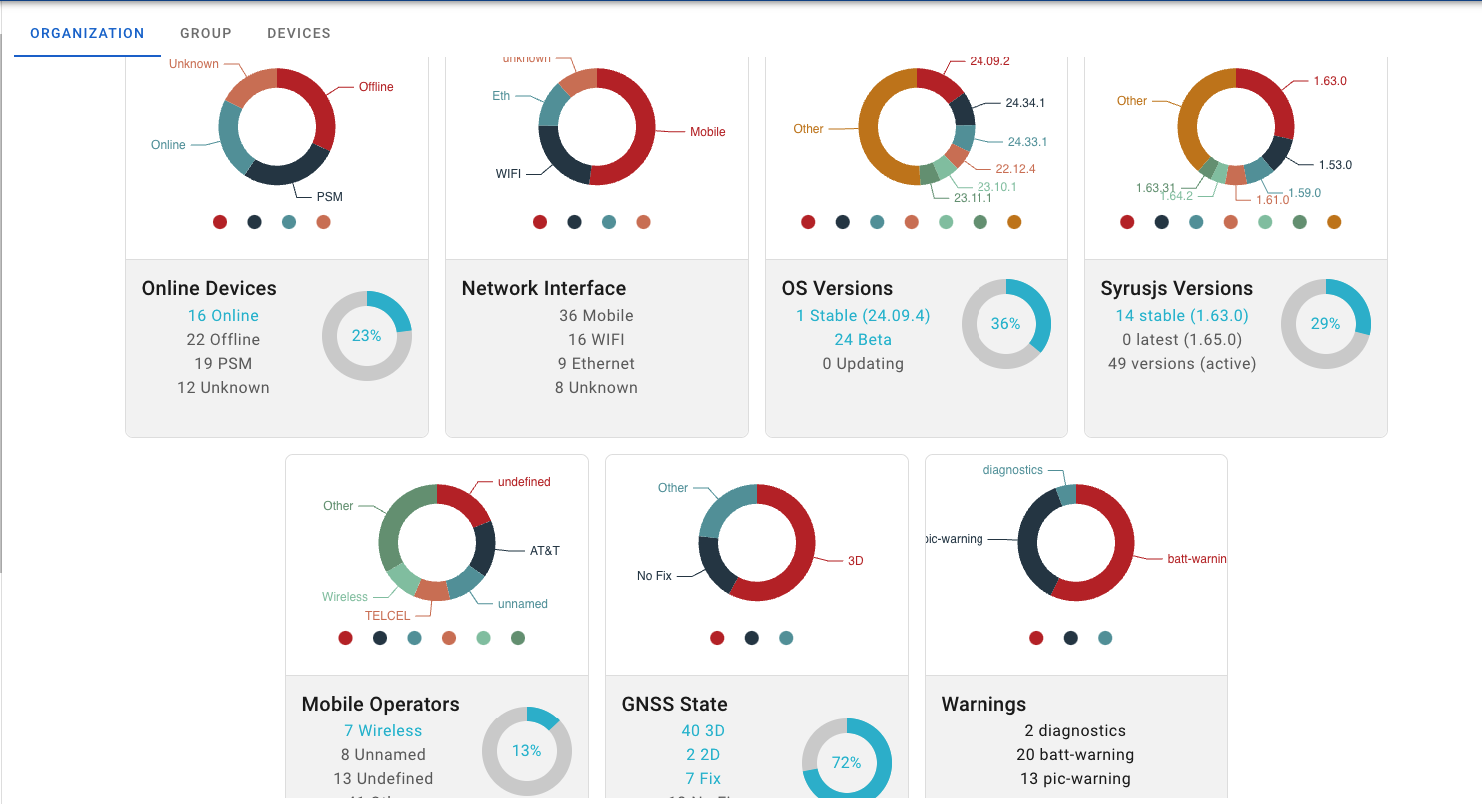
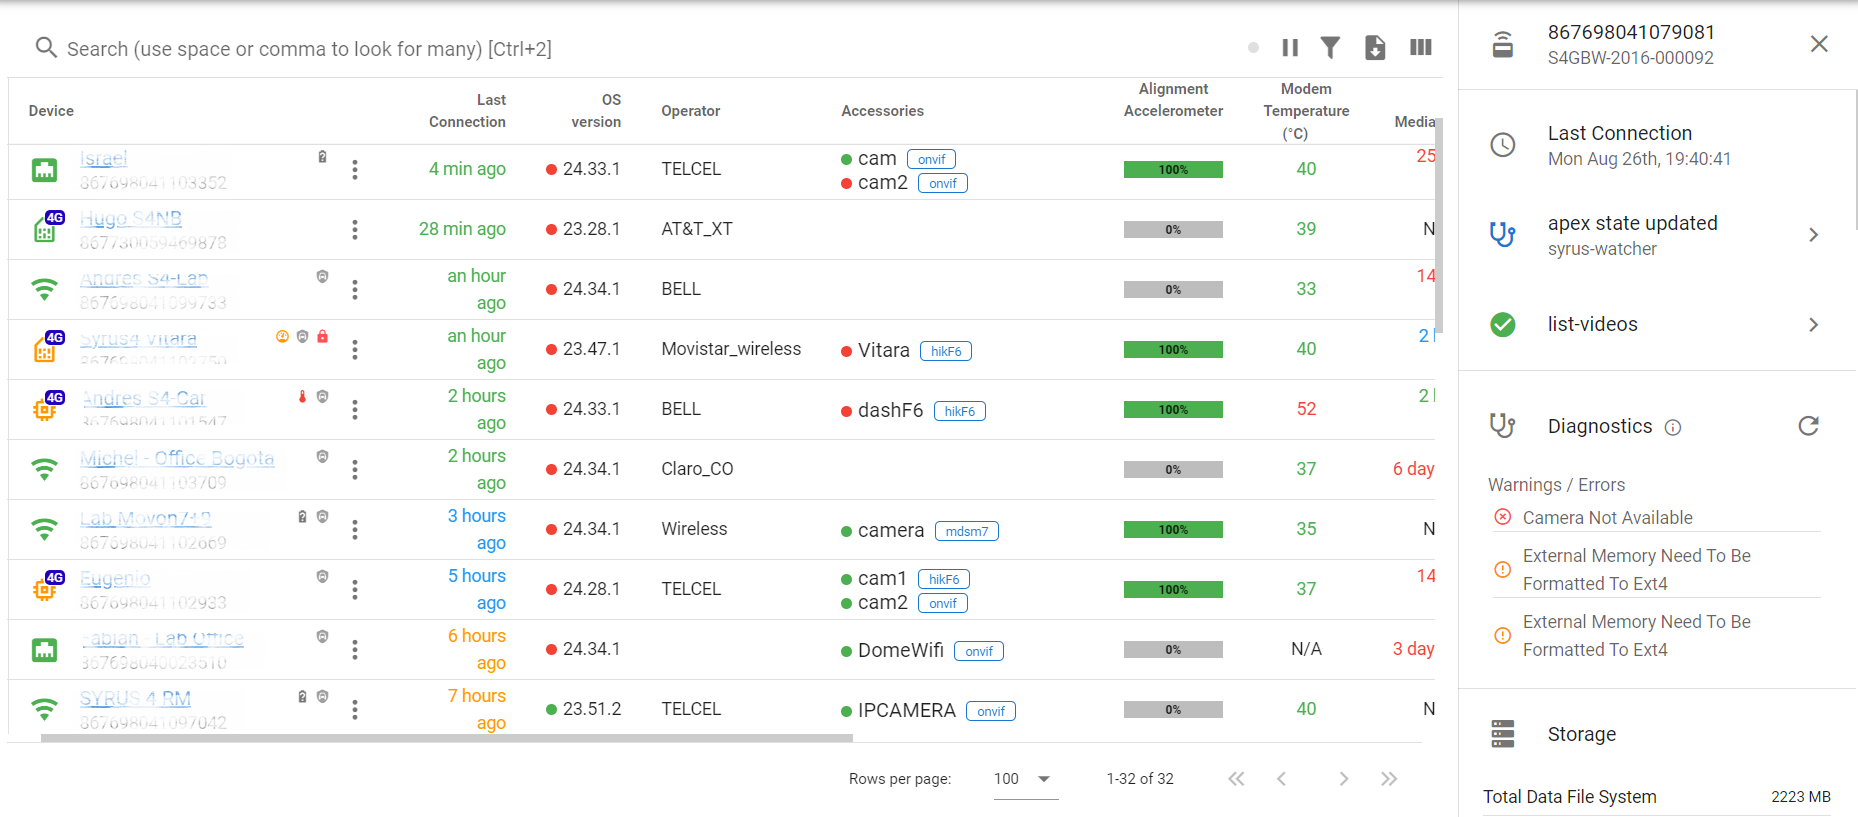
The summary provides general information on each device that's connected. From the summary, you can see information such as Last Connection, OS Version, Operator, Accessories, Alignment Accelerometer, Modem Temperature, Last Media Event, Cipia Status, Cipia Version, Cipia Ago, Cipia Configuration, Storage and Warranty.
Methods of connection:
- Ethernet
- Wireless
- Mobile normal SIM Card
- Mobile embedded SIM Card
The method connection will be green when the device is Online, the method of connection will be yellow/orange when the device is Offlineand in PSM mode and the method connection will be red when the device is `Offline
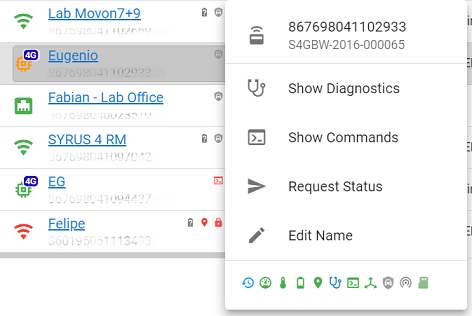
From the list you can click on the menu on the right of the device to access the following options:
- Show Diagnostics: navigates to the Diagnostics section
- Show Commands: navigates to the Commands section to send commands
- Request Status: asks the device for an update to it's state
- Edit Name: allows you to name the device for easier identification
- The options listed at the bottom navigate to the right-hand side bar device info, also when click on each device this info will be shown
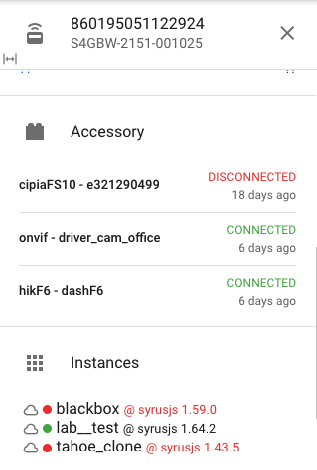
You can view information about the mounted external memories, including a uSD card and/or a hard drive via USB.

You can also view information on the sidebar from Fatigue Sensors such as the Cipia FS-10 and other accessories
Diagnostics
The diagnostics section provides information on the last messages reported by the device. In case the device has communication issues you can generally check this section to get an idea of the reason why. Here you would see information such as battery critically low.
From the list, you can click on the menu on the right of the device to access the diagnostic page of each device, commands page, request a status, and edit the device name.
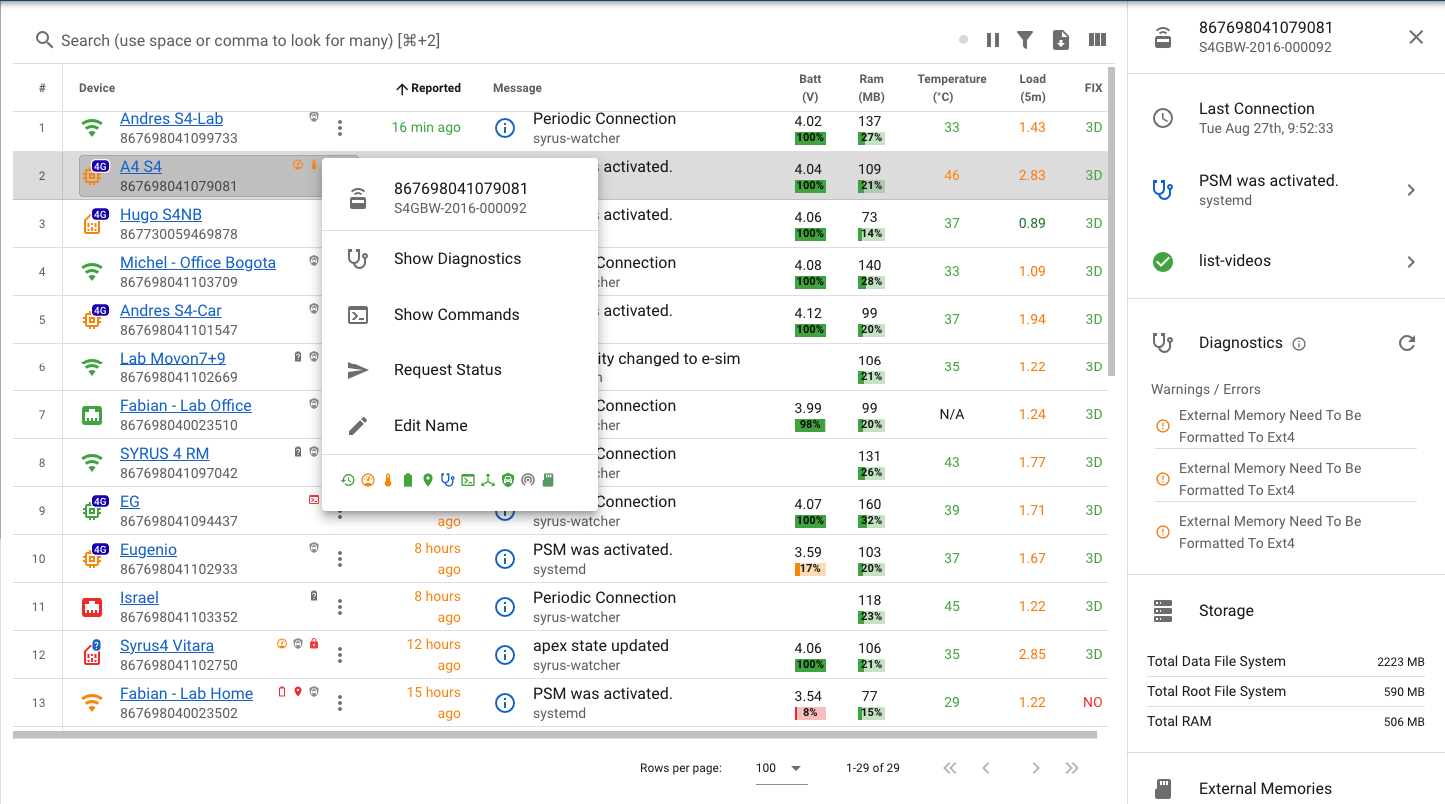
The option "Show Diagnostics" navigates to the device diagnostics list.
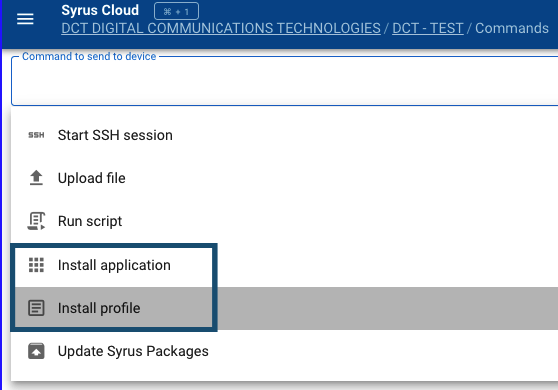
Commands
The Commands section will give you access to send and receive commands to one or multiple devices.
Linux or apx- commands are accepted.


Clicking the input reveals multiple options to upload, download, even run your own shell/bash scripts scripts.

External Memory Formatting
When a client selects Format External microSD memory in Syrus Cloud, we run a simple shell command to safely format the SD or USB device. The exact invocation depends on the device’s Apex firmware version.
Supported Apex Versions
- Apex< 22.26.1
Formats immediately (unit must be unmounted first):
#!/bin/bash
ftype=sd   # or usb
sudo apx-ext-memory format --type="$ftype" -y- Apex ≥ 22.26.1
Because the OS can’t unmount a live device, we schedule the format at reboot:
# !/bin/bash
ftype=sd   # or usb
sudo apx-ext-memory format --type="$ftype" -y -c
Flags
--type= <sd|usb> Selects which external device to format.
-y Yes, force the format without prompting.
-c(v22.26.1+ only) Continue on reboot—reboots the device to release the mount point, then formats at startup.
What Happens Under the Hood
- Select device (sd or usb) based on mount location.
- Verify mount to ensure the device is present.
- If -c is used, the system reboots, releasing the mount so formatting can proceed.
- The -y flag forces the format operation without user interaction.
- Once formatting completes on reboot, the OS automatically re-mounts the device.
Videos
The videos section allows you to see video playback history from your devices.
To get started make sure you follow the connect guide on how to connect a video camera to the Syrus.
Once you have the camera profile synchronized with your camera, and the camera is connected you can press on the Videos button to retrieve the videos.

Device video list
You can filter by day all videos stored in memory if the device did not upload diagnostic messages with the video clip status.
In the calendar, the disabled dates (gray) are days with videos already shown in the table and the
active days (bold) are the available days that can be requested because there is no information in the table about that day. The command can’t be sent if the device is offline.

Accelerometer
The accelerometer section shows you a summary of all the devices and their accelerometer calibration state.
To start the device calibration you can click on the name of a device and a dialog will popup with a button that says "START CALIBRATION".
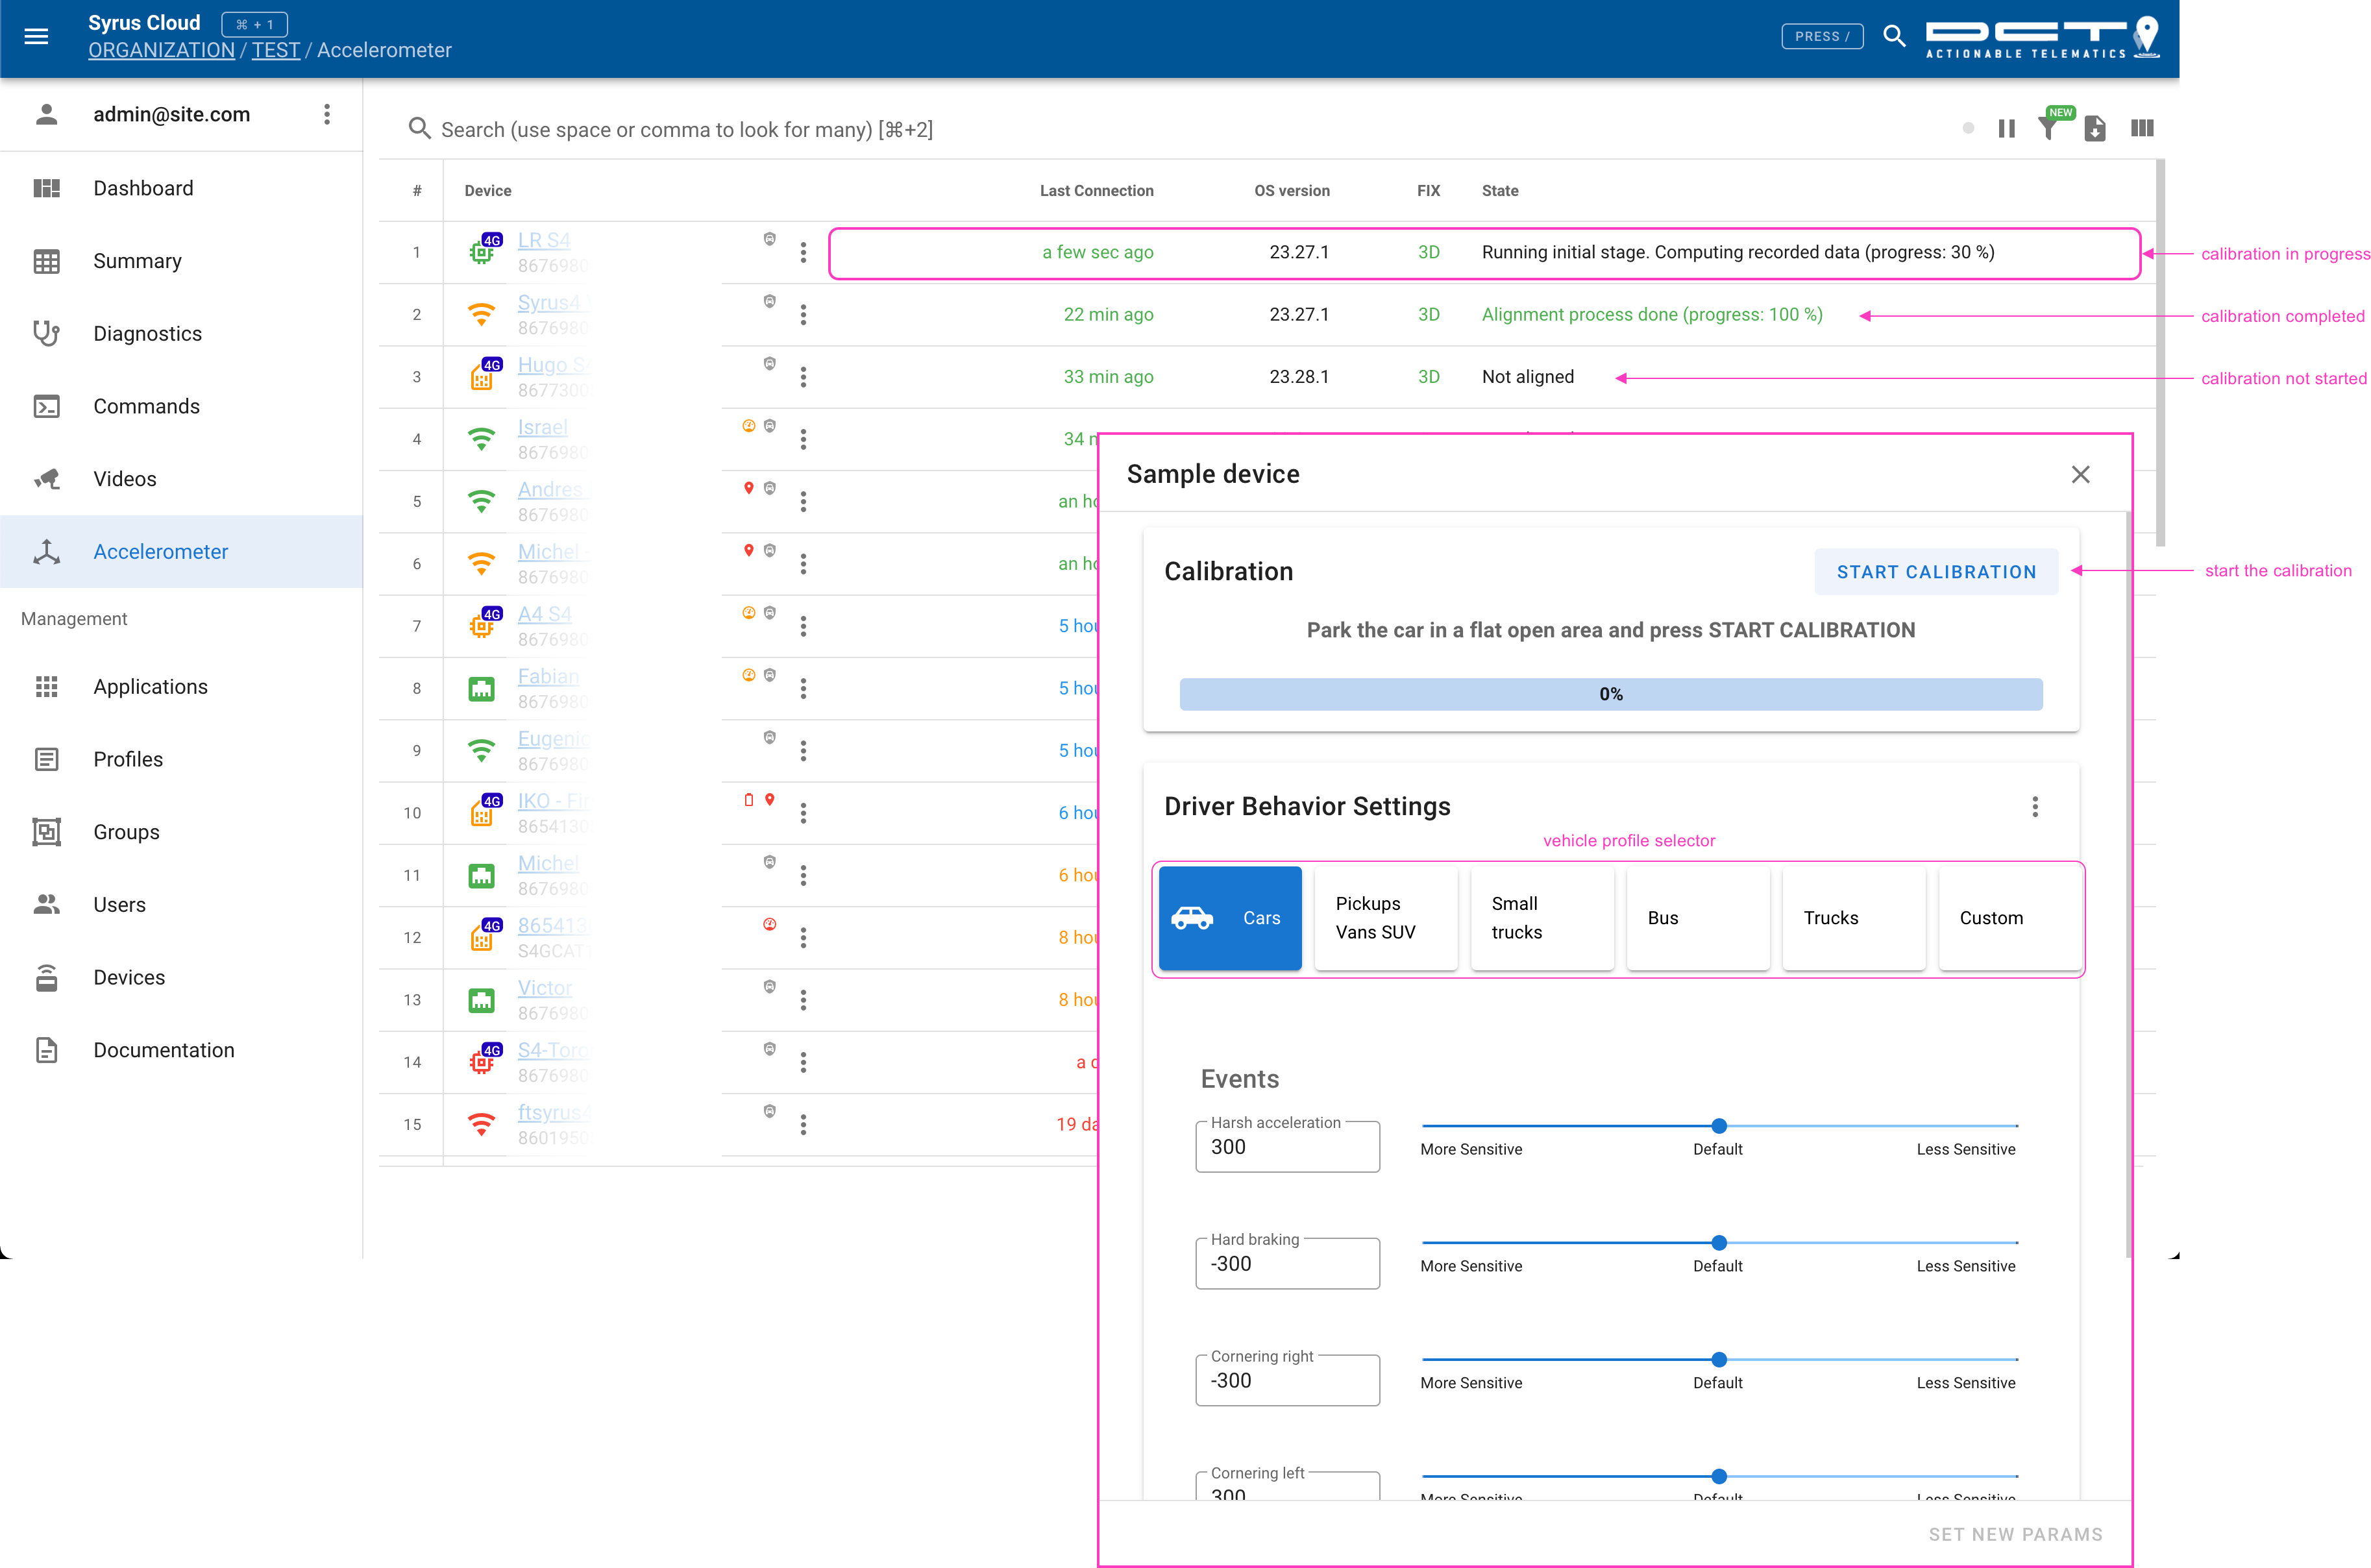
Once the calibration has been started you can follow the instructions here. # Management
Applications

Applications allows you to manage any application for your Syrus 4 devices.
This section has 2 main tabs:
- OVERVIEW - list of devices and their application status.
- APPLICATIONS - allows you to create and manage applications.
Overview
The main icons are:

App is managed by Syrus Cloud

App is not managed by Syrus Cloud
The texts
| Legend | Description |
|---|---|
| 🟢 | app is running |
| 🔴 | app is stopped |
| 🟡 | app is activating (indicates an error initializing) |
| red text | version is outdated |
| black text | application is up to date |
In order to take full advantage of Syrus Cloud's app management you need to create the instance inside of Syrus Cloud and install it from Syrus Cloud onto your devices. This is a manual process that must be done 1 time in the beginning in order to onboard your devices with the applications.
Here's an example procedure you may follow in order to accomplish this with SyrusJS application (we recommend you perform this locally with a test device before deploying over the air)
- Download the current configuration files from commands
- Create the application on Syrus Cloud and associate the configuration and destination files
- Send a command with
syrus-apps-manager stop old_instance_nameto stop the other instance of the app running - Add the device to the application instance created on Syrus Cloud to install it
- Ensure that the application is running and the device is online (note that Syrus Cloud will install it with an instance name that starts with
__cloud_) - Erase the old running instance with
syrus-apps-manager delete-instance old_instance_name
Create Applications
From the Applications tab you can create a new application instance and upload the files necessary for the application to run.

Create or edit files you upload

Add devices to install the application

Once you hit save you can head to the Commands to see the progress of the application installation.
One instance running per destination of SyrusJSBe sure not to point multiple instances of SyrusJS to the same destination as these use cases are not handled.
Examples
Here are some examples of applications that are installed on Syrus 4 devices and their different meanings

Syrus Cloud application descriptions
Profiles
The profiles section allow you to manage configuration files massively. Configuration files are the ones that work with the device's system tools. Files such as the ECU monitor configuration file, onewire whitelist, geofences, camera configurations, rs-232 configurations, etc.
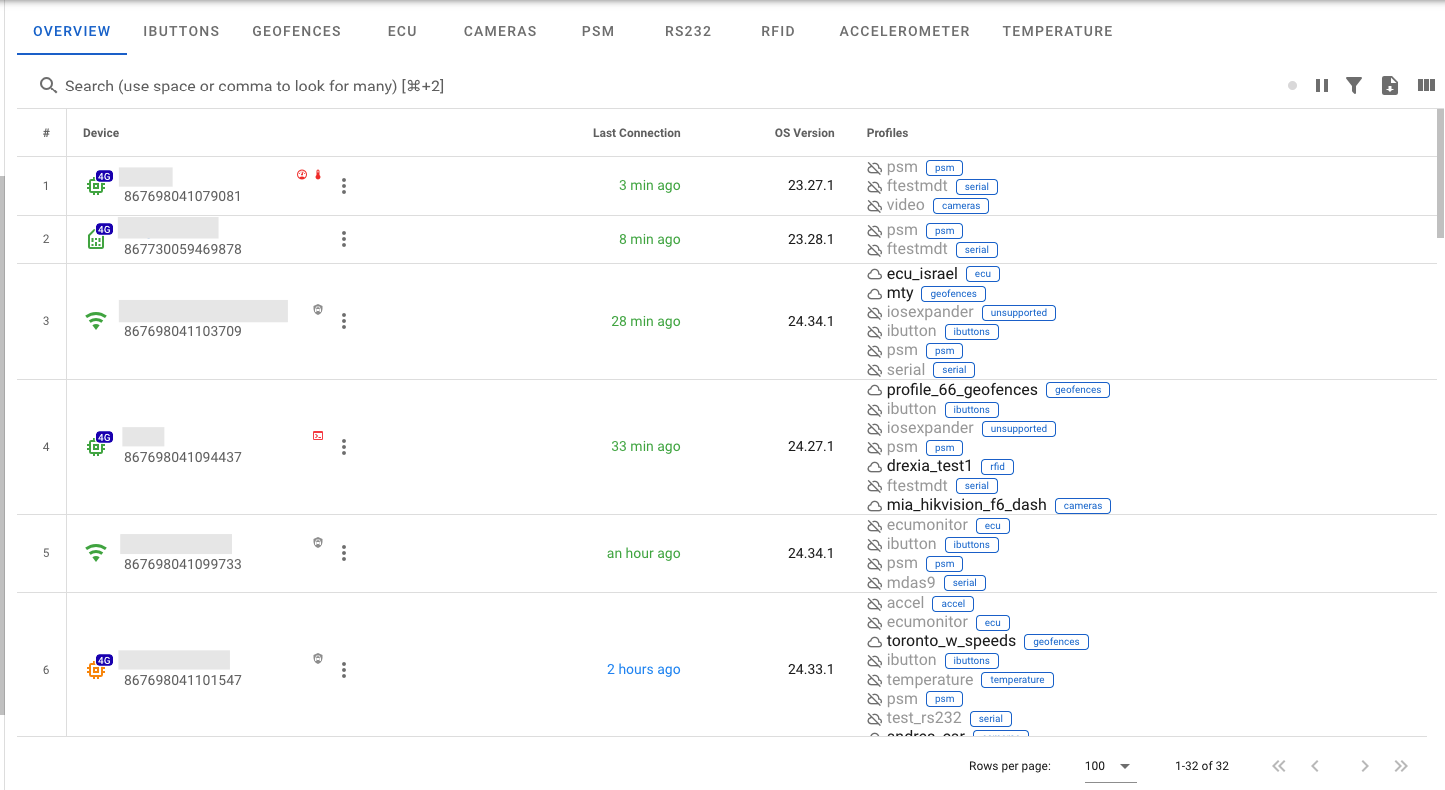
- [OVERVIEW] - Shows a list of the installed profiles on all your devices
- IBUTTONS - Create and manage ibutton profiles.
- GEOFENCES - Create and manage geofence profiles.
- ECU - Create and manage ecu profiles.
- CAMERAS - Create and manage camera/video profiles.
- PSM - Create power saving mode profiles.
- RS232 - Create serial interface profiles.
- RFID - Create [rfid] profiles.
- ACCELEROMETER - Create [accelerometer] profiles.
- TEMPERATURE - Create temperature profiles.
Overview
The profiles installed on your Syrus 4 can be monitored here using the following legend as reference:
The main icons are
Profile is managed by Syrus Cloud
Profile is not managed by Syrus Cloud
| Legend | Description |
|---|---|
| black text | profile is managed by Syrus Cloud and in sync with device |
| gray text | profile is created locally on the device, NOT managed by Syrus Cloud |
| red text | profile is managed by Syrus Cloud and is NOT in sync with the device |
a blue box appears next to the name to indicate what kind of profile it is.
The first time you create a profile it will be saved on your Syrus Cloud Organization. Remember profiles are nothing more than configurations based off of their respective apx system tools. Thus any device that reports to the Syrus Cloud with a configuration that matches an existing profile will show that profile name but greyed out since it was not installed via Syrus Cloud and thus is not managed by Syrus Cloud.
It's recommended to always synchronize profiles from Syrus Cloud to your devices. You can do this from the Profile by adding the device, or by sending a command to install that particular profile.
IBUTTONS
The ibutton profiles are saved locally on the device under /data/users/syrus4g/onewire/ibutton.onewire.conf
This file is considered a 'white list' of ibuttons, and has the following format:
In our profiles, you can add any syrus 4 device to the profile with the "ADD NEW" button, to proceed to install the profile,
then mark the device to install and synchronize the profile
NAME:IBUTTON_IDexample:
driver1:0012331241412401
driver 2:0012331241412501
Using Syrus Cloud you can create and manage the ibutton aliases to authorize them on the whitelist. you can edit and update the profile, previous to sync device

GEOFENCES
For geofence profiles, you can use the Syruslang guide for creating a file with up to 3000 geofence definitions.
Example:
# two circular
define geofence hilton_blue_lagoon group=hotels radius=150mts -80.27856,25.78155
define geofence hilton_miami group=hotels radius=165ft -80.18867,25.79092

# one polygon
define geofence dolphin_mall group=malls -80.38476,25.79042 -80.37606,25.79044 -80.37613,25.784339 -80.38449,25.78506
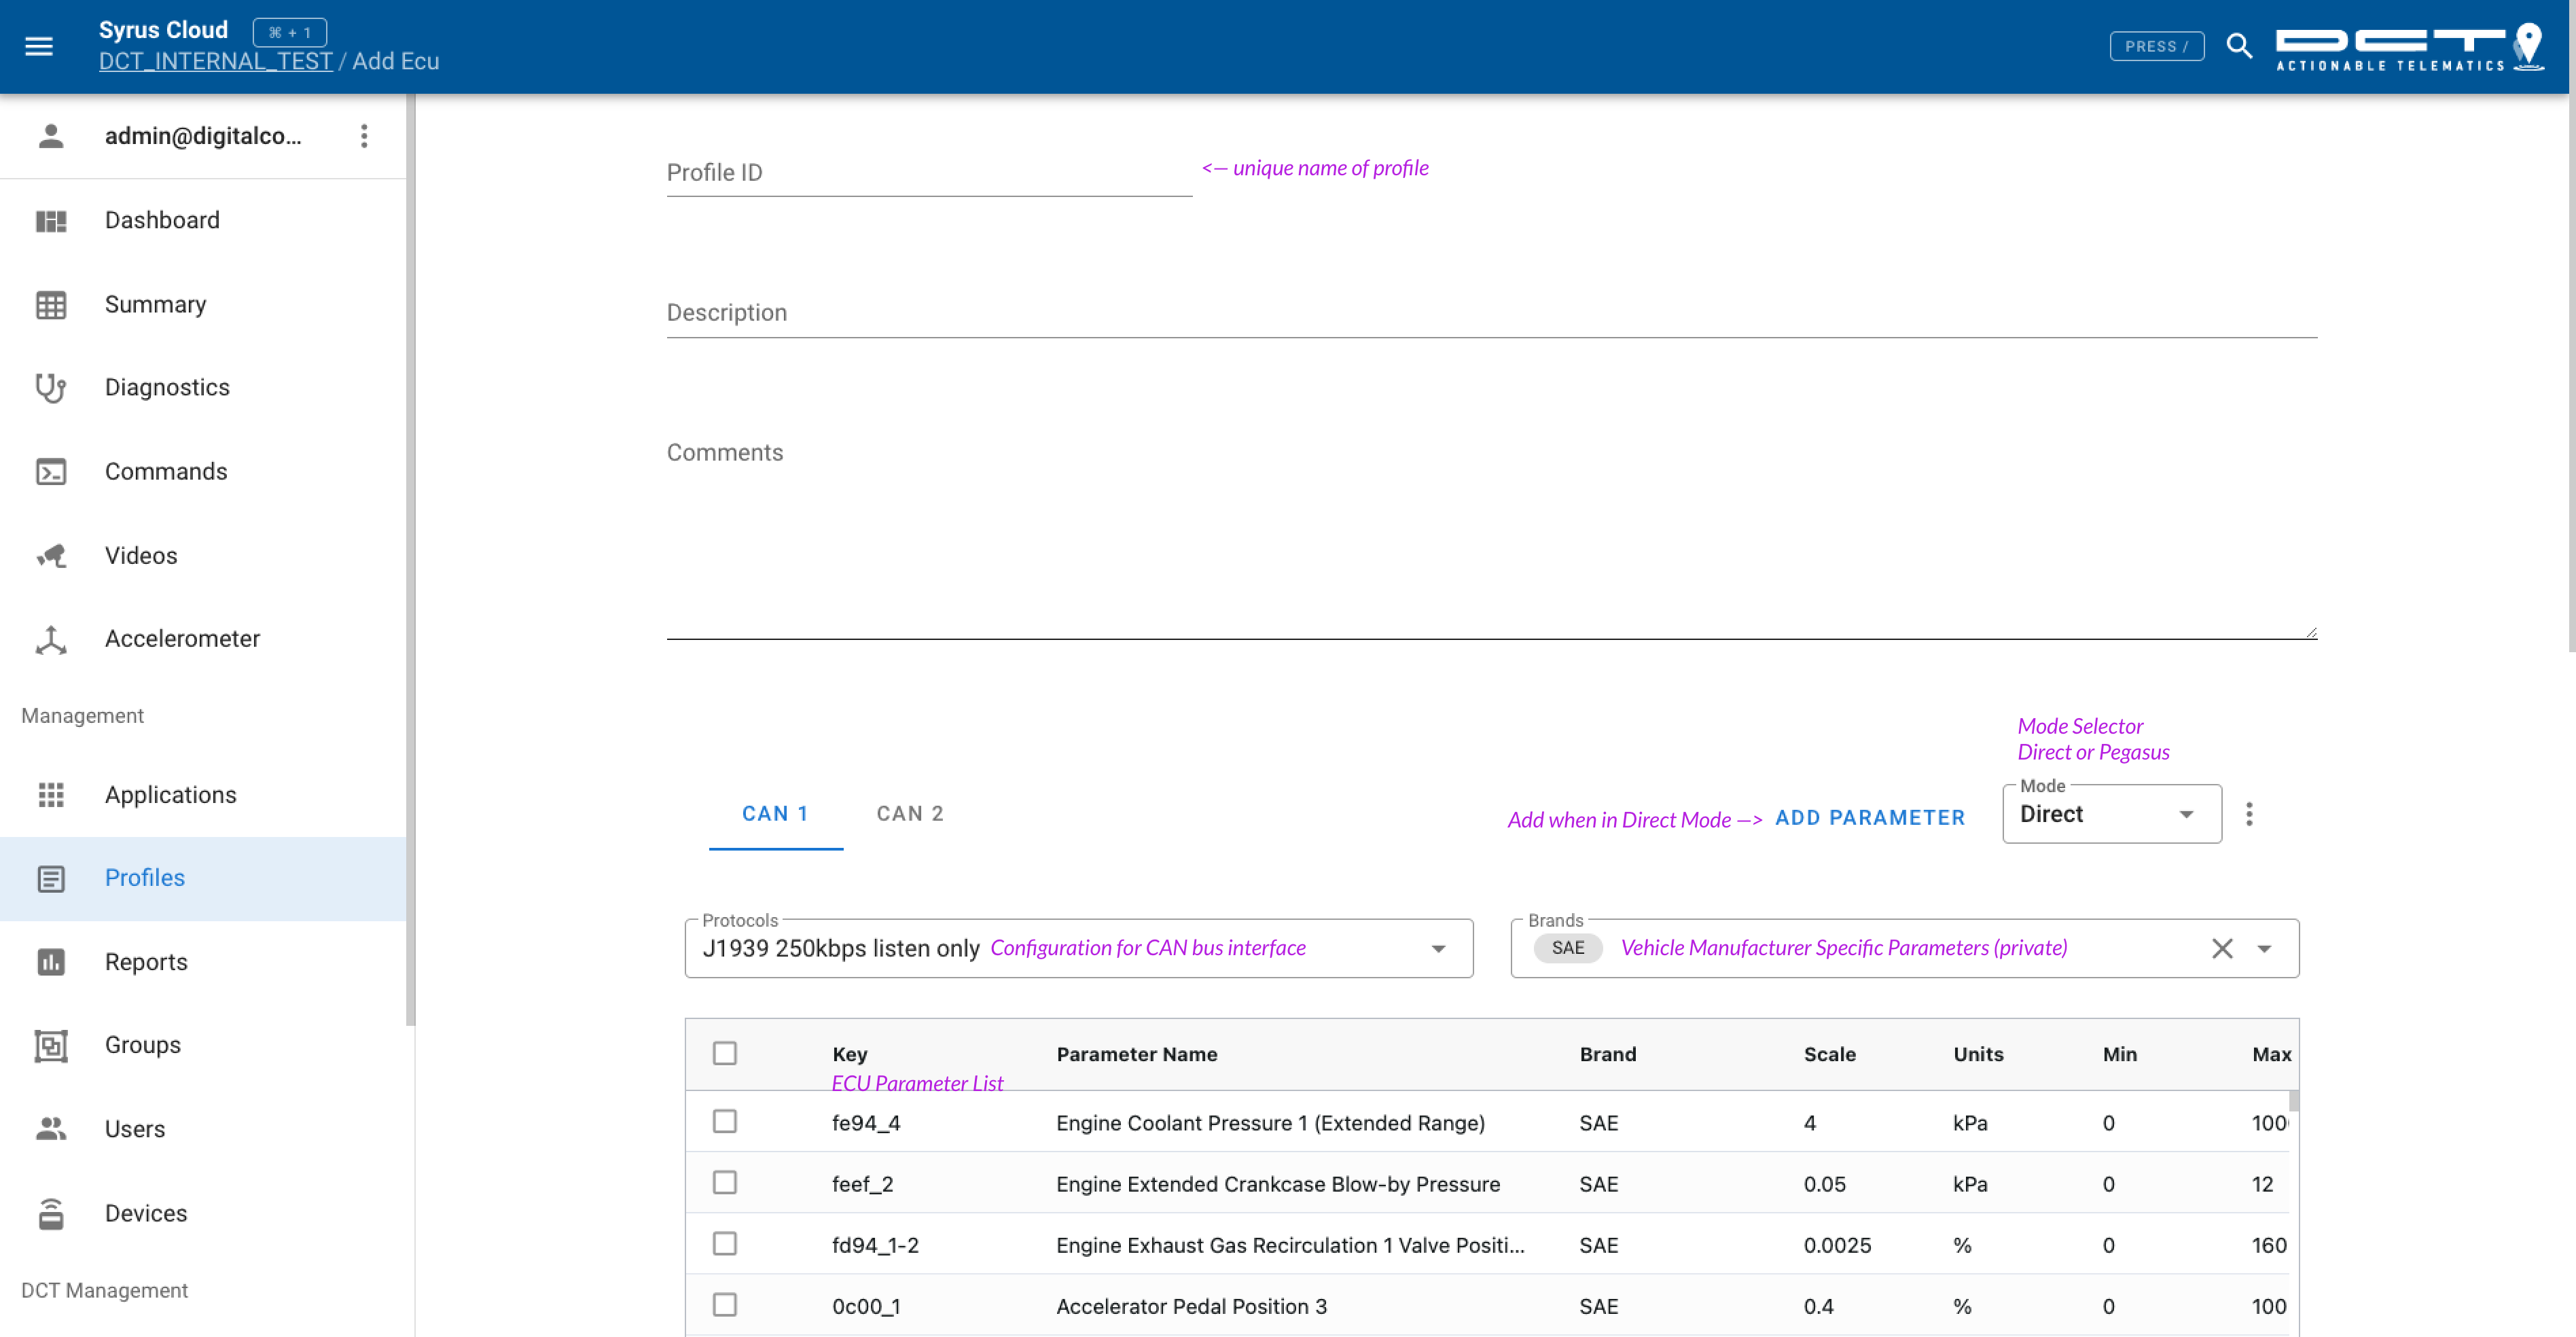
ECU
The ECU profile allows you to create a configuration file for the core ECU module. This file configures the PRIMARY and SECONDARY CAN interfaces on the device, as well as what parameters it's able to read.
Start by setting the configuration of the primary and secondary CAN interfaces and whether or not you want to enable the listen only mode. Next, select the parameters that you would like to read, or create your own.
This ECU profile features
- An intuitive way to configure new parameters no matter the PGN
- 2 configuration modes
- Direct - where you can create parameters and they are automatically tagged in SyrusJS application with the key field.
- Pegasus - where you can select parameters that are compatible with the Pegasus IoT Platform
- Ability to select from any of the standard fields in SAE J1939 standard
CAMERAS
The camera profile synchronizes the video.conf.json file from the apx-video system tool, allowing you to define the cameras and their configuration remotely.

To define a camera profile you need to obtain the camera settings, to do so just head to the Management Tool UI -> Video section, click on CONFIGURATION and the menu on the right to download the settings.

After you download the settings, upload it to the Camera profile on SyrusCloud, select your device, and press SAVE.
The commands are sent remotely to synchronize the camera settings with your device.
Now you're able to share these settings with other devices or make any adjustments, like editing the resolution, remotely.
PSM
The power saving mode profile allows you to define power saving modes (PSM) and synchronize it remotely with your devices.
It's important to consider when to apply this to your solution as you may want something more customizable depending on different conditions and different modes.
This method sets one general power saving mode for the device. If you want control over how and when to set it use the power saving commands from Syruslang.
Default PSM mode in Syrus Full and Syrus LiteStarting Feb 04 2025, depending on the syrus model and only for PSM profiles created after this date, Cloud installs the default value like this:
Syrus FULL
sudo apx-psm mode"IGN:0,SLP:1800;IGN,PWR,IN1,IN2,IN3,MIN:720;1800"
Syrus LITE
sudo apx-psm mode"IGN:0,SLP:64800;IGN,PWR,IN1,IN2,IN3,MIN:120;600"
RS-232
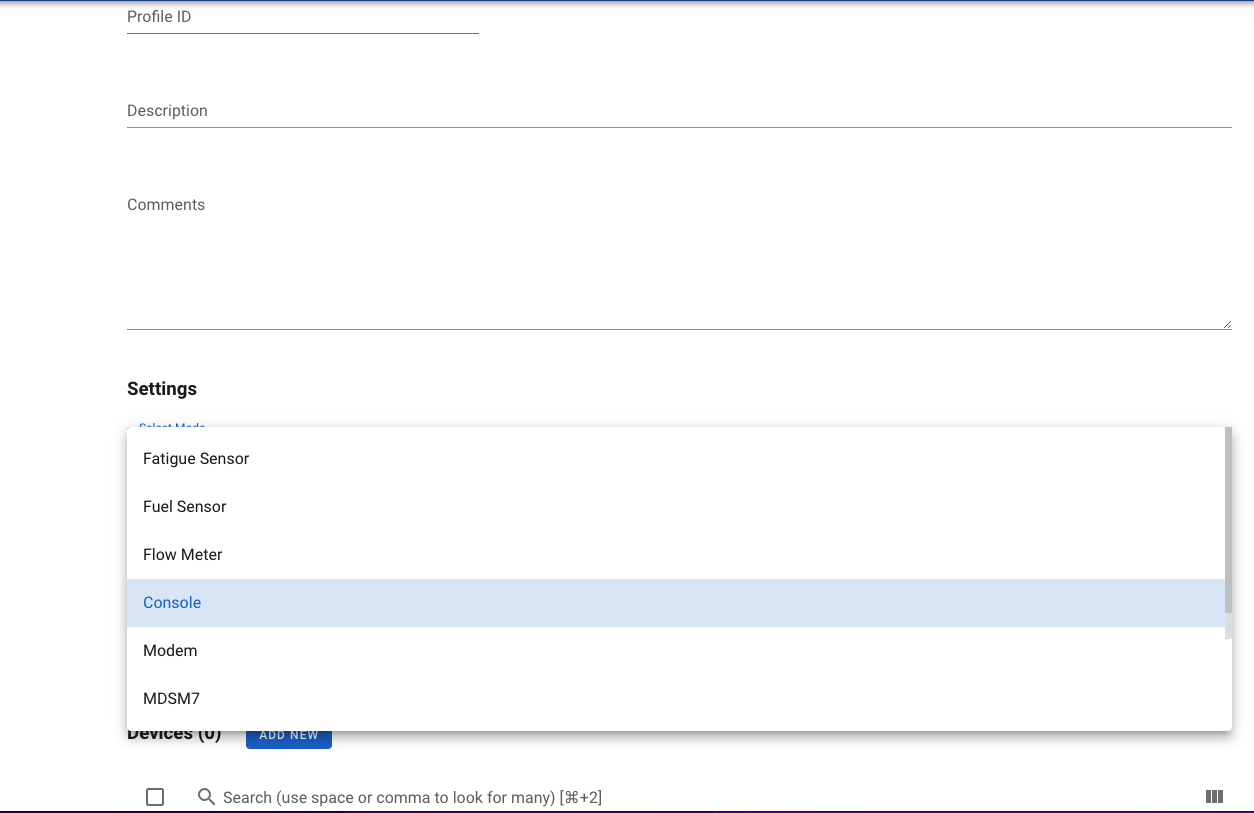
The RS-232 profile allows you to define the serial interface of the device, allowing you to set any serial mode such as modem, console, fatigue_sensor, etc. This method uses the apx-serial system tool for the configuration. Note that there can only be 1 serial profile installed per device, thus if you need to change it you must first remove the original profile before installing a new one.
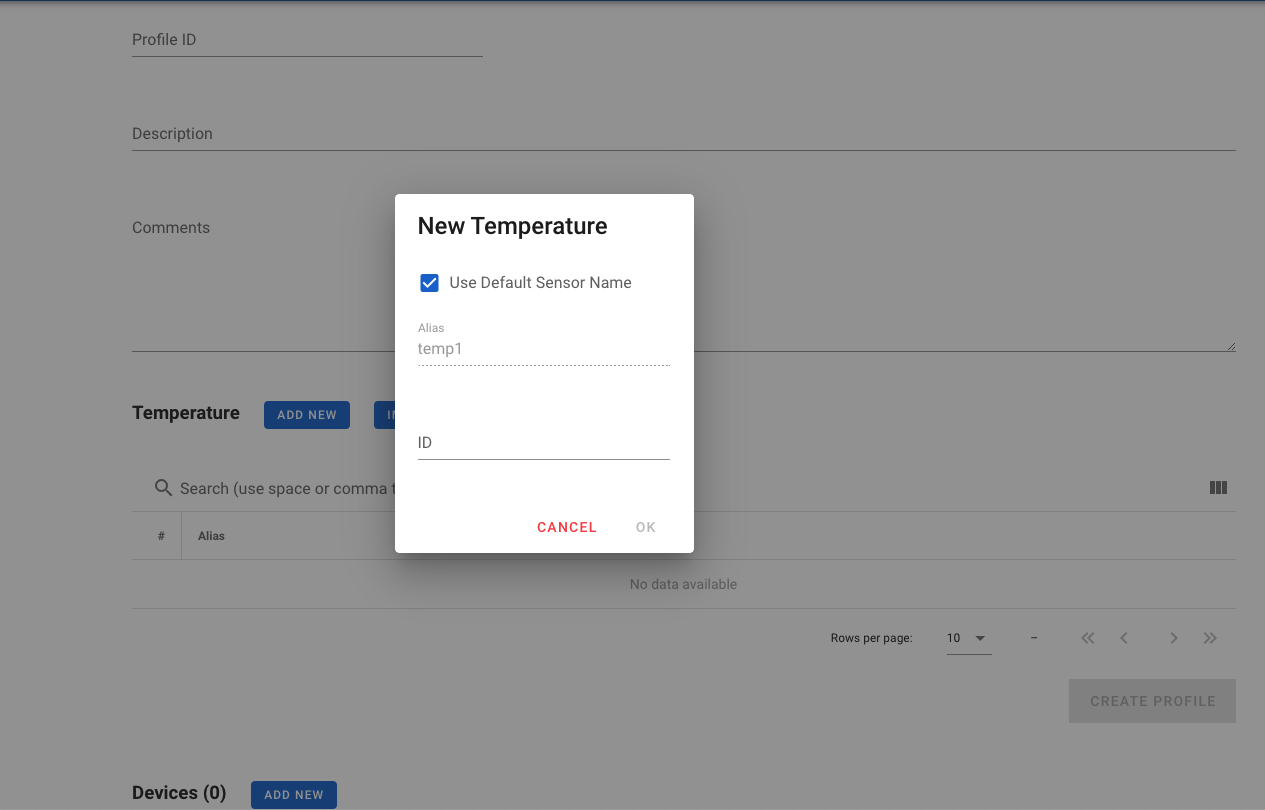
TEMPERATURE
Allows the management of temperature sensors on Syrus 4 Lite and Syrus 4 IoT Gateway. In the Syrus configuration, you need to specify the identifier of which sensors are going to be installed on the device.
Examples
Here are some examples of profiles that are installed on a Syrus 4 device and their different meanings

Groups
The groups section allows you to create groups for your Syrus devices and assign users to the group.
Users
The users section allows you to create and manage users within your organization.
Note that these users will be limited in terms of their functionalities, see the Users and Permissions section for more details.
You must contact us if you want to add another admin user to your organization.
Devices

From the devices section you're able to upgrade the Apex OS version. To accomplish this, start by showing the list of Upgradeable devices, then select the devices you want to upgrade and scroll all the way to the bottom to find the Upgrade Devices button. Complete the action by clicking on the checkmark on the right.
Note that the OS upgrade is >100MB in size, so make sure you take this into account when queueing the command.
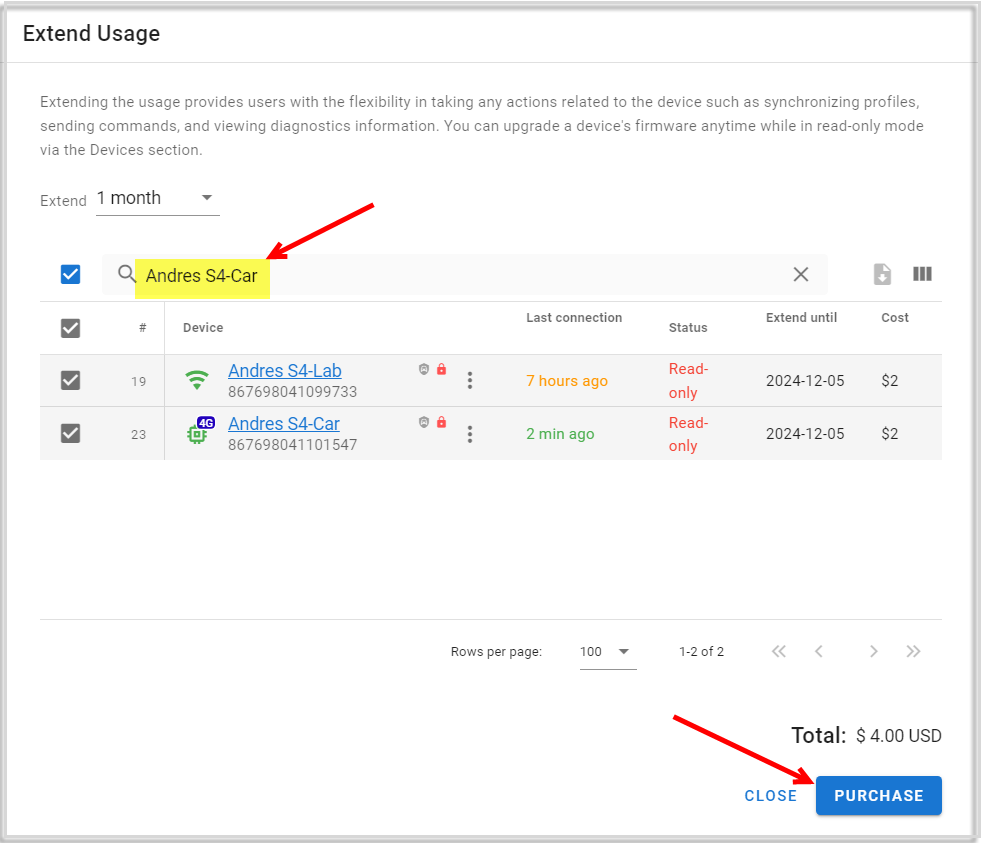
Billing
Within the billing section, Admins and DCT Personel will be able to view detailed information of their payments made to unlock the usage of their devices.
In cloud the devices's usage is locked at the 13th month annyversary after the first full 7 days of usage of each device.
To unlock one or several devices at once; Go to;
-
Devices> click on EXTEND USAGE button (at the right hand side of the page)

-
Search for the Device and/or vehicle name that you desire to unlock, select them by checking their check box in the left hand side and click on the PURCHASE button at the end of the selector
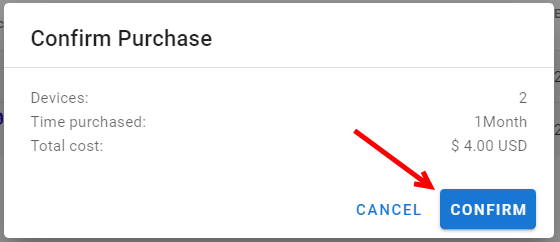
-
In the Pop up box click on CONFIRM to complete the unlocking procedure.
Updated 8 months ago