System Tools
Apex core system tools
The Syrus 4 system tools are applications that are in charge of enabling/disabling and resetting specific hardware functionalities. They can also be used to interact with some Linux applications such as hostapd which is used for bringing up a hotspot. And finally the tools serve as a way to create functionalities such as tracking criterias, geofences and more, which is useful for fleet management.
These applications are accessed via the shell with apx- as a command prefix.
The standard response of these system tool command is JSON, thus you may find it useful to use jq to get a specific result.
# returns the last gps point
$ sudo apx-gps state | jq .LATEST_POINT
{"lat":25.945318,"lon":-80.452825,"alt":12.492,"speed":0.019,"heading":0,"epoch":1607006801}

# returns the first 5 geofences in the namespace applications
$ sudo apx-geofences getstatus applications | jq '.[0:5]'

# returns the name of all the geofences in the namespace applications
$ sudo apx-geofences getstatus applications | jq '.[] | {name: .geo_name}'
Result codes (Linux exit codes)
They can be consulted by echoing the Linux exit status code $?. The most common result codes are:
- 0: Action executed successfully with no errors
- 1: Catchall for general errors
- 2: Misuse of shell builtins (according to bash documentation)
- 22: Invalid argument
- 90: Response too long
- 126: Command invoked cannot execute
- 127: Command not found
- 128: Invalid argument to exit
- 128+n: Fatal error signal “n”
- 130: Script terminated by Control-C
- 255+: Exit status out of range
Sudo privilegesNote that all apx commands require special privileges, thus you must use
sudoto execute them.
Accelerometer
apx-imu
Inertial measurement unit manager for the accelerometer and device's gyroscope. This tool calibrates the accelerometer and sets it's event thresholds.
This tool helps us download and create acceleration profiles (this allows calibration of equipment without having to move the vehicle physically), and generate a backlog of accelerations to be downloaded and analyzed later.
apx-imu <command> [<args=value>]| command | description |
|---|---|
configure [OPTIONS] | Use this command to set the different parameters related to the accelerometer. |
calibrate [OPTIONS] | Starts the self-alignment process. Take into account that the vehicle must be stopped/stationary on a level surface when starting this process |
test | Starts the accelerometer self-test. If second parameter is not used it returns the motion state. It forces some of the events (motion, collision, hard_braking, etc) to be triggered. |
status | Returns the list with all the configured parameters. |
events | Returns the list with the last 25 acceleration events. |
get_profile | Make a copy of the current calibration profile into: /data/users/syrus4g/imu/accel.conf |
set_profile | Install the calibration profile from: /data/users/syrus4g/imu/accel.conf |
backlog create [options] | Will create a X, Y, Z backlog file with 2500 samples = 10s. It receives as argument the file name. |
backlog status [options] | Returns the list of the backlogs created. If --name is specified, it returns a json with the file status. |
Use the following options to set/get the different parameters related to the accelerometer. If the second argument is not specified, it returns the value configured
Calibration Options
| options | description |
|---|---|
--status | start - Starts the calibration process. stop - Stops the calibration process. clear - Stops and deletes the current calibration. |
Calibration timeoutNote that the calibration ends automatically if it is left ON for more than 1 hour
Configuration Options
| options | description |
|---|---|
motion_threshold | From 10 to 500, Default: 30 (30*1milli-g=30milli-g) |
motion_duration | From 1 to 8, Default: 2 (2*0.5=1sec) |
hard_motion | From 200 to 800, Default: 400 (400*1mg=400mg) |
front_collision | From -1000 to -15000, Default: -2000milli-g |
back_collision | From 1000 to 15000, Default: 2000milli-g |
right_collision | From -1000 to -15000, Default: -2000milli-g |
left_collision | From 1000 to 15000, Default: 2000milli-g |
harsh_acceleration | From 200 to 600, Default: 260milli-g |
hard_braking | From -200 to -600, Default: -260milli-g |
cornering_right | From -200 to -600, Default: -400milli-g |
cornering_left | From 200 to 600, Default: 400milli-g |
The alignment process can be found in the CONNECT page.
Acceleration EventsNote that the
self_alignmentprocedure is required in order to trigger any acceleration related signal with Syruslang except for the hard_motion event. This one will trigger automatically even if the device is NOT calibrated. Also note that since it does not depend on the calibration the hard motion will detect negative and positive accelerations whose absolute value meet the threshold.
Query status of alignment procedure
# Configure the hard braking threshold to -240 milli-g and cornering left to 350 milli-g
$ apx-imu configure --hard_braking=-240 --cornering_left=350

# Start the calibration process
$ apx-imu calibrate --status=start

# Create a backlog
$ apx-imu backlog create --name=mybacklog
The device will return one of these states
| ALIGNMENT_CURRENT_STATE | % completed | description |
|---|---|---|
| 1 | 1% | Deleting previous alignment data |
| 2 | 10% | Waiting for GNSS signal |
| 3 | 30% | Running initial stage. Computing recorded data |
| 4 | 50% | Running second stage. Waiting for GNSS signal |
| 5 | 70% | Waiting for vehicle speed to go over 30kph |
| 6 | 80% | Waiting for a valid braking event |
| 7 | 90% | Braking event detected. Computing recorded data |
| 8 | 100% | Alignment process done |
Examples:
# Start the self alignment process:
$ apx-imu calibrate --status=start

# Configure the hard braking to -240 milliG and cornering left to 350 milliG:
$ apx-imu configure --hard_braking=-240 --cornering_left=350

# Read the value of the harsh forward acceleration threshold:
$ apx-imu CFG_HARSH_FWD_ACCELERATION

# Read the list of parameters configured:
$ apx-imu config_list
{"MOTION_THRESHOLD":30,"CFG_FORWARD_COLLISION":-2000,"CFG_BACKWARD_COLLISION":2000,"CFG_LAT_COLLISION_FROM_RIGHT":-2000,"CFG_LAT_COLLISION_FROM_LEFT":2000,"CFG_HARSH_FWD_ACCELERATION":260,"CFG_HARD_BRAKING":-260,"CFG_CORNERING_RIGHT":-350,"CFG_CORNERING_LEFT":350}
Applications
syrus-apps-manager
Install, run, and manage applications on the device.
syrus-apps-manager [option] [argument_1] [argument_2] [argument_3]
Syrus application managerThe command
syrus-apps-managerdoes not requiresudoin front and can be run by usersyrus4g
| option | description | ||
|---|---|---|---|
help | Prints this help message | ||
install-app | install an app from .zip file on the device, makes it available to create instances, takes as argument_1 the path where the zip file exists | ||
| `update-app \ | download-app` | download a new version of the app from the repository declared for the app, takes as argument_1 the name of the app and argument_2 the new version to download, if argument_2 is omitted it will try to download the stable version if available | |
list-apps | list the available apps installed on the device | ||
delete-app | delete an app on a specific version, takes as argument_1 the app and argument_2 the version of the app | ||
check-updates | checks for updates on every app thats exposes a repository on the manifest | ||
list-instances | list all the instances of apps running on the device | ||
create-instance | create an instance from a previously installed app on the device, argument_1 is the name of the instance, argument_2 the name of the app, and the argument_3 the version | ||
update-instance | update an instance to a different version, takes as argument_1 the name of the instance and argument_2 as the version | ||
delete-instance | delete an instance, takes as argument_1 the name of the instance | ||
| `start \ | stop \ | restart` | start,stop or restart one instance, takes as argument_1 the name of the instance |
get-running | return a list of only running instances | ||
status | return the status of one instance, takes as argument_1 the name of the instance | ||
send-message | Send a message (via nc) to applications that expose a unix socket. | ||
start-shell | Start a shell (via nc) with applications that expose a unix socket. | ||
clear-buffer | Delete the buffer associated to a destination |
Instance namingNote that instances must start with lowercase, and contain no spaces or special characters.
Examples:
# Manual application installation from source

$ cd /data/downloads

$ wget https://server.com/applications/customApp/1.0.0.zip

$ syrus-apps-manager install-app customApp /data/downloads/1.0.0.zip
# SyrusJS example installation
$ wget https://syrus4.dctserver.com/apex/applications/syrusjs/1.34.1.zip -O /data/downloads/1.29.1.zip
$ syrus-apps-manager install-app /data/downloads/1.34.1.zip
$ syrus-apps-manager create-instance test_instance syrusjs 1.34.1
$ syrus-apps-manager start test_instance# Update syrusjs application
$ syrus-apps-manager update-app syrusjs 1.34.0
# Update an instance of syrusjs
$ syrus-apps-manager update-instance my_app_instance_name 1.34.0
# Send commands to a syrusjs instance
$ syrus-apps-manager send-message my_app_instance_name "get signal_value isON"
signal value=true
# if sending the command locally make sure to use single quotes ' around commands with special characters
$ syrus-apps-manager send-message my_app_instance_name 'get value $net_wifi.ip_address'
192.168.1.148
# if sending a command via syrus-cloud or MDT you must use double quotes " and escape special characters
$ syrus-apps-manager send-message my_app_instance_name "get value \$net_cell.connected"
true
# you can send TAIP commands with the send-message
$ syrus-apps-manager send-message my_app_instance_name ">SSSU051<"
# send command to upload using Blackbox feature
syrus-apps-manager send-message my_app_instance_name "upload blackbox protocol=taip destination=my_server from=1708963644 to=1708963654"
# Start a shell with syrusjs
$ syrus-apps-manager start-shell my_app_instance_name
get signals
define signal ...
# Delete the buffer associated to a destination
$ syrus-apps-manager clear-buffer __cloud_hw_lab_tests pegasus
Audio
apx-tts
Tool to convert text to speech in different languages. Use the apx-bt tool to pair to a compatible bluetooth device first.
apx-tts <language> <message>| language | description |
|---|---|
en-US | English |
en-GB | Great Britain |
de-DE | German |
es-ES | Spanish |
fr-FR | France |
it-IT | Italian |
message is the actual message to say
Examples
$ apx-tts en-US 'Testing text to speech'

$ apx-tts es-ES 'Una prueba de texto a voz'
Tips on using Text to SpeechYou can use UPPERCASE letters after the first word to spell out words.
apx-tts en-US 'welcome to USA'is the same as:
apx-tts en-US 'WELCOME to USA'You can use periods
.for short pauses during the speech.
Bluetooth
apx-bt
Bluetooth tool with BLE functions and pairing with compatible with bluetooth headsets. If you're looking for the text to speech function, check out the apx-tts tool.
apx-bt [<action>] [--arguments]Actions
| actions | description |
|---|---|
help | Returns this message. |
on | Will enable the Bluetooth module. |
off | Will disable the Bluetooth module. |
status | Will display core application version, prioritized audio, device MAC, device name, and the mode configured. |
scan | Followed by --time in seconds. Application will scan for nearby devices for up to 30 seconds. |
pair | Followed by --mac. Will begin the pairing process with the device. Device needs to have been previously scanned. |
pair_forced | Followed by --mac. Will force a pair process with the device. |
connect | Followed by --mac. Attempt a connection with a previously paired device |
unpair | Followed by --mac. Will unpair a previously paired device. |
disconnect | Followed by --mac. Will disconnect a previously connected device. |
switch_audio | Followed by --mac. Will declare the device to be the main source of audio. |
info | Followed by --mac. Will display information about the device. |
info_all | This will display information about all of the recently discovered devices, if those devices are paired, or if they are paired and connected. |
history | This will display information about all of the devices that were discovered by the scanning process since last activation of the Bluetooth module |
list_discovered | Returns the list of all the devices that have been discovered by the scanning process. Note: A device might be scanned and added to the list of paired devices but not appear in the list of discovered devices. Recommended to check both lists. |
list_connected | Returns the list of all paired and connected devices. |
restart | This will restart the application module. |
reset | This command resets everything regarding the application. All information about the devices, connections, and pairs will be lost. |
routed_audio | This will display the address of the device producing audio. |
soc_audio | Routes prioritized audio device to allow audio from SOC. |
mdm_audio | Routes prioritized audio device to allow audio from MDM. |
| arguments | description |
|---|---|
--mac | Device MAC address. A single string of hexadecimal is expected for the device |
--time | Time in seconds |
Switch audioNote that the
switch_audioaction is only relevant when you have multiple compatible speakers paired to the Syrus, and you want to switch which speaker to use to playback an audio without having to disconnect them.
Examples:
# Start a scan for nearby bluetooth devices for 15 seconds.
$ apx-bt scan --time=15

# List discovered Bluetooth devices after scanning
$ apx-bt list_discovered
{"C83432DA6A1C":"Family Room TV","000664EDF530":"CricutAIR2-F530","E8ABFB463615":"Boltune BT-BH010","84A444220FA2":"[TV]Samsung LED55"}

# Pair to a discovered bluetooth device with the MAC address: 02:06:EF:66:43:0A
$ apx-bt pair --mac=0206EF66430A
BLE Actions
$ apx-bt [<action>] [--arguments]| action | description |
|---|---|
advertising | Followed by desired parameters to enable or disable advertising, which type of advertising to do, and for how long to advertise (--mode, --flag, and --duration respectively). If not followed by anything it shows the parameters used. |
auth | Followed by the password. Only usable from the BLE device that is connected. |
change_auth | Takes two arguments. The --old_pass and the --new_pass that BLE devices must use for authentication. Passwords must be of 1 to 30 characters long and cannot contain spaces. Only 0-9,a-z,and A-Z characters are allowed. |
send | Followed --characteristic and --message. This command takes two arguments where the first argument is the characteristic to notify and the second argument is the message to send to the device that is subscribed for notifications. The message can be any NULL terminated string. Refer to Valid Characteristics. |
ping | Used for maintaining a keep alive communication between a BLE device and this unit. Will return "pong". |
change_name | Followed by --name. Will change both the Bluetooth name of the device and the BLE name being advertised by the device. The name will always be prefixed with Syrus 4G. The name can be up to 15 alphanumeric characters. |
ble_status | Not followed by any arguments. Will display a list of all BLE devices that are currently connected or recently disconnected. |
Advertising
| arguments | description |
|---|---|
--mode | Either 0 or 1 for disable and enable respectively. |
--flag | To get the desired on state flag, simply add the hex numbers from Number on the Advertising Table below. |
--duration | A value in seconds between 30 to 300 seconds. A number more than 300 will force advertising duration to be 600 which means advertising is continuous, meaning advertising will always be on. |
Advertising Table:
| Number | Not added | Added |
|---|---|---|
0x001 | Local Random Address | Local Public Address |
0x002 | Non Discoverable | Discoverable |
0x004 | Non Connectable | Connectable |
0x010 | Advertise Name Off | Advertise Name |
0x020 | Advertise Tx Pwr Off | Advertise Tx Pwr |
0x040 | No Appearance | Advertise Appearance |
0x100 | Peer Random Address | Peer Public Address |
Valid Characteristics:
| characteristic | Description |
|---|---|
events | To be used for events that occurred |
user_apps_console | To be used by internal user applications that wish to communicate with external user applications. |
Examples:
# Advertising is enabled, discoverable (`0x002`), connectable (`0x004`), and the name is advertised (`0x010`) for 200 seconds.
$ apx-bt advertising --mode=1 --flags=0x16 --duration=200

# Send a json string to the events
$ apx-bt send --characteristic=events --message={"name":"Joe"}
Bluetooth Sensor
This tool lets you read and configure the BLE scan engine
$ sudo apx-bbs help$ apx-bbs <command> [<args=value>]Commands
| command | description |
|---|---|
| status | Returns the last scanned devices. |
| set [options] | Used to configure the service parameters like the scan_time. |
| add [options] | Add or modify a BLE device to the white list. |
| remove [options] | Removes a BLE device form the white list. |
| get [options] | Reads the alias of a device given a MAC address. |
| get_config | Reads the configuration of the bluetooth beacon settings. |
| get_all | Returns all the BLE devices added to the white list. |
| version | Returns the tool version. |
| help | Print this help. |
Arguments
| arguments | description |
|---|---|
| -s, --scan_time | The BLE channels scanning time this determine the update time (default 10s). |
| -m, --mac | The mac address of the BLE device. |
| -a, --alias | The desired alias of the BLE device. |
| -e, --enabled | Enable or disable the loggin service |
Examples:
# Check the last scanned devices:
     apx-bbs state
#Enable BLE service and set scanning time:
     apx-bbs set --scan_time=60 --enabled=true
#Get information about the configuration:
     apx-bbs get_config
#Add a new ble device to the whitelist:
     apx-bbs add --mac=AABBCCDDEEFF --alias=Refrigerated_truck
#Remove a ble device from the whitelist:
     apx-bbs remove --mac=AABBCCDDEEFF
#Get information about the devices:
     apx-bbs get --mac=AABBCCDDEEFF
     apx-bbs get_all
Counters
apx-counter
Start device counters for ignition, distance and other metrics.
 apx-counter [action] [namespace]
 apx-counter [action] [namespace] [key] [value]
apx-counter [action] [namespace] [key]| action | description |
|---|---|
start | Must be followed by namespace. Will start the desired namespace. Creates it if it doesn't exist. |
stop | Must be followed by namespace. Will stop the desired namespace. |
reset | Must be followed by namespace. Will stop the desired namespace and resets the counter key values. |
resetall | Same as above only that thresholds are reset to default values. |
set | Must be followed by namespace key value. Key has its value set to value. |
get | Must be followed by namespace key. Will return the value of the key. |
getall | Must be followed by namespace. Will return the value of all of the keys. |
delete | Must be followed by namespace. Will delete the namespace. |
list | Not followed by anything. Will list information about all known counters. |
help | Prints this help message |
| key | description |
|---|---|
ODOMETER | Distance traveled in meters with ignition on. |
IGNITION_TIME | Total time ignition has been on in seconds. |
IDLE_TIME | Total time ignition has been on in seconds with no distance traveled after the time defined in BEGIN_IDLE_TIME. |
OVER_SPEED | Total time in seconds that the speed has exceeded the threshold value defined in SPEED_THRESHOLD |
OVER_RPM | Total time in seconds that the RPM has exceeded the threshold value defined in RPM_THRESHOLD |
HARD_BRAKES | Total number of hard brakes produced. |
HARSH_FWD_ACCELERATION | Total number of harsh accelerations produced. |
DISTANCE | The distance traveled in meters with no ignition. |
RPM_THRESHOLD | Key to define an RPM value that the vehicle must exceed to begin incrementing OVER_RPM |
SPEED_THRESHOLD | Key to define a speed value (km/h) that the vehicle must exceed to begin incrementing OVER_SPEED |
BEGIN_IDLE_TIME | Key to define how long to wait in minutes before incrementing IDLE_TIME. Default 5 minutes |
Namespace restrictionsThe namespace for the custom counters has the following restrictions
- Max length 50 characters
- No uppercase letters
- No spaces
- No symbols
We recommend you define a schema like:
type:name:counterapx-counter start driver:john:0
Examples:
# start custom counter
$ apx-counter start custom1

# set the speed threshold to 100km/h for custom1
$ apx-counter set custom1 SPEED_THRESHOLD 100

# get all the values of custom1 counters
$ apx-counter getall custom1
ECU
apx-ecu
Tool to consult the current state of the ecu application and read data from a vehicle's onboard computer using the CAN Bus.
apx-ecu [<action>] [--arguments]| action | description |
|---|---|
configure | This will return the current configuration used. |
listen_mode | This will return the current listen_mode being used. |
list_parameters | Not followed by any arguments. Returns a JSON of all the parameters read with the unique id and value. |
log | This takes three arguments. The valid arguments are --log_time, --file_name, and --log_interface. Where --log_time is the time in seconds starting from 1 second up to 40 seconds to save to the log file --file_name from the --log_interface. The file name is a relative file path name and only letters and numbers are allowed for the file name up to 20 characters long. All logs are saved in /data/users/syrus4g/ecumonitor/ecu_logs/. |
status | This will return the current state of the ecumonitor application. It includes a timestamp with the reference time that indicates the last time that the Syrus4 device received data from the CAN bus and the available parameters. |
restart | Not followed by any arguments. Restarts the ecumonitor. |
clear | Not followed by any arguments. Will clear any previous returned by list_parameters command. |
version | Not followed by any arguments. Will return the version of this tool and the version of the ecumonitor core application. |
decode | This may take two arguments. The valid arguments are --unique_id and --value. This will decode the --value from the --unique_id returning a different JSON based on the unique_id to decode. If no arguments are passed then the list of valid unique_ids will be printed. |
help | Returns this help message. |
| Arguments | description |
|---|---|
log | [--log_time=<time_in_seconds>] [--file_name=<file_name>] [--log_interface=<interface>] |
decode | [--unique_id=<unique_id>] [--value=<value>] |
Examples:
# Decode a J1939 data trouble code*
$ apx-ecu decode --unique_id=feca_3-6 --value=2114126001
{"spn":177,"fmi":3,"cm":0,"oc":126}
# *Note this requires the definition of PGN: `feca` start_position: `3-6` in your ecumonitor.conf

# Perform a candump for 40 seconds from 2 CAN interfaces.
# Remeber to use ecumonitor.conf file to configure the interfaces.
$ apx-ecu restart
$ apx-ecu clear
$ apx-ecu log --log_time=40 --log_interface=PRIMARY_CAN --file_name=logTruck500.log
$ apx-ecu log --log_time=40 --log_interface=SECONDARY_CAN --file_name=logTruck250.log
$ apx-ecu list_parameters
# Note that underscores are not allowed for the name of the log file

# clear and list ecu parameters
$ apx-ecu clear
$ apx-ecu list_parameters
Ethernet
apx-ethernet
Manage the ethernet interface on the device. Allows you to configure DHCP mode or other network configuration.
apx-ethernet <command> [<args=value>]| commands | description |
|---|---|
restart | Use this option for restarting the ethernet interface |
status | Returns the current state of the ethernet interface |
set [OPTIONS] | Returns the current state of the ethernet interface |
version | Returns the tool version |
help | Prints this help message |
| options | description |
|---|---|
-r, --route | Use this option for forwarding the ethernet traffic to another interface, it allows the connected device to have internet access by specifying the output interface. Valid values are: wlan0, ppp0 (Mobile network), both, and none. |
-i, --ip | Use this option for changing the interface IP address and mask |
-g, --gateway | Use this option for changing the gateway address |
-d, --dns | Use this option for changing the dns address |
-s, --dhcp | Use this option for enabling the DHCPServer on this interface. So, when a device is connected to the device ethernet, it assigns an IP address to the connected devices. |
-f, --default | By using this option the ethernet IP address is assigned by the network. |
Examples:
# Uses the IP address assigned by the network
$ sudo apx-ethernet set --default

# Configure the ethernet in DHCP mode
$ sudo apx-ethernet set --dhcp

# Set the IP address of the ethernet interface
$ sudo apx-ethernet set --ip=192.168.5.5/24

# Configure the ethernet network with dhcp enabled
$ sudo apx-ethernet set --ip=192.168.5.1/24 --gateway=192.168.5.255 --dns=8.8.8.8 --dhcp --route=none
# Where: 192.168.5.5/24 = Device IP/Mask
#        192.168.5.255  = Gateway address
#        8.8.8.8        = DNS
#        yes            = DHCP server enabled
#        none           = Traffic is not routed to another interface

# Route ethernet traffic to both wlan0 and ppp0 interface
$ sudo apx-ethernet --route=both

# Restart the ethernet inteface
$ sudo apx-ethernet restart

# Check the ethernet status
$ sudo apx-ethernet status
{"state":"Enabled","mac":"9C:1D:58:3D:5A:90","ip":"","bcast":"","mask":"","rx_bytes":"0","tx_bytes":"0","routing":"both"}
Geofences
apx-geofences
Tool that adds and removes geofences on the device. Note that a maximum of 3000 geofences can be saved as of apex version 20.12
*Add a geofence
apx-geofences add [namespace] [group] [type] [name] [radius] [lon,lat] [...]

Examples:

apx-geofences add places parks circular country_village_park 100 -80.305340,25.943784
apx-geofences add --namespace=places --group=parks --type=circular --name=village_park --radius=100 --coord="-80.305340,25.943784"

with speed limits:
apx-geofences add --namespace=places --group=parks --type=circular --name=village --radius=100 --speed-limits="uphill,50,100,200" --coord="-80.305340,25.943784"| parameters | description |
|---|---|
namespace | Name of the namespace. If no namespace, specify an empty string "". Max 30 characters |
group | Name of the group. If no group, specify an empty string "". Max 30 characters, min 3 characters |
type | Type of geofence. Must be circular or poly |
name | Name of the geofence. Max 50 characters |
radius |
|
lon,lat | Longitude and latitude coordinates in the format decimal degrees: -80.3471745,25.917071. Max 500 pairs of coordinates. Minimum of 3 pairs of coordinates for a poly type geofence |
speed_limits | The speed limits must be setup guided by the following format: <alias1>,\<speed\_limit1>,\<min\_heading1>,\<max\_heading1> <alias2>,\<speed\_limit2>,\<min\_heading2>,\<max\_heading2>. For more information Speeding in Geofences |
| speed_limits | description |
|---|---|
| Alias | String of max 15 characters, this value is mandatory. |
| Speed limit | Integer, this value is mandatory. |
| Min Heading | Integer from 0° to 359°, this value is optional, if it isn’t found the app assumes that is 0° and only one speed limit will be evaluated. |
| Max Heading | Integer from 0° to 359°, this value is optional, if it isn’t found the app assumes that is 359° and only one speed limit will be evaluated. |
For syruslang use go here Geofences signals
Remove a geofence
apx-geofences remove [namespace] [group] [name]

$ apx-geofences remove places parks country_village_park
Remove all geofences of a namespace
apx-geofences remove [namespace]

$ apx-geofences remove places

# Note that it is not possible to remove a group, you would have to remove all the geofences from a group one by one or remove the namespace
Get a list of all namespaces that exist
$ apx-geofences getns
["places","shopping_malls"]
To get all the information of the geofences of a specific namespace
apx-geofences getall [namespace]

$ apx-geofences getall places
[{"namespace":"places","group":"group","geo_name":"norman_jean","type":"poly","n_vertices":4,"vertices":["-80.33352400,25.93546900","-80.32843900,25.93494800","-80.32832100,25.93337500","-80.33331000,25.93355800"]}]
where:
namespace: Name of the namespacegroup: Name of the groupgeo_name: Name of the geofencetype:polyorcircularradius: Radius of circular geofence in metersn_vertices: Number of lon,lat pairs in the geofencevertices: Lon,lat pairs
To count the number of geofences that exist in namespace[s]
apx-geofences count [namespace]

$ apx-geofences count places
4
To get the current state of each geofence of a specific namespace
apx-geofences getstatus [namespace]

$ apx-geofences getstatus places
[{"group":"parks","geo_name":"country_village_park","is_inside":false,"time":1623959290}]
where:
group: Name of groupgeo_name: Name of geofenceis_inside: True if device is currently inside the geofence
Get Status of Geofence InsideNote that if you create a geofence around the location of your device the
getstatuscommand will return that it'sis_inside: true.
To get the current version of the tool
$ apx-geofences version
{"version": "0.0.5"}| RETURN_CODES | description |
|---|---|
0 | OK |
22 | Invalid argument |
80 | Max number of geofences reached |
81 | Geofence not found |
82 | Missing parameter |
127 | Unknown command |
Example:
# Create a polygonal geofence around 25.935469,-80.333524 25.934948,-80.328439 25.933375,-80.328321 25.933558,-80.333310
$ apx-geofences add places parks poly park_norman_jean -80.333524,25.935469 -80.328439,25.934948 -80.328321,25.933375 -80.333310,25.933558

# Print the geofences that are in the namespace places
$ apx-geofences getall places
[{"namespace":"places","group":"parks","geo_name":"park_norman_jean","type":"poly","n_vertices":4,"vertices":["-80.33352400,25.93546900","-80.32843900,25.93494800","-80.32832100,25.93337500","-80.33331000,25.93355800"]}]
apx-geofences-manager
Tool to import and export geofences massively on the device.
apx-geofences-manager [option] [arguments]| option | description |
|---|---|
import | Create geofences in batch using syruslang scripting command, the tool requires arguments: namespace and path. |
export | Export geofences to a single file. Accepts arguments: format, namespace, and file. |
| arguments | description |
|---|---|
--remove | Remove all geofences in the namespace before start importing |
--dry-run | Run command to proccess without creating geofences |
--format · -f | Format to be exported, accepted values are: syruslang,geojson |
--namespace · -n | Namespace to be export or imported |
--path · -p | Path to file destination where import geofences or path where to export destination. Must be a syrus.conf and contains syruslang script language or a .geojson with valid geojson data |
# Contents of /data/downloads/geofences.syrus.conf
# polygonal
define geofence terminal_a_1416 group=mygroup1 -80.27661,25.79784 -80.27358,25.79897 -80.27091,25.79904 -80.27083,25.79689 -80.2734,25.79728 -80.27561,25.79676 -80.27638,25.79674 -80.27661,25.79784
# circle
define geofence sample_circle_geofence_27422 group=mygroup2 radius=50mts -122.08570313535118,37.42169546752972

# Import geofences from '/data/downloads/geofences.syrus.conf' with the namespace 'myplaces' to the device.
$ apx-geofences-manager import -p /data/downloads/geofences.syrus.conf -n myplaces

# Export geofences on the device from the namespace: 'myplaces' into Syruslang format with the name: '/data/downloads/geofences_applications.syrus.conf'
$ apx-geofences-manager export -f syruslang -n myplaces -p /data/downloads/geofences_applications.syrus.conf
{"results":"ok","geofences":10}
GNSS/GPS
apx-gps
Allows you to control the GNSS/GPS interface on the device.
apx-gps <command> [<options>]| command | description |
|---|---|
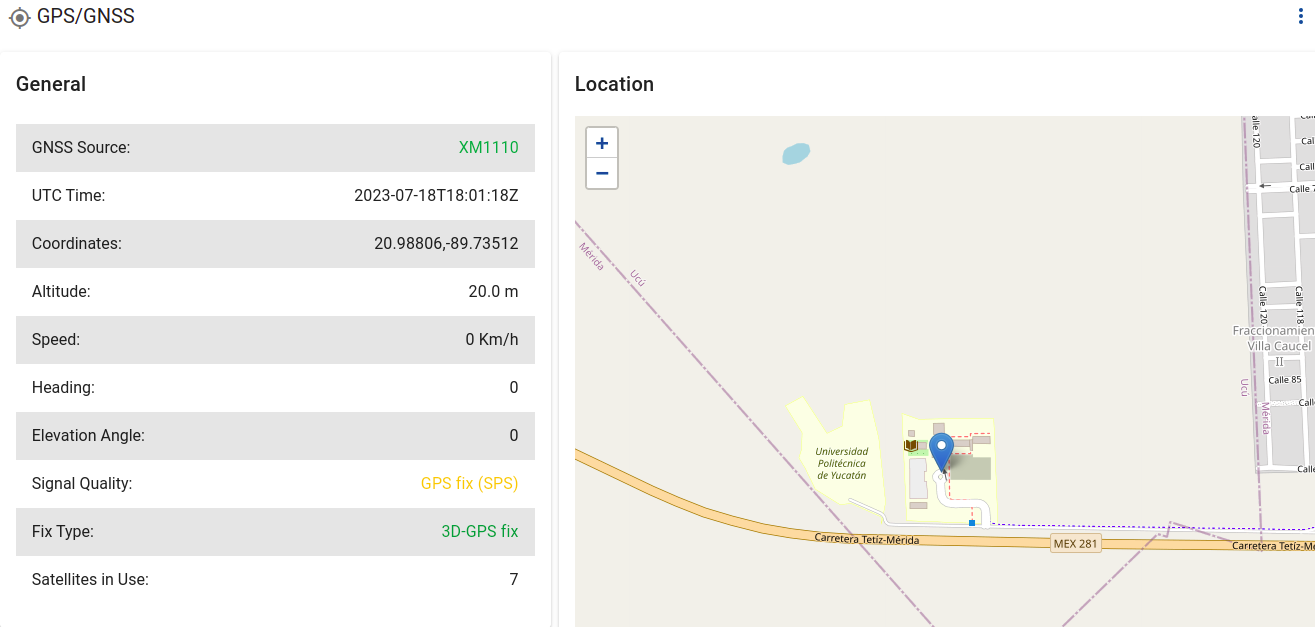
status | Will display the current position, the GNSS engine, the application version, the satellites on view, the DOP, and the configuration parameters |
on | Will enable the GNSS module |
off | Will disable the GNSS module |
restart | Will power off/on the GNSS module |
position | Use this option to consult the current position |
cold-start | Will execute a cold start on the GNSS module |
warm-start | Will execute a warm start on the GNSS module |
hot-start | Will execute a hot start on the GNSS module |
antenna-on | Power on the GNSS antenna, 3.3 Volts are placed on the antenna connector |
antenna-off | Power off the GNSS antenna |
antenna-st | Antenna state (if it's connected or not) |
set-filter [options] | Use this option to configure the GNSS anti-drift filter, it receives as options the hdop, motion and speed(km/h). Valid ranges: 1.0 <= hdop <= 5.0; motion true/false; 0 <= speed < 100 |
set-rate | Use this option to change the GNSS nmea sentece output frequency. Valid options are 1, 5, and 10 Hz |
backlog create | Will create a GNSS backlog file, it receives as parameters the file name --name and the time window --time-win, the time window limit is 300 seconds |
backlog status | Returns the state of the GNSS backlog file specified with the --name argument |
set [options] | Use this option to enable or disable the simulation or nmea-log mode |
version | Returns the tool version |
help | Prints this help |
| options | description |
|---|---|
set-filter | [--hdop=<value>] [--motion=<value>] [--speed=<value>] |
set-rate | [--rate=<value>] |
backlog create | [--name=<value>] [--time-win=<value>] |
backlog status | [--name=<value>] |
set | [--simulation-mode=<true/false>] [--nmea-log=<true/false>] |
Examples:
# Get the gps state
$ apx-gps status
{"TIME":"2023-04-03T20:26:35Z","ENGINE":"xm1110","VERSION":"1.7.4","FIX":3,"LATEST_POINT":{"lat":25.783475,"lon":-80.293563,"alt":17.040,"speed":0.963,"heading":115.27,"epoch":1623959390},"filter":{"hdop":2,"motion":true,"speed":5},"rate":10,"antenna":"disconnected"}
# Where: TIME           = GMT Timestamp in ISOFORMAT
#        ENGINE         = GPS chip
#        VERSION        = GPS version
#        FIX            = Fix quality, 1: 'Fix not available', 2: '2D', 3: '3D' (http://aprs.gids.nl/nmea/)
#        LATEST_POINT
#            lat        = Latitude
#            lon        = Longitude
#            alt        = Altitude in meters above mean sea level
#            speed      = Speed in km/h
#            heading    = Heading in degrees from North, increasing eastwardly
#            epoch      = GPS epoch timestamp
#        filter         = anti-drift filter settings
#            hdop       = Min hdop
#            motion     = True if it needs to detect motion with accelerometer
#            speed      = Minimum speed
#        rate           = Rate of gps update (in Hz)
#        antenna        = Antenna status (disconnected, connected, or short-circuit)

# Perform a warm-start on the GPS module
$ apx-gps warm-start

# Change the GPS anti-drift filter to hdop of 1.8, movement detected, with speed of 50 km/h
$ apx-gps set-filter --hdop=1.8 --motion=true --speed=50

# Get the latest location
$ apx-gps position
"http://maps.google.com/maps?q=25.783560,-80.293480"

# Generate a backlog of the last 60 seconds, and next 20 seconds from now
$ apx-gps backlog create --name=mybacklog --time-win=-60,20

# Get the status of the gnss backlog
$ apx-gps backlog status --name=mybacklog

# Set Simulation mode
$ apx-gps set --simulation-mode=true
GNSS/GPS Simulator
apx-gps-sim
This tool lets you simulate tracking points in order to test geofences, speed limits, changes in heading, and anything related to the GPS.
apx-gps-sim <command>| command | description |
|---|---|
| version | Returns the tool version. |
| start | Start the simulator. |
| stop | Stop the simulator. |
| help | Print this help. |
Once the simulation has started you can use the following actions to control the application
| action | description |
|---|---|
status | Print the current status of the simulator. |
reset | Reset all values of the current simulation. |
set --<option>=<value> | Used to set the GPS values. |
stop | Stop the simulation. |
help | Prints this help again. |
| option | description |
|---|---|
| --debug | Print on screen the json messages that are being generated. i.e set --debug=on |
| --lat | Set GPS Latitude in degrees, use negative for South. i.e set --lat=-34.12345 |
| --lon | Set GPS Longitude in degrees, use negative for West. i.e set --lon=-134.12345 |
| --alt | Set GPS Altitude in meters. i.e set --alt=1568 |
| --head | Set GPS heading. (0-359) i.e set --head=64 |
| --speed | Set GPS speed in kilometers per hour. i.e set --speed=25 |
| --pdop | Set GPS PDOP. i.e set --pdop=3 |
| --vdop | Set GPS VDOP. i.e set --vdop=2 |
| --hdop | Set GPS HDOP. i.e set --hdop=3 |
| --qlt | Set GPS NMEA-GGA fix quality. (0-8).
|
| --fix | Set GPS NMEA-GSA 3D-fix. (1-3).
|
| movement command | description |
|---|---|
| move | The Coordinates change according to speed and heading set, the simulation must first be started with the 'start' command. Speed must be greater than 0 to see some movement. |
| pause | Stop the simulation and keep the values, except for the speed, which will be reset to 0 km/h. |
+ | Increase speed by 1 kph. |
- | Decrease speed by 1kph. |
o | Set speed to 0 kph. |
d | Move heading 1 degree to the right. |
a | Move heading 1 degree to the left. |
D or L | Increase longitude. D increases by 0.00001, L by 0.001. |
A or J | Decrease longitude. A decreases by 0.00001, J by 0.001. |
W or I | Increase latitude. W increases by 0.00001, I by 0.001. |
S or K | Decrease latitude. S decreases by 0.00001, K by 0.001. |
Once started it simulates the location of the device with the coordinates of the last known GPS.
Here's an example of a typical simulation. Each command goes one after the other.
# Start the simulator
apx-gps-sim start

# actions
set --speed=50
set --head=64
move
The above commands will start moving the device in a heading of 64° (North East) at 50 km/h. We can visualize the movement in the GPS section of the Management Tool or Pegasus.
To test events inside and outside of some geofence group use the following script, in this case we want to know if the vehicle entered into any geofence of the group "harrys_team" and to send an event if the vehicle entered with more than 10 kph.
# Define a tracking resolution
define tracking_resolution standard 30deg 20sec 500mts

# Generate an event when it meets any of the tracking resolution criteria
define event track group=tracking ack=seq label=trckpnt code=0 trigger=@tracking_resolution.standard.signal

# Signal for inside the geofence
define signal sg_geo_privet min_duration=1sec $geofences.harrys_team.inside

# Speed limit signals
define signal speed_zone_10 min_duration=1s $gnss.kph > 10
define signal speed_zone_15 min_duration=1s $gnss.kph > 15
define signal speed_zone_20 min_duration=1s $gnss.kph > 20
define signal speed_zone_50 min_duration=1s $gnss.kph > 50
define signal speed_zone_100 min_duration=1s $gnss.kph > 100

# Event for inside the geofence while speeding above 10km/h
define event speeding_10 group=tracking ack=seq label=speeding10 code=10 trigger=sg_geo_privet,speed_zone_10,and
Inputs/Outputs
apx-io
This tool allows the management of the parameters associated with the inputs and outputs. Click here for legacy version of this tool
apx-io <action> <key> <value>
    apx-io <action> <key>
apx-io <action>| action | description |
|---|---|
set | Must be followed by key and value. Will set desired output for the device. |
get | Must be followed by key. Will obtain the value of the desired key |
getall | Must be followed by key. Will obtain all of the values for the desired key |
status | Prints virtual ignition status |
help | Prints all the usages |
pulse_counter | Must be followed by key. Will set the start, stop or resume of the pulse counter. The maximum allowed is 800 pulses per second. |
Allowed values
set
keys:
OUT1,OUT2,OUT3,OUT4,virtualignandBUZZER(The buzzer key is only compatible with S4 Lite), Only valid for Pulse Counter :IN1,IN2,IN3values: for OUTX keys =
trueorfalseor
--times= integer between 1-10
--on= from 20 to 1000 (milliseconds)
--off= from 20 to 1000 (milliseconds)for virtualign key
--signal=IN1,IN2,IN3,IN4,IN5,IN6,IN7,PWR,MOT,AN1,AN2,DAN
--on_threshold= from 0 to 28000 for ANx signals 0 or 1 for INx signals
--off_threshold= from 0 to 28000 for ANx signals 0 or 1 for INx signals
--on_time= from 0 to 60 (seconds)
--off_time= from 0 to 60 (seconds)for BUZZER key
--mode=user,imu,user_imu(You can take the control of the buzzer inuseranduser_imumodes)
--times= integer between 1-10
--on= from 10 to 1000 (milliseconds)
--off= from 10 to 1000 (milliseconds)**Note: The sum of the on and off times cannot exceed 1000 milliseconds.
for IN1, IN2, IN3 keys
--mode = pulse_counter
get
keys:
OUT1,OUT2,OUT3,OUT4,IGN,IN1,IN2,IN3,IN4,IN5,IN6,IN7,PWR,MOT,SO1,SO2,SO3,SO4,TIG,AN1,AN2,DAN,BAT
getall
keys:
outputs,inputs,analogs
status
key:
virtualign
Examples:
# Activate output 2:
$ apx-io set OUT2 true

# Activate output 4, 3 times, ON for 1000ms and OFF for 1000ms
$ apx-io set OUT4 --times=3 --on=1000 --off=1000

# Get the value of all the analog inputs:
$ apx-io getall analogs
{"BAT":4.047,"DAN":11,"AN1":0,"AN2":0}

# Set virtual ignition with Analog Input 2
# Detects ON when the value is above 5000mV for 5 seconds, OFF when below 5000 for 5 seconds
$ apx-io set virtualign --signal=AN2 --on_threshold=5000 --off_threshold=5000 --on_time=5 --off_time=5

# Set and trigger the buzzer for the S4 Lite
# First the user mode must be set.
$ apx-io set BUZZER --mode=user
# Then the buzzer must be trigger.
$ apx-io set BUZZER --times=5 --on=400 --off=500
Pulse counter example:
Inputs work in Pulse Counter Mode or Normal ModeThe device inputs will either work in Pulse Counter Mode or Normal Mode but not both at the same time.
$ apx-io pulse_counter --start/--stop
$ apx-io pulse_counter --resume/--status/--count

$ apx-io set IN1 --mode=pulse_counter
Safe Immobilization
Tool that activates the device's safe immobilization feature. This feature activates the device's output 1 after certain conditions are met - thereby making it a safe activation.
Caution should always be exercised if using this to immobilize a vehicle.
apx-seco <command> [<options>]Commands:
| command | description |
|---|---|
set [options] | Command to enable/disable the SECO mode and the SECO trigger |
status | It returns a json object with the current state of the SECO mechanism |
version | Returns the tool version |
help | Print this help |
Options:
| option | description |
|---|---|
-m, --mode | Valid values are enable and disable. When enabled, the user can not control the output 1 via 'apx-io set out1' command |
-t, --trigger | Valid values are enable and disable. When enabled, the SECO mechanism will try to activate the output 1 when safety conditions are met. Use disable to cancel the instruction or deactivate the output 1 |
--ecu_speed | Define a PGN/SPN for reading the engine speed used for the speed threshold that's used to trigger the safe immobilization. See the deploy for more information. |
Status:
| status | description |
|---|---|
| 0 | SECO IDLE |
| 1 | Canceled by the user |
| 2 | Output deactivated (Power restored) |
| 3 | Output activated (Power suspended) |
| 4 | Vehicle speed under 10kph, if this condition persists for 20 seconds, the output will be activated. |
| 5 | No GPS, if this condition is reached, the device will wait for 5 minutes without movement before activating the output, if during this 5 minutes the imu module reports motion, the 5 minutes timer is restarted. |
| 6 | Safe conditions are not met, either motion was detected or vehicle speed is above 10kph. |
| 7 | Periodic report, the SECO mechanism is running but waiting for safety conditions. |
Examples:
# enable the safe immobilization mechanism
$ apx-seco set --mode=enable

# activate output 1 safely
$ apx-seco set --trigger=enable

# set the engine speed pgn/spn to fef1_2-3
$ apx-seco set --ecu_speed=fef1_2-3

# check the status
$ apx-seco status
LTE-Modem
apx-mdm
Tool to manage the LTE module of the device. Allows you to configure the APN and other configuration related parameters as well as perform actions like sending an SMS, enabling airplane mode, or converting text to speech.
apx-mdm <command> [<args=value>]COMMANDS:
| command | description |
|---|---|
status | Use this option to consult the current state and general information about modem network registration and configuration parameters.It returns a json object. |
restart | Use this option for restarting the modem device. |
call [OPTIONS]\ | Use this for starting a voice call |
end-call | Use this option for ending an established voice call. |
set [OPTIONS]\ | Configure parameters used by the modem application |
phone-book [SUBCOMMAND] [OPTIONS] | Use this command to manage the phone book |
tts [OPTIONS] | Use this command to convert text to speech |
version | Returns the tool version. |
COMMAND:
set [OPTIONS]- Use this option to configure the parameters used by the modem application
| option | description |
|---|---|
-a, --apn | The access point name. Set to none to remove the value. |
-p, --pin | The SIM card PIN. Set to none to remove the value |
-u, --user | The username for the APN. Set to none to remove the value. |
-p, --pass | The password to access the APN. Set to none to remove the value. |
-b, --sim-sw-interval | The time interval in hours for changing from external SIM to embedded when no data connection is reached (default: 4). Use 0 to never switch to the other SIM. |
-c, --sim_priority | With this parameter, you can specify the sim card to use: e-sim embedded (default) or sim-card external |
-k, --keep_alive | The time interval in minutes to check the data connection. The default is 15 min, minimum: 1 min, and the maximum: 60,000 min. A value of 0 deactivates the keep-alive. |
-v, --call_validation | Use true for validating the phone number before answering the call, it depends on the authorized phone list added with phone_book option. By default, the device validates the phone number before answering the call |
-m, --sms-validation | Use 'true' for validating the phone number before processing the incoming sms, it depends on the authorized phone list added with phone_book option. By default, the device validates the phone number before processing the incoming sms |
-f, --airplane_mode | Use true for entering in airplane mode and false for returning to normal mode. |
-j, --jamning-level | The received signal strength indication threshold to evaluate jamming. Default value: -40. Range: -90 to -25. Unit: dBm. By using values lower than -40, the device is going to detect less powerful jamming signals, however, this increases the chance to have fake jamming detections. |
-o, --operator-sw | Use this option to enable (1) or disable (0) the operator switching mechanism. This functionality helps the device switch between operators when connectivity issues occur. To enable it, you must also configure the whitelist, keep-alive, and sim-header. |
-l, --whitelist | Use this option to configure the list of available operators for connection. Before adding operators to the list, ensure your SIM connection profile is properly configured and verify that all listed operators are accessible for connection. |
-r, --sim-header | Use this option to configure the SIM card header, which is used to verify whether the inserted SIM card supports switching between whitelisted operators. |
-e, --operator | Use this option to set the operator to use. The value must be the operator code and it has to be included in the whitelist. |
COMMAND:
phone-book [SUBCOMMAND] [OPTIONS]- Use this command to add, remove and consult the authorized phone book list
| subcommand | description |
|---|---|
add | Use this option to add a phone number to the authorized list. |
remove | Use this option to remove a phone number from the authorized list. |
list | Use this option to consult the phone number authorized list. |
| option | description |
|---|---|
-n, --number | The phone number to add or remove |
Disable the call identifier to answer calls from unregistered numbersIf you want Syrus to answer a call from a number not in the
phone_bookremember to first disable the call validation:# disable call validation $ apx-mdm set --call-validation=false # place a call to the Syrus sim's number and it'll pick up # remember you can use the apx-mdm end-call to end the call from the Syrus side
COMMAND:
send [OPTIONS]- Use this command to send SMSs
| options | description |
|---|---|
-s, --sms | The message to be sent. |
-n, --number | The destination phone number |
COMMAND:
call [OPTIONS]- Use this option for starting a voice call
| options | description |
|---|---|
-n, --number | The phone number to call |
COMMAND:
tts [OPTIONS]- Text to speech. Use this option to turn text into sounding by using the Bluetooth speaker connected
| options | description |
|---|---|
-t, --text | The text to be reproduced |
Examples:
# Set the APN of the regular SIM card (not embedded)
$ apx-mdm set --apn="mycarrierapn.com" --user=myuser --pass=mypass

# Set the APN, remove the user and pass
$ apx-mdm set --apn=myapn.com --user=none --pass=none

# Set the priority of the SIM card used to the regular SIM (not embedded):
$ apx-mdm set --sim-priority=sim-card

# Add phone number to the phone book:
$ apx-mdm phone-book add -n=3013333333

# Send an SMS to 3013333333
$ apx-mdm send --n=3013333333 --sms='Testing Syrus4 SMS'

# Start a call with the number: 3013333333
$ apx-mdm call -number='+13013333333'

# Speak command
$ apx-mdm tts --text='Testing text to speech'

# Get the status of the LTE modem
$ apx-mdm status
{"MANUFACTURER":"Quectel","REVISION":"EG25GGBR07A07M2G","MODEL":"EG25","IMEI":"867698041061234","MODEM_STATE":"ON","GSM_REG":5,"GPRS_REG":5,"RAT":"FDD LTE","MCC_MNC":310410,"BAND":"LTE BAND 2","OPERATOR":"At&t wireless","SIM_STATE":"READY","eSIM_STATE":"Not in Use","IP":"100.95.54.63","LAC":"3206","CID":"A6D7CC0","eSIM_IMSI":"310260869334233","eSIM_ID":"8901260862393348814F","NO_CONN_TIME":0,"RSSI":31,"SIM_IMSI":"732123200690261","SIM_ID":"89883070000006772525","JAMMING":"NOT_SUPPORTED","TEMPERATURE":32,"SIM_SW_INTERVAL":1,"KEEP_ALIVE":15,"APN":"super","SIM_PRIORITY":"sim-card","JAMMING_LEVEL":-40}

# Set the operator switching mechanism
apx-mdm set --operator-sw=1 --sim-header=89012 --keep-alive=5 --whitelist=[302610,302220]

# Force the device to use 302610 as operator
apx-mdm set --operator=302610
Status of New SIM Depends on PriorityNote that the
apx-mdm statuscommand doesn't reflect a newly inserted SIM card if the priority is set to thee-sim. In other words, you must set the priority toapx-mdm set priority --sim-priority=sim-cardto see an updated SIM ID on theapx-mdm statusresponse.
Restart Device Before Inserting a New SIMIt's recommended to restart the device
apx-system rebootbefore removing and inserting a new SIM.
apx-ppp
Manages the ppp connection to the internet with the specified profile.
apx-ppp [option] profile| option | description |
|---|---|
start | Starts the pppd deamon with the profile specified |
stop | Stops the pppd process |
state | Returns 0 if daemon is running and ppp0 interface has an IP, 1 otherwise |
help | Prints this help message |
Example:
$ apx-ppp start defaultOnewire
iButton
Temperature
IOs Expander
Manage devices that communicate via the 1-wire bus system like temperature probes, IButtons or IO's Expander.
WarningAll commands related to the IO's Expander are only available from the following versions:
- APEX 24.11.01
- syrus-onewire 2.1.2
- apx-onewire 0.2.0
apx-onewire
Use this Apex tool to add/remove onewire devices to or from the whitelists found in /data/users/syrus4g/onewire/. This tool also allows to get information about the onewire devices connected.
apx-onewire [type] [action]
apx-onewire [type] [action] [argument_1] [argument_2] ... [argument_n]| type |
|---|
ibutton |
temperature |
iosexpander |
| IOs Expander arguments |
|---|
| IN1, IN2, IN3, IN4, OUT1, OUT2, OUT3, OUT4 |
| action | description |
|---|---|
add | Followed by argument_1 and argument_2. Will add the alias found in argument_1 with the onewire id number found in argument_2 to the white list based on the valid type. Alias cannot be empty, must be of 50 characters or less, and cannot contain the character ':'. The onewire id must be exactly 16 characters long therefore you must place padding with leading zeros to complete the 16 digits. |
remove | Followed by argument_1. The argument_1 can be either the alias or the onewire id which will be removed from the white list based on the valid type. |
remove_all | Not followed by any arguments. Will remove all of the onewire devices based on the type specified from the corresponding white list. |
remove_last | Not followed by any arguments. Will remove records of the last onewire device discovered. |
get | Followed by argument_1. The argument_1 can be either the alias or the onewire id. Returns an object with information about the onewire device based on the type given. |
get_all | Not followed by any arguments, returns an array of objects for all the onewire devices based on the type specified. |
get_last | Not followed by any arguments, returns an object of the last onewire device that was connected based on the type specified. |
restart | Not followed by any arguments, not preceded by a type, will restart the onewire application. |
reset | Not followed by any arguments, not preceded by a type, will reset the onewire application. Deleting all white list files as well as previous information about past onewire devices. |
help | Not followed by any arguments, not preceded by a type, will print this message. |
version | Not followed by any arguments, not preceded by a type, will return the core and the tool version. |
status | Not followed by any arguments, not preceded by a type, will return the status of the onewire bus. 0 meaning operation is normal. -1 meaning that there is a fault in the onewire bus. |
set | Only for IOs Expander, followed by argument_1 and argument_2. The argument_1 must be the capitalized name of the output to be configured, The argument_2 must be true or false depending on what is desired. |
Examples:
# add ibutton with alias: "driver 1"
$ apx-onewire ibutton add "driver 1" 0123456789123401

# read all ibuttons
$ apx-onewire ibutton get_all
{"ibuttons":[{"alias":"driver 1","id":"0012331241412401","whitelisted":true,"connected":false,"conn_epoch":null,"disc_epoch":null}]}

# add temperature alias for room1
$ apx-onewire temperature add "room1" 3501144D2797AA28

# read all temperatures
$ apx-onewire temperature get_all
{"temperatures":[{"alias":"room1","id":"3501144d2797aa28","value":null,"connected":false,"epoch":1619786506}]}

# read all IO's
$ apx-onewire iosexpander get_all
{"in1":false,"in2":false,"in3":false,"in4":false,"out1":false,"out2":false,"out3":false,"out4":false}

# read one Input or Output
$ apx-onewire iosexpander get IN2
false

# read IO's status
$ apx-onewire iosexpander status
{"status":"connected","in1":false,"in2":false,"in3":false,"in4":false,"out1":false,"out2":false,"out3":false,"out4":false}

# set outputs
$ apx-onewire iosexpander set OUT3 true
People Counting
apx-ndm-pc
Tool to manage the people counting camera.
apx-ndm-pc <command> [--<option>=<value>]| commands | description |
|---|---|
start | starts the people counting. |
stop | stops the people counting. |
reset | reset the internal people counters. |
status | get actual counters status. |
report [OPTIONS] | returns the JSON formatted report. |
| options | |
|---|---|
report | [--from=<value>] [--to=<value>] |
The report is used to request a summary of the people counted
ALLOWED VALUES:
from: epoch format -> 1668798420to: epoch format -> 1668798420
Example
# Start
$ apx-ndm-pc start

# Stop
$ apx-ndm-pc stop

# Reset
$ apx-ndm-pc reset

# Status
$ apx-ndm-pc status

# Report
$ apx-ndm-pc report --from=1665316800 --to=1665331200
Power Save
apx-psm
Tool to manage the device's power save mode.The power save mode is ON by default where the device goes into a low power consumption mode after 5 minutes without the ignition wire detected. This behavior can be overwritten with this tool. Syrus 4 consumes ~200mA when using GNSS, modem and wifi, thus it's recommended to always have a power save mode configured, to avoid any issues with a car's battery for example.
Default PSM_STRING: IGN:0,SLP:300;IGN,MIN:720;300
apx-psm [action] [PSM_string]| action | description |
|---|---|
immediate | This action is not followed by PSM_string, instead it orders the device to enter Power Save Mode with the previously loaded configuration. When a previous PSM doesn't exist the device will use the default PSM. |
mode | Must be followed by PSM_string and the only valid format is sleep_condition;wakeup_condition;wait_time. Signals for the conditions are separated by commas (,) and conditions are separated by semicolons (;). All of the sleep_condition signals must have a valid value of 0 or 1 and the colon (:) character must be used to separate between signal and value. Note: MIN is the only signal for wakeup_condition that has a value. SLP signal cannot exist without a MIN signal and vice versa. Be sure to encapsulate PSM_string with "Quotation Marks" |
help | Prints this message. |
guide | Guides the user on how to properly create a Power Save Mode string. Note The device will be configured with the results of this guide. |
Configuration of the[PSM_string]
First enter the sleep_condition. This is the condition the device must meet so that it will go into Power Save Mode. This condition is broken into signal:value separated by commas where only the valid signals below are allowed and the only valid values are 0 (inactive) or 1 (active)
| sleep_condition signals | description |
|---|---|
IGN | Ignition state. |
IN1 | Input 1 state. |
IN2 | Input 2 state. |
IN3 | Input 3 state. |
IN4 | Input 4 state. |
IN5 | Input 5 state. |
IN6 | Input 6 state. |
IN7 | Input 7 state. |
PWR | External power state. |
MOT | Motion state. |
SO1 | Short-circuit on output 1. |
SO2 | Short-circuit on output 2. |
SO3 | Short-circuit on output 3. |
SO4 | Short-circuit on output 4. |
TIG | Ignition from main power supply state, this ignition is detected based on the signal frequency |
SLP | Time to wait for the device to go back into sleep mode in seconds (300 - 65535 seconds) |
Next enter the wakeup_condition. This is the condition that lets the device know how it should return from the Power Save Mode. The device will wake up upon any of the given wake up signals being met. Only use the valid wake up condition signals described below. The only signal that uses a value is 'MIN' and this signal lets the device know how often to wake up. Example: MIN:10 will wake up every 10 minutes.
| wakeup_condition signals | description |
|---|---|
IN1 | Will wake up based any change detected in input 1. |
IN2 | Will wake up based any change detected in input 2. |
IN3 | Will wake up based any change detected in input 3. |
IN4 | Will wake up based any change detected in input 4. |
IN5 | Will wake up based any change detected in input 5. |
IN6 | Will wake up based any change detected in input 6. |
IN7 | Will wake up based any change detected in input 7. |
IGN | Will wake up upon ignition signal change. |
PWR | Will wake up upon external power source signal change. |
SO1 | Wake up due to a short in output 1. |
SO2 | Wake up due to a short in output 2. |
SO3 | Wake up due to a short in output 3. |
SO4 | Wake up due to a short in output 4. |
MOT | Will let the device wake up upon motion being detected. |
MIN | Lets the device know how often, in minutes, to wake up. 1 - 65536 (note this needs a value) |
Lastly, enter the wait_time. This is the time the sleep condition must be met and sustained before the device will into Power Save Mode. This number is defined in seconds. The wait time must be between 300 seconds (5 minutes) or 65536 seconds (18 hours) inclusive.
About Power Saving ModeNote that there is no way to remove the power save mode, however you can configure it in a way so that the device never falls asleep
Examples:
# Set the power save mode to go to sleep after 240 seconds (4min) (240) of no ignition detected (IGN:0), wake up for 5 minutes (SLP:300) every 10 minutes (MIN:10) or end the power save mode when motion is detected (MOT).
$ apx-psm mode "IGN:0,SLP:300;MOT,MIN:10;240"

# Set the power save mode to go to sleep after 300 seconds (300) of no movement detected (MOT:0), and wake up only when input1 is detected (IN1).
$ apx-psm mode "MOT:0;IN1;300"

# Set the power save mode to go to sleep after 5 minutes (300) of no movement or ignition (MOT:0,IGN:0), wake up every 2 hours (MIN:120) for 3 minutes (SLP:180) or end the power save mode when INPUT 1, or IGNITION, or MOTION is detected (IN1,IGN,MOT).
$ apx-psm mode "MOT:0,IGN:0,SLP:180;IN1,IGN,MOT,MIN:120;300"
RFID
apx-rfid
This tool allows you to configure the RFID mode, check the current status, and perform various actions related to RFID functionality. With its user-friendly interface, you can easily adjust RFID settings, monitor real-time status updates, and execute specific commands. Additionally, by using Syrus Cloud profiles, you can upload the RFID authorized list to the device, enabling it to recognize specific IDs and perform predefined actions based on those credentials. Whether you need to enable or disable certain features, troubleshoot connectivity issues, or ensure seamless integration with other systems, this tool provides a convenient and efficient way to manage RFID operations.
apx-rfid <command> [<option>=<value>]| command | description |
|---|---|
set [OPTIONS] | Use this option to set the RFID mode. |
get [OPTIONS] | Use --last to get the last ID read or --id=xxx... to consult if a specific ID is part of the authorized list. |
clear [OPTIONS] | Use this command to clear the last ID read. |
status | Use this command to consult the current state. |
| option | description |
|---|---|
-i, --id | The ID to be consulted. |
-a, --alias | The alias associated with an ID. |
-m, --mode | Valid modes are drexia or default. Drexia mode is used to convert ibutton IDs in RF IDs. |
-l, --len | Use this field to set the length of the drexia ID to be read. Valid values are 3 and 4. |
--last | To get the last ID read. |
Examples:
apx-rfid set --mode=drexia
apx-rfid set --mode=drexia --len=4
apx-rfid get --id=1234
apx-rfid get --alias=Driver_1
apx-rfid get --last
apx-rfid clear --last
Serial Interface
Manage the RS-232 interface of the device to communicate with accessories via the serial port.
apx-serial
Configures the RS-232 serial interface in different modes for communication with serial accessories such as Satcom & Sigfox communicator, fatigue sensor, mobile data terminal, rfid reader can60 (Linkedcore), or fuel level sensor.
apx-serial <command> [<option>=<value>]| command | description |
|---|---|
restart | Use this option to restart the serial module. |
set [OPTIONS] | Use this option to set the serial work mode. |
get [OPTIONS] | Use this option to get the current serial work mode. |
send [OPTIONS] | Use this command to send data through the serial port |
| option | description |
|---|---|
--mode | Used with set or get command. |
--msg | Message to be send; To use with the send command. Valid: Any string |
--canonical | This option is only valid in console mode. Valid values are 0 (to turn it off) and 1 (to turn it on). |
| mode | description |
|---|---|
serial_expander | Used when the Serial Expander device is connected. |
fatigue_sensor | Used when an fatigue sensor device is connected. |
fuel_sensor | Used when an fuel sensor device is connected. |
flow_meter | Used when an flow meter device is connected. |
console | Used for interact with the Syrus device through a serial terminal at 115200 8 n 1, using apex commands. |
modem | Used when Satcom or Sigfox accessories are connected. |
mdsm7 | Used when a MDSM7 device is connected. |
rfid | Used when an RFID device is connected. This mode can also be used to extract IDs from serial streams. The ID extracted will be notified as an RFID. |
user | Used when you want to leave the serial port free for your use. |
mdt | Used for MDT data transmission. |
mdt_rs485 | Used for MDT data transmission via RS485. Use the same apx-serial-mdt tool to configure and interact with the RS485 device. |
mdas9 | Used when a MDAS9 device is connected |
can60 | Used when a LinkedCore device is connected. |
apx commandsNote that there are separate apx commands for console modem, mdt fatigue sensor fuel level sensor , user, expander, flow meter, mdsm7, rfid and mdas9 integration.
Examples:
apx-serial restart

apx-serial get --mode

apx-serial set --mode=console
apx-serial set --mode=fuel_sensor
apx-serial set --mode=mdas9

# sending a message over TAIP
apx-serial send --msg=">RTXmessage<"
apx-serial-ftgs
Used to communicate with a fatigue sensor. The photos captured by the fatigue sensor are automatically stored in: /data/users/syrus4g/fatigue_sensor.
apx-serial-ftgs <command> [<option=value>]| command | description |
|---|---|
state/status | Use this command to consult the current mode state. |
list | It returns the list of the photos stored in the device memory. |
set [OPTIONS] | Use this command to set the different options listed after. |
get [OPTIONS] | Use this command to get the different options listed after. |
upload | Use this command to upload the photos to the syrus4 server. |
capture_photo | Use this command to capture a photo. |
delete_photos | Use this command to delete all the photos stored. |
| option | description |
|---|---|
--sensitivity | Sensor sensitivity. Range 2-11. Default 3. |
--min_speed | Refers to the warning start-up speed. Range 10-60. Default 10 km/h. |
--speeding | Sensor speed alarm rate. Range 50-150. Default 50. |
--max_photos | Max number of photos that can be stored in the device memory. Range 10-100. Default 25. |
--speaker_volume | Sensor speaker volume. Range 0-2. Default 2. |
--auto_upload | When enabled, the application will automatically upload the photos to the syrus4 server. 0: disabled, 1: enabled. Default disabled |
Examples
| sensitivity | approximate delay time in seconds to alarm |
|---|---|
| 2 | 2.2 seconds |
| 3 | 2.9 seconds |
| 4 | 3.7 seconds |
| 5 | 4.5 seconds |
| 6 | 5.3 seconds |
| 7 | 6.1 seconds |
| 8 | 6.9 seconds |
| 9 | 7.7 seconds |
| 10 | 8.5 seconds |
| 11 | 15 seconds |
Examples
apx-serial-ftgs state

apx-serial-ftgs list

apx-serial-ftgs upload

apx-serial-ftgs capture_photo

apx-serial-ftgs delete_photos

apx-serial-ftgs get --sensitivity

apx-serial-ftgs set --sensitivity=3 --min_speed=20 --speeding=60
Auto-upload
The auto-upload feature is used to automatically upload photos to DCT's server. In a future release we'll provide access to download the photos from DCT's server, if you're using Syruslang
Note that the photos captured by the fatigue sensor use the following format:
epoch-photo_description.jpeg
Where photo description can be any of the following:
- fatigue_alarm: driver fatigue detected
- fatigue_remind: driver fatigue reminder
- fatigue_warning: driver fatigue warning
- distraction: driver distracted
- no_portrait: driver not detected
- photo: regular photo captured with fatigue sensor
apx-serial-fs
Fuel sensor mode for the serial port.
apx-serial-fs <command> [<option=value>]| command | description |
|---|---|
set [OPTIONS] | Use this command to configure the fueling threshold, consumption threshold, and consumption window. |
status | Use this command to consult the current sensor state. |
version | Returns the tool version. |
help | Print help message. |
upload | Use this command to upload the photos to the syrus4 server. |
| option | description |
|---|---|
-f, --fuelling-threshold | The threshold used for triggering the fueling signal. |
-c, --consumption-threshold | The threshold used for triggering the consumption signal. (Note that this threshold is based on the raw value reported by the Fuel Level Sensor - If the fuel level sensor was configured in deci-liters then you have to adjust the threshold accordingly) |
-w, --consumption-window | The time window in seconds used for evaluating the consumption behavior. |
Examples
# Note that the threshold value depends on how the fuel sensor was configured
# If the output message of the sensor is in deci-liters then you have to adjust the threshold accordingly

# Set the consumption threshold to 100 deci-liters (10.0 liters) in 20seconds
apx-serial-fs set --consumption-threshold=100 --consumption-window=20

# Get the status of the fuel sensor
apx-serial-fs status
Did you know?Multiple fuel sensors are supported via Serial Expander.
Max sensors supported: 3
Since:
- APEX 24.19.1
- syrus-serial ver. 0.6.2
- SyrusJS 1.63.0
Multiple Fuel Sensors configure
To use multiple fuel sensors you need to set the serial RS232 mode in serial-expander.
apx-serial set --mode=serial_expanderAfter this, it is important that you configure the desired settings for each sensor like this:
# IMPORTANT: The value of --port indicates which port the sensor is connected to on the serial expander.
apx-serial-fs set --port-id=1 --consumption-threshold=100  --consumption-window=20 --fuelling-threshold=100
apx-serial-fs set --port-id=2 --consumption-threshold=80  --consumption-window=50 --fuelling-threshold=90
apx-serial-fs set --port-id=3 --consumption-threshold=100  --consumption-window=20 --fuelling-threshold=85
Additionally you can set an alias to each port/sensor.
# Max Alias length = 20 chars
apx-serial-fs set --port-id=1 --alias=left
By default the alias assigned are port1, port2, port3
Also you can check the current state of the configured sensors:
apx-serial-fs status
# For example:
[
{
    "port_id": 1,
    "alias": "port1",
    "state": "connected",
    "temperature": 24,
    "frequency": 2571,
    "level": 15,
    "timestamp": 1713981201,
    "consumption-threshold": 100,
    "consumption-window": 20,
    "fuelling-threshold": 80
},
{
    "port_id": 3,
    "alias": "back",
    "state": "disconnected",
    "temperature": 130,
    "frequency": 2556,
    "level": 19000,
    "timestamp": 1713982342,
    "consumption-threshold": 90,
    "consumption-window": 20,
    "fuelling-threshold": 90
}
]
For SyrusJS configuration please go to: Fuel Sensor Signals
apx-serial-mdt
Manages data coming into the serial port cables and creates data packets based on different user defined parameters.
apx-serial-mdt <command> [<option=value>]| command | description |
|---|---|
state/status | Use this command to consult the current mode state. |
send [OPTIONS] | Use this command to send data through the serial port |
set [OPTIONS] | Use this command to configure the MDT mode. |
| option | description |
|---|---|
--baudrate | Transmission speed. Valid: 1200, 4800, 9600, 19200, 38400, 57600, 115200 |
--type | Message type. Valid: 'x' for Hexadecimal or 'a' for ASCII |
--timeout | Transmission timeout. Range 0-900s. Use 0 for ignoring this setting |
--max_size | Message max size. Range 0-1024. Use 0 for ignoring this setting. |
--header | Message header. Up to 4 hexadecimal bytes. Use 0 for ignoring this setting. |
--tail | Message tail. Up to 4 hexadecimal bytes. Use 0 for ignoring this setting. |
--mask | Message mask. Up to 4 hexadecimal bytes. Use 0 for ignoring this setting. |
--offset | The number of positions since header for applying the mask. Range 0-1024. Use 0 for ignoring this setting. |
Valid escape characters(only for ASCII Mode):
- For ASCII: \n, \r, \t, \0, \1, \2, \a, \v, \f
- For HEX: \00, \01, \02, \07, \09, \0a, \0b, \0c, \0d, \5c
- For HEX: \x0, \x1, \x2, \x7, \x9, \xa, \xb, \xc, \xd, \5c
Examples
apx-serial-mdt state

apx-serial-mdt send --msg=AE01CFE45

apx-serial-mdt send --msg='hellow world'

apx-serial-mdt send --msg='worldtest\r\n'

apx-serial-mdt send --msg='world\5ctest\xd\xa'

apx-serial-mdt set --baudrate=115200 --type=x --timeout=10 --max_size=20 --header=0a --tail=0b --mask=01 --offset=5
apx-serial-modem
Used to communicate with other serial capable modem devices/accessories like the Syrus Satcom and Sigfox Communicator.
apx-serial-modem <command> [<option=value>]| command | description |
|---|---|
state/status | Use this command to consult the current mode state. |
send [OPTIONS] | Use --msg to send data through the serial port like >REV331852148....;ID=35...< |
set [OPTIONS] | Use --buffer_size to set the size of the serial modem buffer. |
get [OPTIONS] | Use --buffer_size to get the size of the serial modem buffer. |
clear_buffer | Use this command to clear the serial modem buffer. |
| option | description |
|---|---|
-m --msg | To be used with the send command. |
-b --buffer_size | To be used with the set/get commands. |
Examples
apx-serial-modem state

apx-serial-modem clear_buffer

apx-serial-modem get --buffer_size

apx-serial-modem set --buffer_size=150

apx-serial-modem send --msg='>REV331852148....;ID=35...<'
apx-serial-rfid
RFID connected to serial port or any serial accessory that sends IDs in ASCII numeric format.
$ apx-serial-rfid <command> [<option=value>]| command | description |
|---|---|
set [OPTIONS] | Use this command to add an ID to the authorized list, change the alias of an existing ID, or configure the header and tail used to parse the serial stream received. |
remove [OPTIONS] | Use this command to remove an ID from the authorized list. Use --all for removing the complete list. |
list | Use this command to list the authorized list. |
get [OPTIONS] | Use --last to get the last ID read. |
clear [OPTIONS] | Use --last to clear the information about the last ID read. |
version | Returns the tool version. |
help | Print this help. |
| options | description |
|---|---|
-i, --id | The ID to be added or removed. |
-a, --alias | The alias to be associated with an ID. |
--all | To be used with the remove command. |
--last | To be used with the get/clear commands. |
--header | This is the header used to parse the serial stream. Once the header is found, the application starts looking for the ID, and once the tail is reached, it publishes via redis the ID read. |
--tail | This is the tail used to parse the serial stream. This option is the complement to the --header option. |
Examples
# Set rfid 1234 to driver1
$ apx-serial-rfid set --id=1234 --alias=driver1

# Remove rfid 1234
$ apx-serial-rfid remove --id=1234

# Remove all rfid values
$ apx-serial-rfid remove --all

# Get last rfid value
$ apx-serial-rfid get --last

# Set header and tail to extract the ID when it comes between something like
# SomeDataHereRUN=12346&MoreDataHere
apx-serial-rfid set --header='RUN=' --tail='&'
apx-serial-user
Allows the user to have control over the serial port and send custom messages.
apx-serial-user <command> [<option=value>]| command | description |
|---|---|
state/status | Use this command to consult the current mode state. |
set [OPTIONS] | Use this option to set the user mode configuration. |
get[OPTIONS] | Use this option to get the user mode configuration. |
send [OPTIONS] | Use this option to send messages through the serial port |
| option | description |
|---|---|
--baudrate | Transmission speed; To use with the set/get command. Valid: 1200, 4800, 9600, 19200, 38400, 57600, 115200 |
--msg | Message to be send; To use with the send command. Valid: Any string |
Valid escape characters:
- For ASCII: \n, \r, \t, \0, \1, \2, \a, \v, \f
- For HEX: \00, \01, \02, \07, \09, \0a, \0b, \0c, \0d, \5c
- For HEX: \x0, \x1, \x2, \x7, \x9, \xa, \xb, \xc, \xd, \5c
Examples
apx-serial-user state

apx-serial-user get --baudrate

apx-serial-user set --baudrate=115200

apx-serial-user send --msg='hello world'

apx-serial-user send --msg='worldtest\r\n'

apx-serial-user send --msg='world\5ctest\xd\xa'
apx-serial-cnsl
Manages communication with the serial port and allows Syrus to respond and interact with the incoming messages.
apx-serial-cnsl <command> [<option=value>]| command | description |
|---|---|
send[options] | Use this command to send a message through the serial port. |
set[options] | Use this command to configure the console parameters. |
get[options] | Use this command to get the current value of the passed param. |
| options | description |
|---|---|
| --msg | To be used with the 'send' command. |
| --baudrate | Transmission speed. To be used with 'set' or 'get' commands. Valid: 1200, 4800, 9600, 19200, 38400, 57600, 115200 |
$ apx-serial-cnsl send --msg='hello world'

$ apx-serial-cnsl set --baudrate=115200

$ apx-serial-cnsl get --baudrate
apx-serial-slctr
Manages the input serial interface of the device. You can only select between one of rs232, 1708, or rs485.
apx-serial-slctr <command> [<option=value>]| command | description |
|---|---|
set [options] | Use this command to change the serial selector. |
version | Returns the tool version. |
help | Print this help. |
| option | description |
|---|---|
| --m, --mode | Valid modes are rs232, rs485 and 1708. |
Example:
$ apx-serial-slctr set --mode=rs232apx-serial-exp
Manages the serial expander configuration.
apx-serial-exp <command> [<option=value>]| command | description |
|---|---|
set [options] | Use this command to change the ports operation mode. |
state/status | Returns the current expander configuration. |
| Option | Description |
|---|---|
--port1 | Expander port # 1 |
--port2 | Expander port # 2 |
--port3 | Expander port #3 |
| mode | description |
|---|---|
fatigue_sensor | Used when an fatigue sensor device is connected. |
fuel_sensor | Used when an fuel sensor device is connected. |
flow_meter | Used when an flow meter device is connected. |
console | Used for interact with the Syrus device through a serial terminal at 115200 8 n 1, using apex commands. |
modem | Used when Satcom or Sigfox accessories are connected. |
mdsm7 | Used when a MDSM7 device is connected |
rfid | Used when an RFID device is connected. |
user | Used when you want to leave the serial port free for your use. |
mdt | Used for MDT data transmission. |
can60 | Used with the LinkedCore device. |
Example:
$ apx-serial-exp set --port1=mdsm7 --port2=mdtapx-serial-can60
Use this tool to communicate with the LinkedCore device.
apx-serial-can60 <command> [<option=value>| Commands | Description |
|---|---|
| status | Use this option to consult the current status. |
| send | Use this command to send data through the serial port, the response will showed. |
| Options | Description |
|---|---|
| --ATCMD= | Use this argument only with the send command, followed by an allowed AT Command. |
Example:

apx-serial-can60 status
apx-serial-can60 send --ATCMD='AT+CSQ'
apx-serial-flw
Consult the flow meter current state.
apx-serial-flw <command> [<option=value>]| command | description |
|---|---|
state/status | Returns the current expander configuration. |
apx-serial-flw statusapx-serial-mdsm7
Manages the MDSM7 options.
apx-serial-mdsm7 <command> [<option=value>]| command | description |
|---|---|
status | Returns the current mdsm7 configuration. |
list | It returns the list of the photos stored in the device memory. |
capture_photo | Use this command to capture a photo |
delete_photos | Use this command to delete all the photos stored. |
apx-serial-mdsm7 status
apx-serial-mdsm7 list
apx-serial-mdsm7 capture_photo
apx-serial-mdsm7 delete_photos
apx-serial-mdas9
AvailabilityThis feature is only available since Apex 24.06.1 or the syrus-geofences package ver.1.2.9 and SyrusJS 1.59.7
WarningThis feature is not available to be used with the serial-expander.
Pre-configuration
- The MDAS9 must be configured to transmit via Serial FMS with a baud rate of 9600, see the image below and change Converter to 9600
- Syrus serial configuration
apx-serial set --mode=mdas9Tool
Manages the MDAS9 options.
apx-serial-mdas9 <command>| command | description |
|---|---|
help | Shows the usage options of this tool. |
status | Returns the current MDAS9 status. |
list | Returns the list of the last 25 events reported by the MDAS9. |
last | Returns the last event reported by the MDAS9. |
apx-serial-mdas9 status
apx-serial-mdas9 list
apx-serial-mdas9 last
Go to MDAS9 Syruslang, to see the Syruslang available signals and configurations.
System
apx-about
Information about the system and it's resources.
$ apx-about
{"ram":{"total":506084,"used":107824,"free":229732,"available":404616},"cpu":{"currF":1000,"usage":19.1926,"governor":"ondemand","stats":{"300":1319.28,"600":16152.25,"720":132.79,"800":52.43,"1000":299.93}},"rootfs":{"total":444018,"free":187666},"datafs":{"total":2255680,"free":2078392},"uptime":17958,"loadAvg":[1.83,1.71,1.65],"apexVersion":"apex-20.22-rc.8","releaseDate":"20200604000110","kernelVersion":"5.4.20-g738552d0b0","hostname":"syrusrouter"}
apx-core
Apex package manager for installing and removing software packages.
apx-core <command> [<option=value>]| command | description |
|---|---|
list | List the Apex Core packages installed. |
update | Downloads the package list from the DCT repository. It gets the list of the newest packages with its dependencies and returns the list of the DCT packages available for updating. |
upgrade | Upgrade all Apex system packages to the stable versions. |
recover | Allows to recover from broken packages when installing doesn't finish correctly. Use --level=1 as argument to fix the dpkg interrupted issue. |
install | Install one or several packages at a time by providing their names. Example: apx-core install --packages=[syrus-gps,syrus-ecu] Example: apx-core install --packages=syrus-gps |
remove | Removes a software package from apex system. |
reinstall | Removes the software package and reinstall it. |
add_dev_repo | Adds the DCT developer repository to the package manager. It enables some linux packages to be installed. To get the list of the available packages, please consult https://syrus4.dctserver.com/apex/dev-packages.txt |
rm_dev_repo | Removes the DCT developer repository. |
version | Returns the tool version. |
help | Prints the help message. |
Example:
# List dct-apex packages installed
apx-core list

# Install latest versions of syrus-gps and syrus-ecu packages
apx-core install syrus-gps syrus-ecu
apx-core install --packages=[syrus-gps,syrus-ecu]

# Install specific version of syrus-gps
apx-core install syrus-gps=1.0-r0.1

# Upgrade available packages.
apx-core upgrade
apx-eeprom
Use this tool to primarily manage data inside the EEPROM (electrically erasable programmable read-only memory).
apx-eeprom [<command>] [--arguments]| command | description |
|---|---|
read | Takes one argument --key and it returns the key value pair if it exists. |
write | Takes two arguments --key and --value. Will write the key value pair to the EEPROM. Since the EEPROM is of 32768 bytes, the keys are limited to 12 characters, and the value is limited to 50 characters. This command will OVERWRITE a key if it already exists. Only valid ASCII characters are allowed. |
remove | Takes one argument --key and it removes the key defined if it exists. |
list_all | Takes no arguments and it prints all of the valid key value pairs found inside the eeprom. |
| [--arguments] | description |
|---|---|
read | [--key] |
write | [--key] [--value] |
remove | [--key] |
Examples:
# write keys imei & foo with values into EEPROM
$ sudo apx-eeprom write --key=imei --value=867698040023056
$ sudo apx-eeprom write --key=foo --value=bar

# read key called imei from EEPROM
$ sudo apx-eeprom read --key=imei
{"key":"imei","value":"867698040023056"}

# list all key value pairs in eeprom
$ sudo apx-eeprom list_all
{"pairs":[{"key":"imei","value":"867698040023056"},{"key":"foo","value":"bar"}]}
apx-ext-memory
Tool that prepares an external storage device such as an SD card to be compatible with Apex OS.
apx-ext-memory <command> [<args=value>]| [command] | description |
|---|---|
format [OPTIONS] | Prepares the external device in order it can be used by the operating system. Warning!, this process will erase all the data stored in this device. |
status [OPTIONS] | Returns a json object with general information about the state of the external memory selected with --type. |
help | Prints this help. |
version | Return the local version. |
| [OPTIONS] | description |
|---|---|
-t, --type | The type of external memory conneced (sd or usb) |
-y | Use this option to force the format without asking for confirmation. |
-c | Use this option to force the format when the memory is being used. This will cause the device to be restarted. |
Examples:
$ apx-ext-memory format --type=sd
$ apx-ext-memory status
$ apx-ext-memory status --type=sd
apx-leds
Tool that manages the device's LEDs.
$ apx-leds <command> <args=value>| COMMANDS | DESCRIPTION |
|---|---|
| set[OPTIONS] | Use this command to change the system LED behavior |
| version | Returns this tool version. |
| help | Print this help |
| OPTIONS | DESCRIPTION |
|---|---|
| -c, --color | Valid colors are red, green, yellow, and blue. |
| -m, --mode | Valid modes are: |
| on | (Deprecated) |
| off | Color led fully off. This option is not valid for red led |
| heartbeat | Color led simulates a heart beat thump-thump-pause |
| one_short | 100ms on - 900ms off |
| two_short | 100ms on - 100ms off - 100ms on - 700ms off |
| one_long | 300ms on - 700ms off |
| two_long | 300ms on - 300ms off - 300ms on - 100ms off |
| low_freq | 500ms on - 500ms off |
| flash | 10ms on - 990ms off |
LED ModesNote that the LED mode is executed in sequential order, so the next activation of the mode happens after all other LEDs have been executed.
LED meaning
Red:
- Heartbeat: APEX Running
- Short blinking: Power saving mode
Green:
- Long Blink: Searching for GSM
- One Blink: Registered in GSM
- Two blinks: Connected with active data session
Orange:
- Long Blink: Searching for GPS
- One Blink: GPS low quality
- Two blinks: GPS good quality
Examples:
$ apx-leds set --color=blue --mode=low_freqapx-logger
Tool for communicating with the SyrusCloud remote diagnostic application.
apx-logger <level> <message>| [level] | description |
|---|---|
**crit** | Critical level message |
**error** | Error level message |
**warn** | Warning level message |
**info** | Info level message |
**update** | Update level message |
**config** | Configuration level message |
These messages are sent to the syrus-cloud as soon as the network connection is ready.
| [message] | description |
|---|---|
message | The message that is going to be sent to the syrus-cloud, enclosed in "quotes" |
Examples:
$ apx-logger info "This is an information message for the cloud, it will be queued"

$ apx-logger crit "This is a critical message for the cloud, it will be sent immediately"

$ apx-logger warn "file_not_found"

$ apx-logger error "file_not_found"
apx-logrotate
This tool lets you read and configure the log rotation mechanism.
apx-logrotate <command> [<args=value>]| command | description |
|---|---|
status | Reads the current log rotation configuration. |
configure | Configure a new or modify a current log rotation. |
remove | Remove a log configuration. |
force | Force log rotation for a specific log configuration. |
version | Returns the tool version. |
help | Print this help. |
| options | description |
|---|---|
| -n, --name | To select log rotation configuration, (--name=all) to select all at reading. |
| -p, --path | The location of the file we want to rotate(--path=/route/to/file.log). |
| -s, --size | The minumum size of the file before compression and rotation (--size=200M) . |
| -r, --rotate | The total number of compressed files to keep in memory (--rotate=5). |
| -c, --compress | Indicate if files most be compressed (--compress=true). |
| -f, --force | To force the rotation based on the current configuration. |
Examples:
# To get all the log configurations:
$ apx-logrotate status --name=all

# To create or modify a log rotation configuration:
$ apx-logrotate configure --name=syrus_instance --path=/data/logs/syrus_instance-out.log

# To remove a log configuration:
$ apx-logrotate remove --name=syrus_instance

# To force rotation for testing:
$ apx-logrotate force --name=syrus_instance
apx-os-update
Tool that updates the device's operating system. Careful when forcing the update of the OS over the air as it can consume a lot of data.
apx-os-update <command> [<args=value>]| command | description |
|---|---|
check | Check if an update is available in the dctserver |
start [OPTIONS] | Start the OS update |
version | Returns the tool version |
status | Return the status of the current update process |
help | Prints the help message |
| option | description |
|---|---|
-f, --force | Use this flag to force the update by using the mobile network. |
-p, --path | The path where the update file is located. |
Examples:
# Check if there's an update available or if there's one already in progress
$ apx-os-update check
{"mess":"Update available"}
# or
{"mess":"Update in progress. This will take a few minutes"}

# Start an upgrade to the latest stable version (must be connected via wifi, otherwise use -f flag)
$ apx-os-update start

# Update from an SD card mounted on the device
$ apx-os-update start -f -p /media/mmcblk0p1/apex-22.44.2
apx-quectel
Use this tool to update the firmware of EG915U modules. At the moment is only available for Syrus Lite Apex OS 24.07.1 and above.
apx-quectel update <args>| command | description |
|---|---|
update | Before starting the update, the firmare file has to be downloaded in /data/users/syrus4g/ folder. Please contact DCT in order to get the latest version. |
--file | File path |
--size | Size of the file in bytes |
--sha256 | Checksum of the file |
apx-quectel update --file=/data/users/syrus4g/8915DM_cat1_EG915ULAABR03A06M08.pac --size=6285927 --sha256=9a0de52ed54852e457f9762c864e554afbbbc1fd45fbbf6aab43182df9c2be1dapx-system
Tool to check general system information of the device, and reboot/restart it.
apx-system <command> [<args=value>]| command | description |
|---|---|
about | It returns a json object with general information about the system. |
reboot | Use this option for rebooting/restarting the apex OS. |
status[options] | It returns the system status depending on the --from epoch received. |
set[options] | Use this option to configure some system settings. |
synctime | Use this option to synchronize the system time with an external server. |
flush [options] | Use this option to flush the data related to the [OPTION] passed. |
version | Returns the tool version. |
help | Prints the help message. |
| options | description |
|---|---|
--g, --default-gw | The ip address of the USB router connected to syrus. This is used to route the data traffic to the USB network interface. |
| --f, --from | The reference used to return the system status. |
| --t, --time | Use this option to configure the system time when the automatic mechanism is not working due to a network failure. |
| --n, --name | The system name to be configured. It is highly recommended to use a name that starts with syrus. Remember that the user session needs to be restarted in order for the change to be applied. |
| -r, --redis-db | The redis instance used for custom applications. |
Examples:
#To get the complete system status:
$ apx-system status --from=0

#To get the system status since a reference time:
$ apx-system status --from=1599573699

#To change the system name:
$ apx-system set --name=syrus-home

#To flush data:
$ apx-system flush --redis-db
apx-user
apx-user <command> [<args=value>]| command | description |
|---|---|
validate [OPTIONS] | Use this command to validate the system user. |
set-pass [OPTIONS] | Use this command to change the user password |
help | Prints the help message. |
version | Returns the tool version. |
| options | description |
|---|---|
-u, --user | The user name. |
-p, --pass | The user password. |
-n,--new-pass | The new user password. |
Note that passwords must be between 6 to 63 characters long
Examples:
$ apx-user validate --user=myuser --pass=mypass
$ apx-user set-pass --user=myuser --pass=mypass --new-pass=mynewpass
apx-watcher
Used to manage the keep-alive messages with syrus cloud remote management interface.
USAGE:
$ apx-watcher <command> [<args=value>]| commands | description |
|---|---|
set [OPTIONS] | Set the connection time and always on flag. |
clean[OPTIONS] | Use this command to close the MQTT connection and open a clean session. The only valid option for this command is --session |
help | Print this help. |
status | Returns a json object with general information about the state of the syrus-watcher application. |
| options | description |
|---|---|
-c, --conn_time | Time in minutes used for sending the keep alive message to the syrus cloud. The default value is 480 minutes = 8 hours. Use 0 for disabling the syrus-watcher task, if this task is disabled the device will not connect with the syrus-cloud. |
-a, --always_on | The flag used to control the connection with syrus-cloud. 0: Disabled, 1: Enabled (Default) |
-k, --keep_alive | Time in minutes used by the MQTT connections. |
Example:
# To change the keep-alive message with Syrus Cloud (https://cloud.digitalcomtech.com) to every 10 minutes and disable always_on
$ apx-watcher set --conn_time=10 --always_on=0

# to check the status of apx-watcher
$ apx-watcher status
{"conn_time":10,"always_on":0}

# Close the MQTT connection and open a clean session
$ apx-watcher clean --session
apx-uchip
apx-uchip option| option | description |
|---|---|
update | Starts the updating of the microcontroller that it is in charge of controlling peripherals and power-saving mode. |
version | It returns the current version of microcontroller application. |
check-update | It returns true/false depending if a new version is available for updating. |
apx-efs
apx-efs <command> [OPTION]=[value]| command | description |
|---|---|
range [OPTION] | Use this to consult the 'oldest'-'newest' events information. |
oldest [OPTION] | Use this to consult the 'oldest' event information. |
newest [OPTION] | Use this to consult the 'newest' event as json. |
list [OPTION] | Use this to consult the information of all events. |
status | Returns the current supervised routes and their corresponding limits. |
version | Returns the tool version. |
help | Print this help. |
| options | description |
|---|---|
--date=<epoch> | Add this option when you want to consult data from the backup, if this option isn't present the data about the current day, will be shown. |
--destination=<mem> | Add this option when you want to consult data from a specific memory location, same as config files. Valid destinations: sd, usb or internal |
Example
apx-efs range
apx-efs range --date=1602468795

apx-efs oldest
apx-efs oldest --date=1602468795

apx-efs newest
apx-efs newest --date=1602468795

apx-efs list
apx-efs list --date=1602468795
apx-db
This tool lets you create and use the sqlite3 database
apx-db <command> [<args=value>]Commands:
| command | description |
|---|---|
create | Creates a new database and table |
read | Reads from the database |
write | Writes to the database |
query | Querys the database |
delete | Delete the specified table |
version | Returns the tool version |
help | Print this help |
Options:
| options | description |
|---|---|
-db,--database | Database path [string] |
-tb, --table | Table name [string] |
-t, --timestamp | Timestamp value to insert into table, this is a primary key [number] |
-p, --payload | Payload value to insert into table [string] |
-s, --from | Timestamp epoch date to start reading from the table [seconds miliseconds] |
-e, --to | Timestamp epoch date to end reading from the table [seconds miliseconds] |
-f, --force | To force the delete |
Examples:
# Create a new database and table
$ apx-db create --database=blackbox.db --table=table_name

# Reads from the database
$ apx-db read --database=blackbox.db --table=table_name --from=1707752556270  --to=1707762556270

# Writes to the database
$ apx-db write --database=blackbox.db --table=table_name --timestamp=1707752556270 --payload='Some payload here'
Tracking
apx-tracking
Tool that's used to manage tracking criterias' on the device. The tracking notification will trigger whenever any one of the criteria is met. Heading and distance notifications depend on valid GPS.
Create or edit a tracking criteria
apx-tracking <command> [<options>]Commands:
| commands | description |
|---|---|
set [options] | Command to add or edit the tracking criteria |
get namespace | Command to consult a tracking criteria |
getall | It returns a list with all the tracking criteria configured |
delete namespace | Command to delete the tracking criteria |
version | Returns the tool version |
help | Print this help |
Options:
| options | description |
|---|---|
-n --namespace | The name used as a reference to identify the tracking criteria. Max 60 characters. |
-h --heading | The heading delta threshold for triggering notifications based on heading changes. Use 0 to disable. Range (0-180) |
-t --time | The time limit in seconds for triggering tracking notifications. Use 0 to disable. Range (0-86400) |
-d --distance | The distance threshold in meters for triggering tracking notifications based on the traveled distance. Use 0 to disable. Range (0-100000) |
-p --pacc | This is optional and can be used to set a positive acceleration threshold in kph/s or mph*s |
-o --nacc | This is optional and can be used to set a negative acceleration threshold in -kph/s or mph*s |
Examples:
# To set a tracking criteria for triggering notifications every 45 deg, 5 min or 100 meters
$ apx-tracking set --namespace=test --heading=45 --time=300 --distance=100

# To set a tracking criteria for triggering notifications every 20°, or 120 seconds, or +10 kph/s, or -8 kph/s
$ apx-tracking set --namespace=test --heading=20 --time=120 --pacc=10 --nacc=-8

# To set a tracking criteria for triggering notifications every 20°, or 120 seconds, or +10 mph/s, or -8 mph/s
$ apx-tracking set --namespace=test --heading=20 --time=120 --pacc=10mphs --nacc=-8mphs

# Return test tracking criterias configured
$ apx-tracking get test

# Delete test tracking criteria
$ apx-tracking delete test
Time Windows
This tool allows you to read and configure time windows, which trigger can be used programatically with Syruslang to trigger actions and events based on a specific time of day.
apx-time-window <command> [<args=value>]Commands:
| commands | description |
|---|---|
status [options] | Reads a current time window state and configuration. |
set [options] | Configure or modify a time window. |
remove [options] | Remove a time window configuration. |
version | Returns the tool version. |
help | Print this help. |
Options:
| options | description |
|---|---|
-n, --name | The name of the desired window. |
-f, --from | Time window start time. Format hh:mm:ss |
-t, --to | Time window end time. Format hh:mm:ss |
-d, --days | Active days of the week denoted by an array of 0 or 1 from Sunday to Saturday (1,1,1,1,1,1,1) |
-s, --start | The starting day for the time window (01/01/2022) |
-f, --end | The ending day for the time window (31/12/2022) |
Examples:
# To get all the windows configurations:
$ apx-time-window status --name=all

# To create or modify a window configuration:
$ apx-time-window set --name=syrus_instance --from=13:00:00 --to=14:00:00
$ apx-time-window set --name=syrus_instance --from=13:00:00 --to=14:00:00 --days=0,1,1,1,1,1,0
$ apx-time-window set --name=syrus_instance --from=13:00:00 --to=20:00:00 --start=01/01/2022 --end=31/12/2022 --days=0,1,1,1,1,1,0

# To remove a window configuration:
$ apx-time-window remove --name=syrus_instance
Video
This tool configures the actions to be carried out in the processing of video files.
apx-video
apx-video <command> [<args=value>]<command> | description |
|---|---|
set [OPTIONS] | Set the general configuration. (destination, reserved space, audio, mac, and id) |
get [OPTIONS] | Get the general configuration. (mac and version) |
remove [OPTIONS] | Remove unused files and/or a camera from the configuration file. |
add_camera [OPTIONS] | Add a new camera to the configuration file. |
record [OPTIONS] | Start or stop the video recording for a specified camera/cameras stored in the configuration file. |
stream [OPTIONS] | Start or stop the video streaming for a specified camera/cameras stored in the configuration file. |
create_clip [OPTIONS] | Find the video files from history location in a specified time window for one camera or all. Cameras stored in the configuration file and creates a video clip. |
create_snapshot [OPTIONS] | Use the incoming data from RTSP or a clip file to take a snapshot for the cameras stored in the config file. |
update_list [OPTIONS] | Shows the event clips information merge with (timeline or history tree) as json |
clip_status [OPTIONS] | Returns the state of the last 25 clips processed. |
snapshot_status [OPTIONS] | Returns the state of the stored snapshot or the state of one selected. |
cipia_config [OPTIONS] | Modify the configuration files of Cipia |
timeline [OPTIONS] | Get history timeline information per camera in a max range of one day (24 hours). |
restart [OPTIONS] | Restart the core application of the chosen module. |
status | Shows the status of the cameras stored in the config file, the values associated with the memory space are given in MB. |
version | Shows the actual version of the apx-video tool. |
always_recording [OPTIONS] | Set always run video record at the start of the application. |
<command> | [OPTIONS] |
|---|---|
set |
|
get |
|
add_camera |
|
remove |
|
record |
|
stream |
|
create_clip |
|
create_snapshot |
|
clip_status |
|
snapshot_status | [--name=<value>] |
always_recording | [--status=<value>] |
update_list |
|
timeline |
|
restart | [--module=<value>] |
status |
| FORMATS | description |
|---|---|
[destination] | Micro-sd card -> sd, USB device -> usb, Internal memory -> internal |
[reserved_percentage] | Reserved space in memory defined in megabytes. e.g --reserved_percentage=5000 (5000 Mb or 5Gb) |
[type] | Type of camera you work with. IP ONVIF camera -> onvif, Dashcam -> dashcam, Movon MDSM-7 Camera -> mdsm7 |
[resolution] | Preferred resolution in the output videos. 1080p -> FHD, 720p -> HD, 480p -> SD. Default resolution HD -> 720p. |
[audio] | Set to true to record audio (must be enabled on the camera). --audio=true or false |
[time_win] | Time before and after to create a video clip, -time_backward,+time_forward in seconds. e.g --time_win=-60,+30. -60sec = 60 seconds before, +30sec = 30 seconds after. (Max ranges: time_backward = 60sec, time_forward=30sec) |
[always_recording] | Set to true to enable always ON video recording at the start of the application. --status=true or false. Default true. |
[from] [to] | Epoch timestamp to retrieve video from timeline ranges. Max range between --from and --to is 24 hours |
[module] | Network device manager ndm or video |
[timeout] | Duration in seconds of the streaming. e.g --timeout=120 |
[codec] | Video codec h264 or h265 |
Always recordingThe
always_recordingflag istrueby default. To disable it you need to set the--status=false
| status | description |
|---|---|
| 0 | STARTING |
| 1 | RUNNING |
| 2 | FINISHED_BY_EOS |
| 3 | NOT_RUNNING |
| 4 | FINISHED_BY_ERROR |
Example:
# GENERAL CONFIGURATION
# Set the destination of video recording to an SD card mounted on the Syrus4 with a max % of 100
$ sudo apx-video set --destination=sd --reserved_percentage=100

# Disable the audio of the camera called: driver cam
$ apx-video set --camera=driver_cam --audio=false

# Set the Cipia MAC address & ID
$ apx-video set --device=cipia_fs10 --mac=A4:04:50:3C:BD:7C --id=E321290376

# GET GENERAL CONFIGURATION
# Get Cipia MAC address
$ apx-video get --device=cipia_fs10 --mac

# Get Cipia FW version
$ apx-video get --device=cipia_fs10 --version


# ADD CAMERAS
# Add an ONVIF IP camera
$ sudo apx-video add_camera --type=onvif --camera_name=cam_1 --ip=192.168.0.52 --user=admin --pass=admin --resolution=FHD --audio=true

# Add a Movon MDSM-7 fatigue sensor camera
$ sudo apx-video add_camera --type=mdsm7 --ip=192.168.0.52 --port=6564

# Add a Cipia fatigue sensor camera
$ sudo apx-video add_camera --type=cipia --host_address=127.0.0.1

# Add a Dashcam
$ sudo apx-video add_camera --type=dashcam --camera_name=dashcam_1 --ip=192.168.0.52 --user=admin --pass=admin --resolution=FHD --audio=true

# Add a Dashcam with live stream
$ sudo apx-video add_camera --type=dashcam --camera_name=dashcam_2 --uri=rtsp://USERNAME:[email protected]/ch1/sub/video


# REMOVE CAMERAS
# Remove back camera from configuration and delete video files
$ sudo apx-video rm_camera --camera=back_cam --delete_files

# Remove Movon MDSM-7 fatigue camera (keeps files)
$ sudo apx-video rm_camera --type=mdsm7


# START/STOP RECORDING
# Start recording on all cameras
$ sudo apx-video record --status=start

# Stop recording for a particular camera
$ sudo apx-video record --status=stop --camera=front_cam


# CREATE VIDEO CLIPS
# Create a video clip on all cameras called '1632141204_crash' for the last 60 seconds and next 30 seconds
$ sudo apx-video create_clip --name=1632141204_crash --time_win=-60,+30

# Create a video clip called '1632141204_crash' for the last 60 seconds
$ sudo apx-video create_clip --name=1632141204_crash --camera=back_cam --time_win=-60

# Create a video clip from all cameras with a from and to date (see timeline to view the available video ranges)
$ sudo apx-video create_clip --name=1632141204-crash --from=1632111204 --to=1632121204


# CLIP STATUS
# View the clip status for camera 'front_cam'
$ sudo apx-video clip_status --camera=front_cam

# View the clip status for a particular video clip
$ sudo apx-video clip_status --name=1632141204-crash


# VIDEO STREAMING
$ sudo apx-video stream --status=start --camera=cam_1 --host=videos.pegasusgateway.com --video_port=5006 --audio_port=5007 --timeout=120  --stream_id=817919789179
$ sudo apx-video stream --status=stop

# ALWAYS RECORDING
# Set always recording to true
$ sudo apx-video always_recording --status=true


# GET TIMELINE
# Get a timeline of the available videos to retrieve a video clip from
$ sudo apx-video timeline --from=1632141204 --to=1632142204

# Get a timeline for a particular camera
$ sudo apx-video timeline --from=1632141204 --to=1632142204 --camera=my_cam
[
{
    "type": "onvif",
    "name": "front_door",
    "range": [
    "1633090417",
    "1633715624"
    ],
    "ranges": [
    [
    "1633501423",
    "1633501499"
    ]
    ]
},
{
    "type": "onvif",
    "name": "rear_door",
    "range": [
    "1632753622",
    "1633715624"
    ],
    "ranges": []
}
]


# UPDATE VIDEO LIST
# Update video list since a particular time
$ sudo apx-video update_list --since=164894646

# Update video list from a time range and include history
$ sudo apx-video update_list --include_history --from=164894646 --to=1648978486


# RESTART
# Restart the net device manager module (handles driver fatigue camera mdsm-7 for example)
$ sudo apx-video restart --module=ndm

# Restart the video module
$ sudo apx-video restart --module=video


# STATUS
# Status of the cameras
$ sudo apx-video status
{
    destination: "sd",
    reserved_space: 97540,
    n_cams: 2,
    cameras:[
{
    name: "CAM1",
    state: 3
},
{
    name: "CAM2",
    state: 3
}
    ]
}

# Modify Cipia config file, note that the settings are set with a flattened key and value inside a json object
# it's recommended to send this as a script via Syrus Cloud
$ sudo apx-video cipia_config --object='{"WifiSettings.SSID":"hotspotlab","WifiSettings.Password":"123456","EventsSettings.DriverDistracted.ReportImage":false}'

# Change video codec to h265 when configuring the camera
$ sudo apx-video add_camera --type=onvif --camera_name=cam_1 --ip=192.168.0.52 --user=admin --pass=admin --codec=H265 --audio=true


# VERSION
# Get video tool version
$ sudo apx-video version
Cipia
apx-ndm-cipia
Tool to manage the Cipia FS10 device.
Version:   0.0.1
NAME:
apx-ndm-cipia -- This tool controls the actions of the NDM application in its cipia sub-module.
USAGE:
apx-ndm-cipia <command> [--<option>=<value>]

    COMMANDS:
    configure              - configures the cipia device based on config files.
    status                 - returns the Cipia current status.
    set                    - stores Cipia MAC and ID or modify a setting in the config file.
    get                    - get Cipia version or MAC and ID stored.
    remove                 - remove stored MAC and ID.
    update                 - request the Cipia update

    Arguments:
    [--mac=<value>] [--id=<value>]

        ALLOWED VALUES:
        mac:      A4:04:50:3C:BD:7C or a404503cbc7c

        EXAMPLES:
        Configure:
        apx-ndm-cipia configure

        Set:
        # set MAC and Cipia ID
        apx-ndm-cipia set --mac=a404503cbd7c --id=E321290376

        # update parameters from the configuration file
        apx-ndm-cipia set --parameter='{"WifiSettings.SSID":"hotspotlab","WifiSettings.Password":"123456","EventsSettings.DriverDistracted.ReportImage":false}'
        # save the changes with configure command
        apx-ndm-cipia configure

        Get:
        apx-ndm-cipia get --mac
        apx-ndm-cipia get --id
        apx-ndm-cipia get --firmware_version
        apx-ndm-cipia get --core_version
        apx-ndm-cipia get --tool_version

        Status:
        apx-ndm-cipia status

        Remove:
        apx-ndm-cipia remove --mac

        Update:
        apx-ndm-cipia update
WiFi
apx-wl-pwr
Tool to manage the wifi bluetooth module. Turning it off can help conserve power.
sudo apx-wl-pwr [action]| action | description |
|---|---|
on | Power on the wl1835 MOD |
off | Power off the wl1835 MOD. WL1835 is a non-removable device, so it cannot be turned off. This option was preserved for compatibility issues |
Example:
# Power on wifi/bluetooth module
$ sudo apx-wl-pwr on
apx-hotspot
Manages the hotspot functionality on the device. Allows you to configure the SSID and password when enabling the hotspot. The password is protected with WPA2-PSK security.
apx-hotspot <command> [<args=value>]| command | description |
|---|---|
start | It starts the udhcpd and hostapd services used by hotspot app |
stop | It stops the hotspot services |
restart | Use this option for restarting the hotspot service. |
list | It returns the list of the connected clients to the hotspot |
status | It returns a json response with the current state of the hotspot. |
set [OPTIONS] | Use this option for configuring the hotspot service. |
version | Returns the tool version. |
help | Prints this help message |
| option | description |
|---|---|
route | Use this option for forwarding the wlan traffic to another interface, it allows you to have internet access by specifying the output interface, available values: ppp0, eth0 |
ssid | Use this option for changing the network identifier |
pass | Use this option for changing the hotspot password (minimum of 8 characters) |
country | Use this option for changing the country_code (2-letter ISO Code) |
fallback | Only for internal use. |
IP address rangesNote that the range of IP addresses that the hotspot assigns is from:
192.168.2.100 a 192.168.2.254.If you require working with static IP addresses you can use from
192.168.2.2 a 192.168.2.99
Example:
$ sudo apx-hotspot start

$ sudo apx-hotspot stop

# To list the client devices connected to the hotspot:
$ sudo apx-hotspot list
{"stations":[{"mac":"96:f5:bc:51:62:de","rx_bytes":"155189","tx_bytes":"18752","uptime":"79"}]}

$ sudo apx-hotspot set --ssid=mynet --pass=mypass --route=eth0
apx-wifi
Tool to manage the wifi interface of the device. Allows you to connect to a wireless network.
sudo apx-wifi <command> [<args=value>]| command | description |
|---|---|
start | It enables the WIFI interface and starts the service for connecting with preconfigured networks |
stop | It stops the WIFI service and disables the interface |
restart | It executes a stop-start in the same call |
list | It returns the list of networks configured |
status | It returns a json response with the current state of the wifi service |
scan | It starts a WIFI scan and returns a list of SSIDs |
add [OPTIONS] | Use this option to add a new network to the wifi configuration file. |
remove [OPTIONS] | Use this option to remove a network from the wifi configuration file. |
set [OPTIONS] | Use this option for configuring the wireless interface. |
connect [OPTIONS] | Use this option to connect to a previously configured network. |
version | Returns the tool version |
help | Prints this help message |
| options | description |
|---|---|
-i, --ip | Use this option for changing the interface IP address and mask. |
-g, --gateway | Use this option for changing the gateway address. |
-d, --dns | Use this option for changing the dns address. |
-f, --default | By using this option the wireless IP address is assigned by the network. |
-s, --ssid | The network identifier. |
-p, --pass | The network password. |
-w, --priority | By default is 0, set higher priority to prioritize as per you need. |
-n, --hidden | Use this flag if the wifi network is hidden |
Escaping Special Character: $When using passwords that include a dollar sign
$, it is necessary to escape it\$apx-wifi add --ssid=mynet --pass="Pa\$\$w0rd
Example:
# To scan the WIFI network and get the list of SSIDs:
$ apx-wifi scan

# Connect to a previously configured network
$ apx-wifi connect --ssid=mynet

# To add a new network to the configuration file:
$ apx-wifi add --ssid=mynet --pass=mypass --priority=5

# Add a hidden network
$ apx-wifi add --ssid=mynet --pass=mypass --priority=5 --hidden

# To remove a network from the configuration file:
$ apx-wifi remove --ssid=mynet

# To have the wireless IP assigned by the network
$ apx-wifi set --default

# Set the parameters of the wireless interface
$ apx-wifi set --ip=192.168.5.1/24 --gateway=192.168.5.255 --dns=8.8.8.8

# Wi-Fi state
$ apx-wifi status
{"state":"Completed","ssid":"MyAwesomeWifi","signal":"-17","key_mgmt":"WPA2-PSK","mac":"50:33:8B:DD:1E:43","ip":"192.168.1.28","rx_bytes":"871399","tx_bytes":"178166"}
Updated about 1 month ago