Video
The Syrus 4G is capable of recording videos based on when an event occurred, as well as maintain a history of videos based on your own conditions or start a live stream to another server.
General Overview
- The way it works is that you obtain a video recording camera that supports ONVIF protocol, a dashcam, or an accessory with recording capability (cipia, movon, etc).
- Access the configuration interface of the camera to modify the network configuration so Syrus can connect to it (set a static IP, user, pass, etc)
- Use the Syrus 4 Management Tool UI to configure the parameters of the camera
- Fine tune any additional settings on the camera and install
Features
There are 3 main features Syrus 4 is capable of achieving with video cameras:
- Continuous recording, or history mode
- Event based video clips with a time window
- Stream real time video
Continuous recording, History mode
The apx-video system tool can be used to start and stop recording.
The videos are recorded in 10 second clips and are stored either locally under: /data/users/syrus4g/video/ or some folder under media if you are using an external SD card: /media/somefolder/.
You can navigate to the external SD card using the File Explorer on the Management UI.
SD Card formatNote that in order to use an external SD card you'll need to format it, you can go into the management tool System section to do this.

The structure of the folder looks like this
The video files (.mp4) are created with the name of the camera followed by a numeric ID for the video. The numeric IDs start at 1 and go up to the maximum number of videos it can record depending on the size allocated.
video/
├── history/
│   ├── CAMERA_NAME_ONE/
│   ├── CAMERA_NAME_TWO/
│   │   ├── CAMERA_NAME_TWO-01.mp4
│   │   ├── CAMERA_NAME_TWO-02.mp4
│   │   ├── ...
│   │   └── CAMERA_NAME_TWO-####.mp4
The size allocated and location of recording for the camera are defined when you configure it on the Management tool (apx-video add command).
Once the videos reach the maximum size allocated the IDs are repeated and the oldest videos are overwritten.
To get an idea of the maximum amount of time you can record for, the max size of a 10sec clip is 3.75MB for FHD, 2.5MB for HD, and 1.7MB for SD.
If you're constantly recording clips of these sizes, the maximum number of clips possible in a day are 8640, giving us a maximum daily size of:
- 32GB for FHD
- 22GB for HD
- 15GB for SD
Video storageThe memory allocated to the history and events folder are 80/20% - where 80% is allocated to the history and 20% is allocated to the events, or the last 100 events, whichever comes first. This limit applies for both the internal storage of the Syrus, or an external SD card that's used. For example, the internal storage of the device allocates 300MB for videos, where 240MB are allocated to history and 60MB are allocated to the events folder. These 60MB for the events folder may not all be used if the size of the events are small because the Syrus rotates the last 100 event clips.
Breakdown when using an external SD card
| Quality | Storage | Duration of history | Duration and number of events |
|---|---|---|---|
| FHD (1080p) | 512GB SD Card | 230 hours | 58 hours or last 100 events |
| HD (720p) | 512GB SD Card | 446 hours | 112 hours or last 100 events |
| SD (480p) | 512GB SD Card | 655 hours | 164 hours or last 100 events |
| FHD (1080p) | 256GB SD Card | 115 hours | 29 hours or last 100 events |
| HD (720p) | 128GB SD Card | 110 hours | 28 hours or last 100 events |
| SD (480p) | 64GB SD Card | 81 hours | 21 hours or last 100 events |
| HD (720p) | Internal storage 300MB | 0.26 hours (~16 min) | 4 min or last 100 events |
As you can see from the table, the duration of the events does not matter as much as the total number of events that can be stored. Unless you have some events that last a long time, you will most likely reach 100 events before your SD card hits the duration limit for events.
Use Industrial Grade rated SD CardsFor video related solutions it is recommended to always use an industrial graded SD card which can withstand high temperatures.
For more information on SD cards check out our FAQ page.
Event-based video clips
The apx-video system tool has a command to create a video clip create_clip.
The video clip it creates can have a time window of time before and time after the command is sent that it gets the recording for. Essentially giving us the ability to simulate what occurred during an event by doing a playback leading up to the event and after it.
Using Syruslang you can trigger events that accomplish this feature.
# capture a video clip 20 seconds before a forward collision and 20 seconds after it
define action forward_collision_video [email protected]_collision.signal create video --name={{$gnss.timestamp}}_forward_collision --time_win=-20,+20
The video clips created are stored under a folder given by the name of the clip: /data/users/syrus4g/video/events/epoch-event_name/epoch-event_name-camera_name.mp4
video/
├── history/
├── events/
│   ├── 1638405417-event_one_name/
│   ├── 1638477090-event_two_name/
│   │   ├── 1638477090-event_two_name-camera_one.mp4
│   │   ├── 1638477090-event_two_name-camera_two.mp4
│   │   ├── ...
Since the events are actually a copy of the video clips created, Syrus is continually recording videos.
Video streaming
Syrus 4 uses RTSP in order to stream videos. To get the RTSP address you'll want to go through the guide below to add a camera, and download it's settings to get the stream URI.


Once you have the URI you can use a video client like VLC Player to start the stream. Note that the stream will only be available locally on the same network as your streaming video client (VLC) unless you expose the Syrus 4's ip and port to the public internet, once the IP and port are available on a public IP you can remotely stream the video.

Sending videos to remote servers
Check out our LFTP tutorial on the Bash/Shell scripting page for information on how to upload and sync videos with a remote server.
Installation
The installation of the cameras depends on the type of camera selected, but there are generally 2 ways to connect to cameras, wired via the ethernet, or wireless via Wifi/Hotspot.
The amount of cameras that can be connected simultaneously to a Syrus 4 depends on the type of camera used, you can connect up to 2 ethernet or wireless cameras simultaneously, as well as an additional accessory camera such as Cipia or MDSM-7.
Note that some options are incompatible with each other. For example, most dashcams provide a hotspot for a device to connect to it, so you can't have Syrus connect to both the dashcam and a separate IP cam, but you could connect to a dashcam and a separate camera via ethernet for example.
Here is a breakdown of the max number of cameras that can be supported
| Name | Camera type | Total amount supported |
|---|---|---|
| Wired / Wireless Network Cameras | onvif | 2 (1 FHD resolution or 2 HD resolution) |
| Dashcamera | dashcam | 1 |
| Fatigue Sensor Cipia-FS10 | cipia | 1 (1280x960 resolution HD-ish) |
| Fatigue Sensor Movon MDSM-7 | mdsm7 | 1 |
Take a look at the following diagrams that explain the different scenarios.


Configuration
When adding a camera to the Syrus there are some general steps you want to follow depending on the interface the camera uses. For wireless interfaces if the camera is the one providing Wifi capabilities via a hotspot (like the case with many dash-cams), then you'll want to follow these steps:
- Download the accompanying app for the camera
- Connect to the hotspot the camera provides
- Optional: download the latest software update/firmware for the camera
- Go to the network settings of the camera and obtain the username and password
- Use the Syrus 4 management UI to configure a new camera of type: Dashcam. Setting with the ip address, username, and password
For other cameras which do not provide a hotspot and instead Syrus is the one that will be providing wireless capabilities:
- Connect to the management interface of the camera, usually an ip address
- Enable ONVIF protocol and port
- Set a fixed/static ip address to the camera
- Set a user/password to have access to the camera
- Optional: disable the time sync on the camera
- Use the Syrus 4 management UI to configure a new camera of type: ONVIF. Setting the ip address, username, and password
Another possibility is that the camera is wired via Ethernet, this one is more simple and requires that you:
- Connect the camera to the Syrus RJ45 port
- Do a network scan
ifconfigto identify the ip address assigned via eth interface - Connect to the ip address of the camera and reach the network settings
- Set a fixed/static ip address, optional: enable onvif, username, and password
- Use the Syrus 4 management UI to configure a new camera of type: ONVIF setting the ip address and other optional settings
Working with an existing networkIf you have an existing network with wireless cameras already connected to a router and you'd like to add Syrus 4 to access those cameras.
The general way you'd go about that is to make sure that the Syrus 4 can see those network cameras, to do this just make sure that the IP address assigned by the router to the cameras is on the same network segment as the one assigned to the Syrus, for example, lets say the router assigns
192.168.3.xIP ranges to the wireless cameras, you'd want to make sure that the Syrus has assigned an IP on that same segment, so192.168.3.254for example.To verify that Syrus can see any camera just ping the IP address of the camera from the Syrus 4 Terminal, a successful ping means that the camera is detected and you can continue with the configuration guide.
Connecting cameras with different interfacesSomething else to consider is what to do when connecting multiple cameras to the Syrus and they use different interfaces.
For example, if you have 1 wireless camera, and 1 ethernet (Profile 2 from the installation diagrams). For this configuration you want to make sure that the Syrus 4 assigns IPs on different network segments for the cameras.
So for example the IP address of the wireless camera can use: 192.168.2.x address (i.e: 192.168.2.60).
The IP address of the ethernet camera can be on a different segment: 192.168.3.x (i.e: 192.168.3.61).
This way they don't have a conflict.
Guide: Dashcam via Hotspot

Dashcam Model DisclaimerNote that you cannot connect a Latam Hikvision Dashcams.
- Supported model: AE-DC5013-F6
- Not supported model: AE-DC5013-F6-MEX
** The MEX suffix indicates the Latam version.If you don't have the camera yet, check the specifications to find out the exact model, or ask your supplier about it.
If you already have the camera, check its model before beginning the setup.
Open the camera mobile app, go into the settings of the camera on the top right and then go to About -> Dashcam Info. once there you should see the model like this:

Micro SD Card DisclaimerNote that the Hikvision dashcam does not come with a Micro SD card, but it is required to have one for the firmware upgrade of the camera and to store videos locally
Note that the minimum SD Card size is 32GB, any lower and the camera will not work correctly.
Multiple Camera DisclaimerNote that you cannot connect multiple Hikvision Dashcams simultaneously to the Syrus as Syrus can only connect to one wifi network at a time. You can connect a dashcam with an IP or Ethernet camera, but not two dashcams.

Start by downloading the HikDashcam application from the Android Play Store or Apple App Store.
Connecting to the Camera
After downloading the app and opening it you'll want to connect to the camera by following the on screen prompts, in this case for Local configuration it will create a temporary wireless network that your phone will connect to allowing you to see the camera settings.

Optional Firmware Upgrade
Go into the Settings of the camera on the top right and the About -> Dashcam Info. section to view the current firmware of the camera, if you see a firmware below V1.3.0 then you'll want to upgrade (note that this requires the micro sd card to be inserted into the dashcam).
The Dashcam Info. section also includes the username and password which will be used later for the setup on the Syrus 4.

Dashcam Settings
Now go back to the dashcam settings and be sure to select the following settings in order to enable/disable the Audio and use the correct Encoding format (H.264)

Disclaimer: Camera recording suspended while parkedNote that this dashcam disables the Wifi while it's parked so it's unable to capture any video clips during a prolonged idling status even if the ignition is ON.
Add Camera Config on Syrus
Now you're ready to set up the camera configuration on the Syrus, using the management tool go into the video settings, and the configuration tab.
Use the following parameters
Camera Name: Any nameCamera Type: DashcamUser: Serial Number from the Dashcam Info sectionPassword: Verification Code from the Dashcam Info sectionPort: Leave emptyIP Address: 192.168.42.1Quality: HD or FHD depending on the quality you set on the camera resolution settings

Add the camera to the Saved Networks Wifi list on the Syrus
On the management tool navigate to the Wi-Fi section and on the Saved Networks click on Add new network.

Under SSID you'll enter the same Network that the camera exposes and the password that you set for the network.

Note that the default Network password of the camera can be changed from the application under the
Settings -> Network Parameter -> Wi-Fi Settings -> Change Wi-Fi password

Streaming Video
In order to start streaming the dashcam video you'll need to replace the following string with the User and Password from the settings:
rtsp://
USER:PASSWORD@192.168.42.1/ch1/sub/av_stream
And place it in the URI field.

Once done you can test the stream using VLC locally as long as your computer is on the same network as the Syrus.
In order to stream the video remotely and access it from any server, you'll need to install a multimedia framework such as GStreamer (specifically gst-launch) on a server that will handle the video stream. Then start and stop the stream using the apx-video tool. More info on this coming soon.
Syrus Cloud Profile
The last step is to save the camera configuration profile via Syrus Cloud so that it is synced with the device and you can manage it remotely.
Start by downloading the Video settings from the Configuration Tab.

Download video.conf.json from management tool/user interface
Then go into Syrus Cloud profiles section and upload the video.conf.json file.

Syrus Cloud camera profile section
You are now ready to create a syruslang script that captures videos and views them on Syrus Cloud.
Guide: Dome camera via WiFi

Start by connecting the camera and entering the default settings in your web browser to access the web management UI of the camera.
Some manufacturers provide software that show the default network info of the camera, here's an example guide with the steps, from there you can update the IP address of the camera so that it connects to your local network.
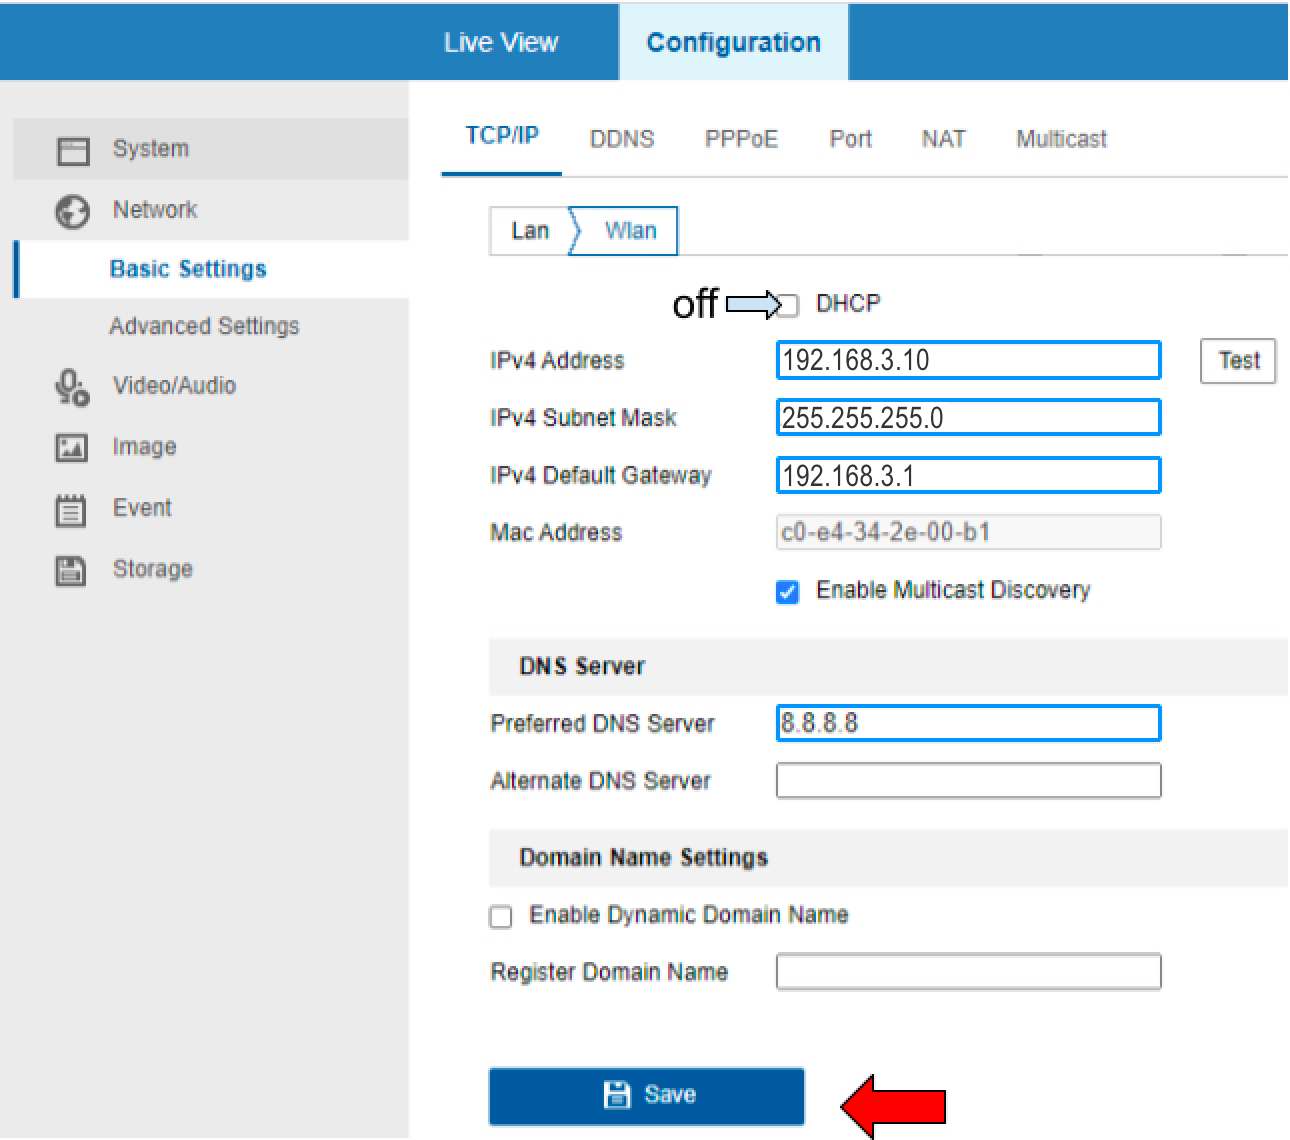
Network Basic Settings (LAN)
Once you have local access to the camera, disable any DHCP and set the IP address of the camera to a fixed static IP.
Note that if you plan on using the WLAN you'll want to configure the LAN IP in a different segment to avoid network issues. (192.168.3.x vs 192.168.2.x for example)
Syrus 4 Hotspot
To connect to the camera we'll have to enable the hotspot of the Syrus 4 with an SSID and Password.

For example: SSID: Syrus4G-02669
Password: 12345678
Network Advanced Settings (Wi-Fi)
Go to the advanced network settings of the camera and enable the Wi-Fi.
For the SSID and Key use the values from the previous step.

Network Basic Settings (WLAN)
The WLAN settings have the IP address information that the camera will have when it connects to the Syrus 4G's hotspot. We will need to configure this IP address on the Syrus 4 when we add it as a camera configuration.

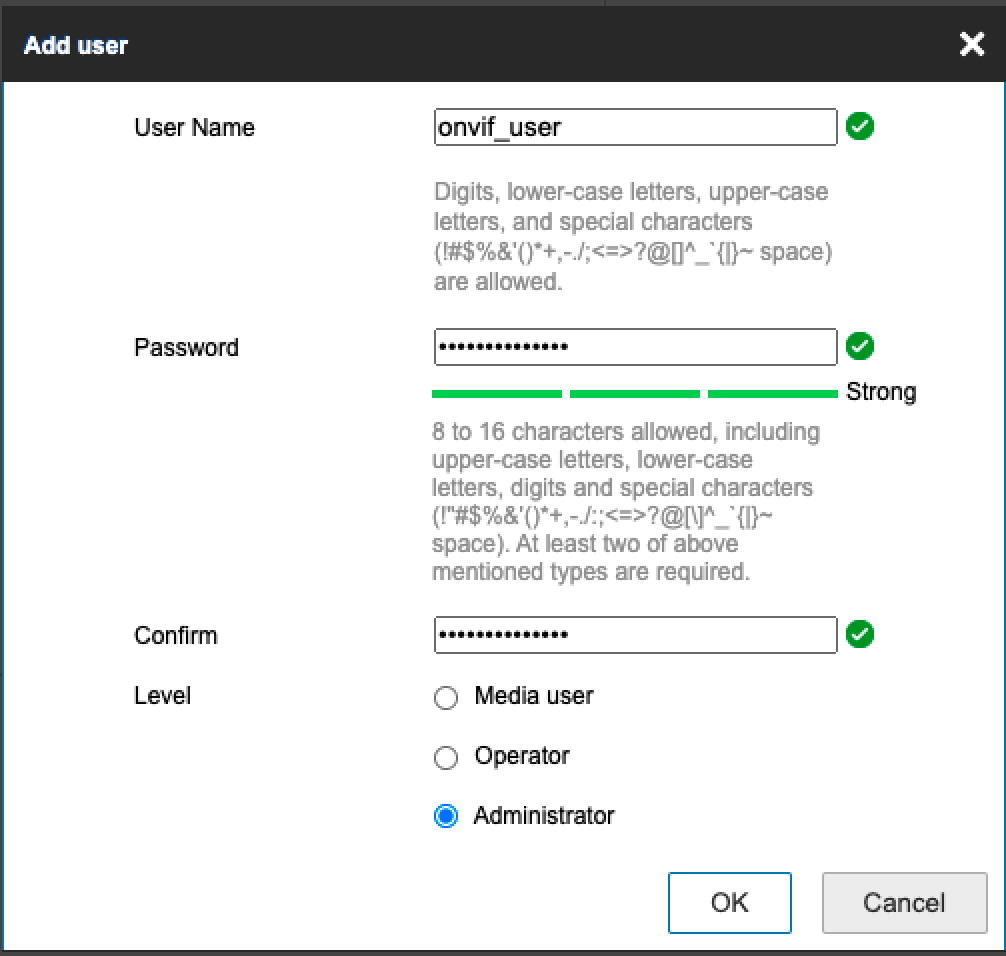
Enable ONVIF Protocol
Make sure to enable the ONVIF protocol and create a user.

The user you create must have the same credentials as the ones used to login to the camera portal and must have Administrator Level permission
Add Camera Config on Syrus
Finally, add the camera to the Syrus via the management tool UI using the IP address of the WLAN set up above, including the user / pass to access the camera.
Note that the user and password you enter here are not necessarily related to ONVIF, they can be general user/pass to access the camera. To be sure enter one of them, press SAVE and go to the monitor tab.
Changes in camera settingsNote that if you update the username and password on some cameras it can take up to 5 minutes for it to synchronize with the Syrus.
Onvif portIf the camera does not specify an ONVIF Port you can set it to
0.

If you are using an external SD card to store the videos you'll want to select it on the Storage.

Advanced Configuration of Video
The following settings are advanced and they get into the recommended configuration for the camera.
Minimum Frame Rate (FPS)The minimum allowed frame rate is 15 fps.

Optional: Image
Optionally you can set the camera name so that it displays on the screen.

Once you have finished provisioning the camera you can synchronize the settings with other cameras using SyrusCloud, or create a SyrusLang script to start video recording.
Adding audio
To enable audio recording make sure you go to the Video type option on the configuration and select Video&Audio


Guide: Bullet camera via WiFi
Camera used Alptop AT-200BW

To access the management interface use the following guide.
Network Settings
Configure the static IP address.

ONVIF Enabled
Enable the ONVIF protocol.

User Access
Enable the user access.

Configure on Syrus
The configuration of the above camera on the Syrus will look like this:

Follow the steps below to configure the camera settings remotely on Syrus Cloud and use SyrusLang to create conditions to record videos.
Adding audio
To enable audio recording make sure you go to the Audio settings and select the following options:

Guide: Mini IP Camera

Step 1
Using Internet Explorer browser (Note that Microsoft Edge does not work), go to Tools -> Compatibility View settings, and add the 192.168.1.10 address.

Go to http://192.168.1.10 using
- Username: admin
- Password: leave blank

Step 2
Open the configuration menu of the camera and use the following settings:
- Net Card: Wire Netcard
- DHCP Enable: [ ] Disabled
- IP Address: 192.168.1.10
- Subnet Mask: 255.255.255.0
- Gateway: 192.168.1.1
- Primary DNS: 114.114.114.114
- Secondary DNS: 8.8.8.8
- Media Port: 34567
- HTTP Port: 80
- Onvif Port: 8899
- High Speed Download [ ] Disabled
- Transfer Policy: Quality Preferred

Step 3
Add a new user, write down the Username & Password.

Step 4
Configure the settings in the Syrus Cloud camera profile using the data from Steps 2, 3.
Use the URI
rtsp://onvif_user:[email protected]:554/h264/ch1/main/av_stream
Be sure to update the user and password to the ones you used in Step 3

Syrus Cloud Sync
Once you have added the configuration of the camera on the Syrus, download the settings from the Video -> Configuration tab, and upload it to SyrusCloud so it can be synchronized across your devices.
Syruslang Scripting
The SyrusLang video section gives you commands to start recording and create video clips based on any signal.
For example, we could start and stop video recording based on the ignition status.
# signal to detect ignition ON after 10 seconds
define signal ignition min_duration=10sec $io.ign

# action to start video recording on all cameras
define action start_recording trigger=ignition start recording

# action to stop video recording when the ignition is OFF
define action stop_recording trigger=ignition,not stop recording
you can also create video clips based on any combination of signals
# capture video 20 seconds before and 20 seconds after hard braking is detected
define action hard_brake [email protected]_braking.signal create video --name={{$gnss.timestamp}}_hard_braking --time_win=-20,+20

# capture video 10 seconds before and 15 seconds after input 1 is pressed
# signal
define signal input1_on $io.in1

# action
define action manual_capture trigger=input1_on create video --name={{$gnss.timestamp}}_input --time_win=-10,+15
Audio recommended settings
In general, if the options are available for your camera to add audio, you'll want to configure the following,
Recommended audio settings:
- Audio encoding: G711
- Sampling rate: 8kHz
- Audio Stream Bitrate: 128kbps
Fatigue Sensor Videos
Refer to the connect section of the Fatigue Sensor page for more information on capturing video clips with fatigue sensors.
Updated 3 months ago