Syrus 4G CAT4 - Getting Started
A quick start guide to help you setup your Syrus 4G IoT Telematics Gateway.


What you get
- Syrus 4G IoT device
- 1 internal battery
- 2 antennas (
Wi-Fi/BT x2&GPS/GNSS + LTE/Cellular x2) - 3 wiring harnesses (
4 pin - Power,14 pin - Interfaces,16 pin - Inputs/Outputs)
What you'll need
- Power supply (12-36V DC) - (we recommend one with a DC power adapter/connector to test in your lab)
Optional
- Micro USB cable
- Ethernet cable (CAT 5/5e/6)
- microSD card (up to 512GB)
- SIM Card (standard size)
- GPS Active Antenna
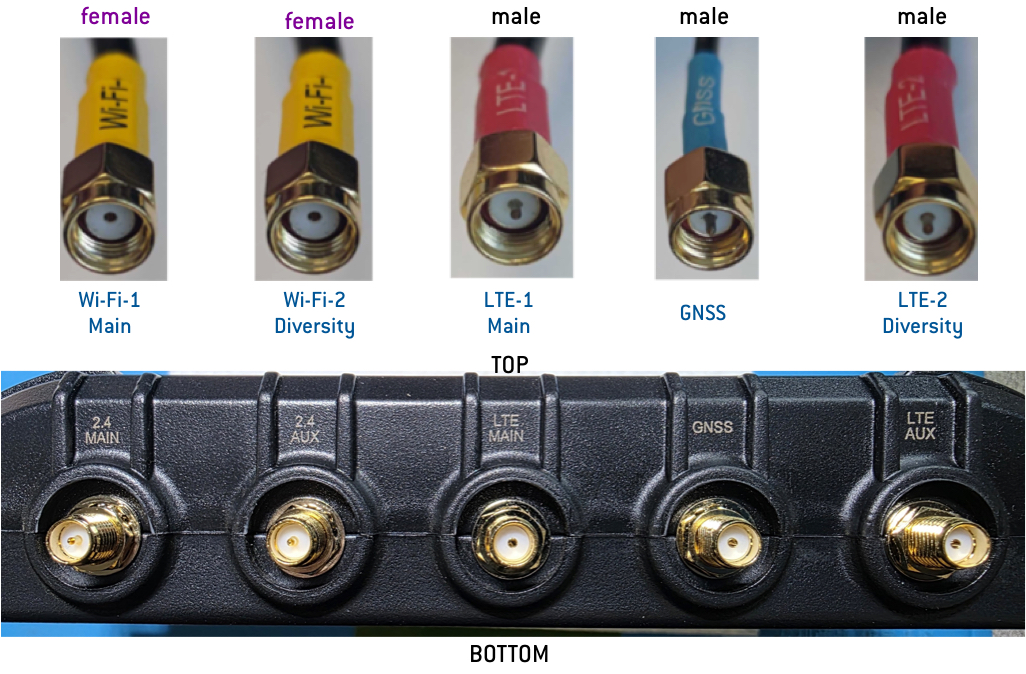
Connectors
Antennas
- Suggested antennas:
- DCT Antennas (Quectel certified)
- Dual Cellular + GNSS Antenna Ref: YB0008AA
- Dual Wifi/BT & Cellular Antenna Ref: YEMA004AA
- Taoglas
- Taoglas Guardian MA950 Purchase: MA950.A.LBICG.005
- DCT Antennas (Quectel certified)
Be sure to connect the antennas to the correct connector.
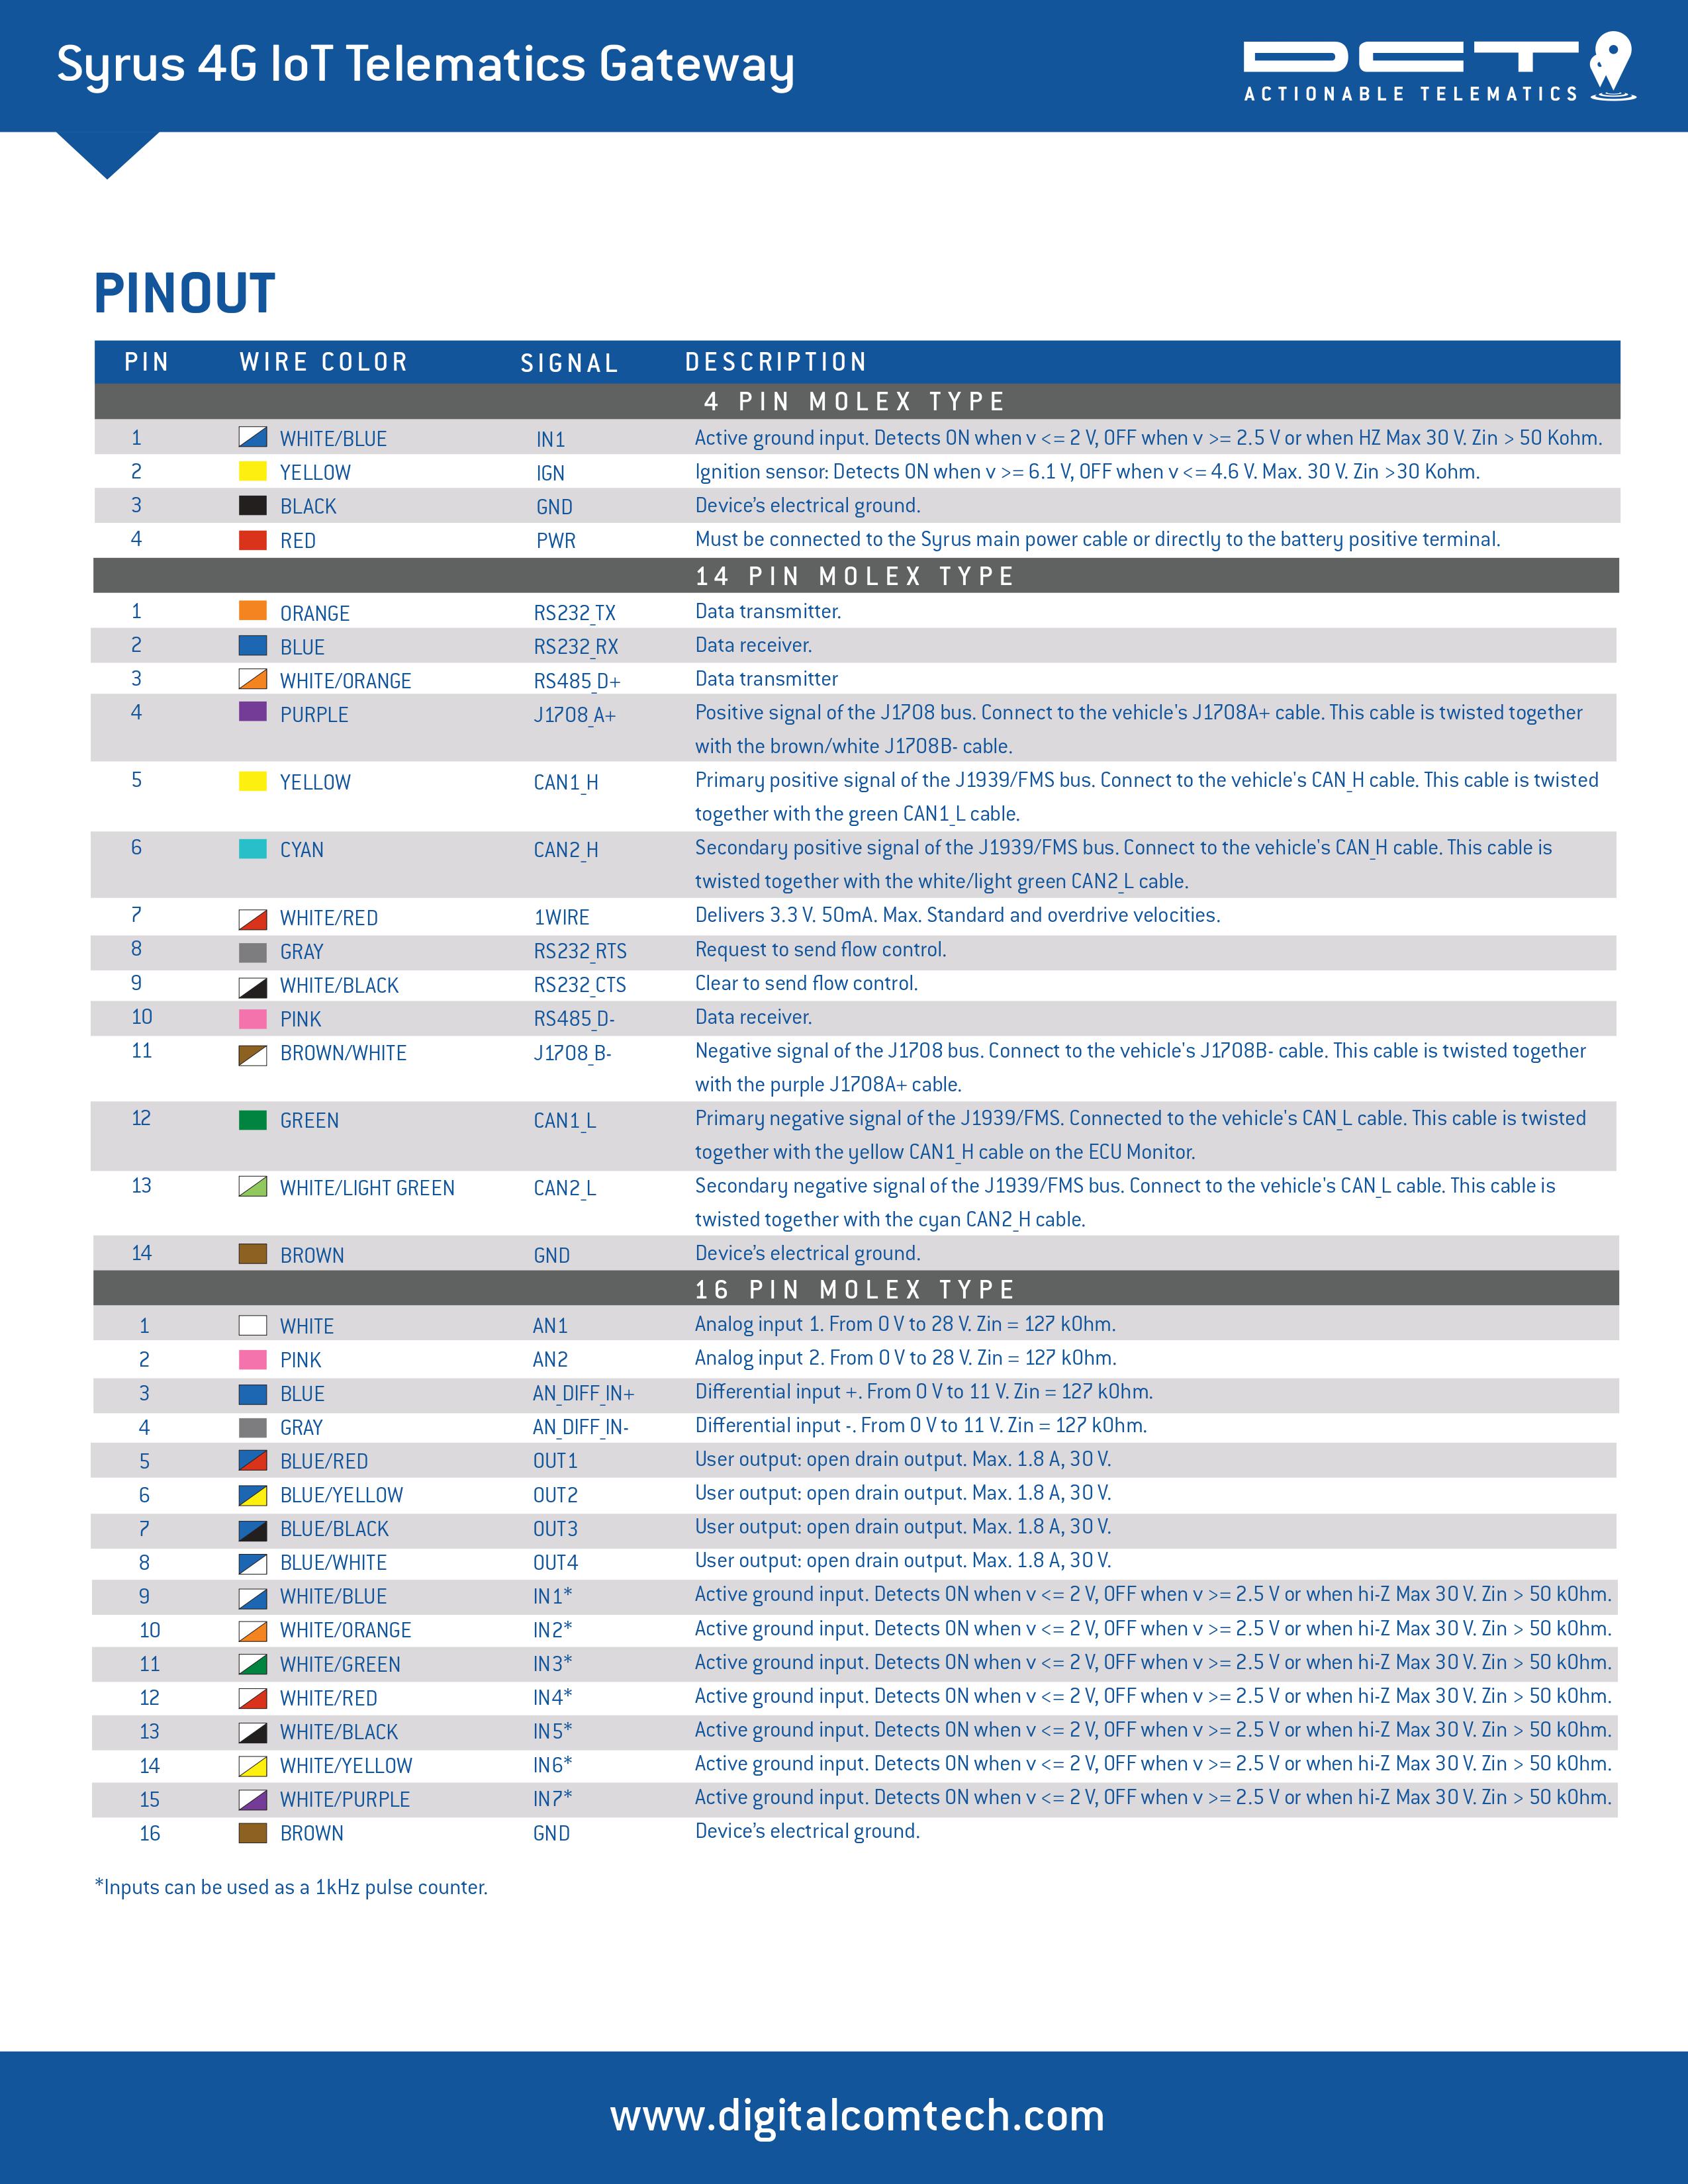
Pinout connections

Syrus 4 Pinout/connection diagrams
Note that for dual colored cables, the first color is the primary which accounts for 90% of the cable's color, the secondary color is a thin line of the cable.

Dual color cables
Powering up
- Make sure the Syrus is unplugged from any power source.
- Connect the antenna(s) to the device antenna connectors.
- Connect the 4 pin power molex to the Syrus and connect the RED and BLACK power cables to the 12 volt power supply (preferably to the DC connectors if you have one). Wait a few seconds while the device boots up. The boot up process takes about ~30 seconds.
- From the same 4 pin power molex connect the YELLOW (Ignition) cable to 12V in order for the device to remain ON and not go into an automatic power saving mode.
Your device is now powered up, proceed to either the desktop or mobile instructions below.
Accessing the device
Desktop instructions
Grab a micro USB cable and plug in the USB side to the computer and connect the micro connector side to the Syrus.
Depending on the operating system your computer could automatically recognize a new USB device and install the necessary drivers.
In the event your Windows computer does not recognize the Syrus, you'll need to download the one of the following drivers and install it manually.
Main driver / Alternate driver.

Driver installation on Windows
Mobile instructions
Follow this link to download the Syrus Terminal Application. Once installed scan for devices and your device should automatically appear.
Connect to it and follow the onscreen prompts to load up the Management Tool / User Interface.
Hotspot/Router discovery
Syrus 4 comes preprogrammed to find an access point with the following credentials over the 2.4GHz band:
SSID: Syrus4G
Pass: syrus1234
this means that once it's powered up if you have a router broadcasting that SSID and password, Syrus can connect to it and you can find it on your network.
Check the troubleshooting page for instructions.
User Interface
The Syrus 4 UI, also known as the management tool interface, is the graphical UI that allows you to interact and program the device.
There are 3 ways to access the management tool depending on the method you're connected.
| method | instructions |
|---|---|
| micro USB cable | visit the address http://192.168.9.2 |
| mobile application (Syrus Terminal) | open the Home tab |
| wireless | visit the address http://syrus-IMEI.local and replace IMEI with your device's IMEI |
You should see a login page like this once you've reached the user interface.

The default login info is:
Username: syrus4g
Password: 123456
The management tool is used for local configuration of the device.
Change Default PasswordWe strongly recommend you change the device's default credentials. Please note that once done there's no way for it to be reset.
Getting Online
Wireless
The Wireless tab on the user interface gives you access to wireless access points on the 2.4 GHz network. Select the network and enter the passphrase to connect.

Once the device has an IP address assigned you can unplug the USB cable and visit that IP address to access it:
Alternatively you can visit the hostname syrus-IMEI.local on a web browser to access it, example: http://syrus-867698040012345.local

Cellular/Mobile
Syrus comes with an embedded SIM card that requires activation. To activate it you must first put it in a MB monthly plan and then change the status to "Active" in your Pegasus Gateway instance.
Once it's in a plan and activated you can instruct Syrus 4G to use that SIM card via the Mobile menu.
You can also choose to select an external SIM and enter its APN settings below.


You can also get the IP address from your router's device list or from a network scanning smartphone application (make sure your phone and the Syrus are on the same network).
Syrus 4G Lite with T-Mobile USASyrus 4G Lite works with CAT-1, and T-Mobile USA doesn’t support CAT-1.
Programming
Syrus uses a programming language called Syruslang to quickly interface with its peripherals and start sending data to any endpoint, you can do things like once ignition is detected start a video stream and report a location message periodically every minute, it's highly customizable and you can learn more about it in our Syruslang guide.
To develop and work on your configuration locally we recommend you use the management tool's Application Manager to install and edit configurations quickly.
Once your configuration is ready you can upload it to your device remotely using Syrus Cloud's application page. This way you can make modifications over the air and synchronize it across your entire fleet of devices.
Installing
The installation of the device requires that you connect it to a power supply of 12-36V, follow the connect guide's General Installation page for more information.
Once your device is securely installed inside a vehicle you must calibrate it using the self alignment procedure, follow the connect guide Accelerometer Detection for more information.
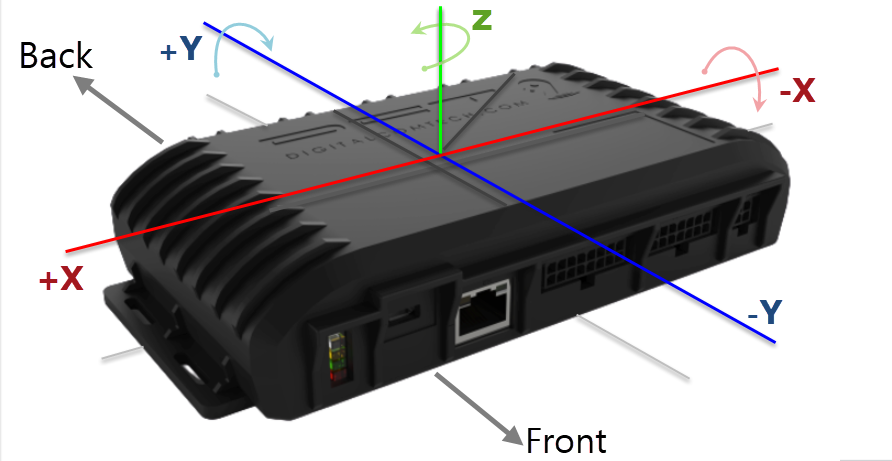
Accelerometer orientation with respect to each axis
Things to keep in mind
Automatic Sleep Mode
Once the Syrus is powered if the Ignition wire is not connected to power, the device will go to sleep automatically after 5 min. While the device is asleep the red LED will flash 1 time every 5 seconds.
To prevent the device from entering sleep mode simply power the yellow ignition wire from the 4 pin wiring harness.
You can change the sleep mode configuration remotely via the Power Save Mode (PSM) profile.
LED Description
🔴 Red:
- Heartbeat: Apex OS Running
- Short blinking: Power saving mode
🟢 Green:
- Long blink: Searching for GSM
- One blink: Registered in GSM
- Two blinks: Connected with active data session
🟠 Orange:
- Long blink: Searching for GPS
- One blink: GPS low quality
- Two blinks: GPS good quality
Updated about 1 month ago